Have you noticed the Summer Swimming button on my sidebar? Well, it's not coming soon anymore--it's here! I'm really excited to announce my new series, which will celebrate all things summery and wet! There will be clothing, quilting, and crafting tutorials, guest posts from some of my favorite people, and twice weekly posts full of watery fun.
~~~
Hi, I’m Kelli, Jill’s sister. If you want to put a face to the name, I’m the one who modeled the clothes that Jill made for Project Sewn.
Oh, look, there’s another picture of me. Well then.
Twice a month, I will be doing a guest post. I majored in Horticulture, with my emphasis in Floral Design, so I’ll do some posts about flower arranging. You can also expect to see posts about making jewelry, and the occasional sewing post. {Jill: She’s the one who helped me with my table centerpiece that I showed you earlier.}
The first project I’m going to share with you is making sea glass.
Imagine...
You’re vacationing at the beach, collecting seashells as a souvenir, and you find a bit of glass that has been frosted by the ocean. You look around and find more, clear/white, green, brown, maybe red if you’re really lucky. You snatch these prizes up and take them home to be used in jewelry, to put a finishing touch on that nautical-themed room, or to put with your other souvenirs.
But what if you can’t just go to the beach and pick up some sea glass? You can make your own!
What you’ll need:
Safety glasses
Glass--empty bottles, stained glass, whatever
Hammer--if you want a more “natural” look, or
Glass cutter--if you want more control (It's the red tool that's not pliers.)
Rock tumbler and play sand
First, you need glass. Any glass should work, as long as it's not too thin. Rather than recycle that empty pickle jar, upcycle it! Clear glass is easy to find, and keep an eye out for colored glass, like the green bottles sparkling cider comes in. If you don’t want to wait to find colored glass, you can buy it. If you do, make sure it’s actually colored all the way through. If it’s just painted, the paint will be gone by the time you’re done. For my colored glass, I went to the stained glass section of Hobby Lobby.
If you want your glass to look more like “natural” sea glass, you’ll want to break it. Wear safety glasses and have some way to contain the glass. I break mine in low box with a paper towel covering it. Bust out your hammer and set to it.
I haven’t wanted to just break my pretty stained glass and see what shapes I happened to get, so I cut it.
Despite the name, you’re not actually “cutting” the glass. You’re scoring it so it will break where you want it to. I’d start with squares and rectangles, since they’re easiest. Press the wheel of the cutter on the edge of the glass, and push it all the way across the glass. With most glass, you will hear a soft crackling noise and end up with a fine line if you’re using the right pressure. Too little pressure, and you don’t get the job done. Too much, and you could fracture the glass so it breaks where you don’t want it to. This hasn’t been a problem for me, so just be aware, and you should be fine. Be sure to wear safely glasses!
You want to make a score line all the way across the glass. But if, like me, you have trouble actually starting your score line on the very edge of the glass, just start scoring as close to the edge as you can, make your score line go all the way across, then turn the glass around so the scored end is towards you.
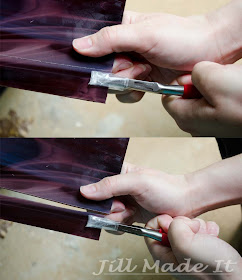
Place your hands on either side of the line, and flex the glass gently. If one of the sides is small, it can be easier to hold that side with pliers. A kind that meets at the tip but not the hinge would be best. I don’t have a pair like that, so I use my flat nosed pliers with the tips wrapped in tape to protect both them and the glass. I haven’t been cut while “cutting” the glass, but if you have leather gloves, you might want to wear them, just in case.
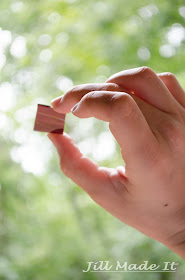
Voila! Isn’t that cool?
Now use the same method to cut that strip of glass into pieces the sizes you want.
Some people use the ball at the end of the glass cutter to tap the score line and break the glass, but for me, it usually didn’t break where I wanted it to.
If you’d like to see a video of someone cutting glass, here’s the video that taught me how to do it: http://www.youtube.com/watch?v=1D0XLXVkJKE
Now you have the glass. So how do you make it sea glass? Sea glass is frosted and the sharp edges are rounded by tumbling in the ocean for who knows how long. You can simulate this with a rock tumbler. For my 3 pound capacity rock tumbler barrel, I fill it half to a bit over half full with glass, then add half a cup of play sand, then fill the barrel with water till the glass is nearly covered. Read the instructions for your tumbler to see how yours should be filled. The sharp edges should be worn down 8-12 hours later. Point the lid away from you when you open it. I’ve never had anything dangerous happen, but, you know--just in case.
Well, now that you know how to make sea glass, what should you do with it? Find out next time, on.........JILL MADE IT!
~~~
Thanks, Kelli!
For those of you who don’t have a rock tumbler, you can buy sea glass at a craft store. I've found it at Jo-Ann. Rock tumblers can be found at craft stores and Amazon.
Be sure to check back with us on Friday for our next Summer Swimming project! If you miss any posts, I will have them all archived under my Series tab.


No comments:
Post a Comment
Thank you for your comment! I love to hear from you--your comments make my day!
I've been getting a lot of spam comments lately, so I'll not be allowing anonymous comments for the time being. Sorry to any legitimate anonymous commenters!