Pages

28 September 2011

My First Giveaway! {My Memories Digital Scrapbook Software}

(This giveaway is now closed.)

I'm not really a scrapbooker, but when Liz from My Memories contacted me about doing a giveaway of their digital scrapbooking software, I was so excited!  Offering my wonderful readers free stuff?  Of course I said yes!

One lucky winner will get this digital scrapbooking software for free!  And all of you get a coupon code for $10 off the purchase of the software PLUS a $10 coupon for goodies in their shop!

Alright, I know you're excited about the giveaway, but I've got to do the review first.  Patience, Grasshopper.

(I know a lot of you are probably super scrapbookers, so don't laugh at my newbie efforts, okay?)


Here's my first page.  I started pretty much from scratch, using a Photos Only template.  It was kinda' difficult.  But I realized it was pretty ambitious for a scrapbooking-newbie like me to learn new software on a mostly-from-scratch project.


So I decided I should start with some of the just-add-pictures templates My Memories has.  It was lots easier, and I got the hang of the software.  (Aww, Boo was so little!)

Since I'm not a scrapbooker, I thought I'd try a different kind of project:


Birthday Invitations for Boo!
(Can you believe she's almost two?  How'd that happen?)

  I started this completely from scratch, without even picture place-holders.  It was easy!  And I think it turned out pretty cute!

So the verdict:  Good program, fun to use, and lots of great possibilities.

There is a learning curve, but it's really pretty easy to figure out.  I do suggest reading the Frequently Asked Questions if you need some help, and just giving yourself some time to play with it and explore the possibilities.

I love that there are lots of choices for paper and embellishments and such--including lots for free!  (I created all these pages with only free kits.)

The organization within the program could be a little better.  All the embellishments, for example, are stored in the same place; I wish there was a "My Downloads" tab so I could quickly find the new embellishments I just downloaded instead of sorting through everything.

I do like that there are several ways to get to anything you need, so you can use the one that makes the most sense to you.

I also like that the Control Panel opens automatically to whatever element (photo, embellishment, etc) that you click on so you know exactly how you can manipulate that element.

I know, I know--enough talk!  It's time for the giveaway!


*To Enter*
--This giveaway is for my followers.  If you're not already a follower, that's easy to fix...  :)
--Visit MyMemories.com and pick out your favorite paper pack, scrapbooking kit, etc and leave me a comment telling me what it is.

*For additional entries, you can*
--Follow the My Memories blog
--"Like" My Memories on Facebook
--Follow My Memories on Twitter

Be sure to leave a separate comment for every entry!  Also, I'll contact the winner by e-mail, so either include your e-mail in your comment, or have your e-mail accessible from your blogger profile.  (If you don't know how, click over to my tutorial.)

And don't forget about the coupon code!  Just enter STMMMS40673 for $10 off the purchase of the My Memories Suite software, plus $10 your purchase of digital scrapbooking wonderfulness.  Feel free to share this code with all your friends.

Good luck, everyone!

I will announce the winner next Wednesday!  (The coupon code is good for longer.)

(Note:  Even though this is obviously a sponsored post, the opinions are all completely mine.  I wouldn't recommend something I didn't think you'd like.)

26 September 2011

"Forget Not" Printable

Every year, the women of my church have the opportunity to attend a special meeting specifically for us.  It is always a wonderful experience, and this year, my favorite talk was by President Uchtdorf.  He talked about the little forget-me-not flower and how the five petals can remind us of five things we need to "forget not."  (I don't think the full text of the talk is online yet, but here's another summary.)

First, "Forget not to be patient with yourself."  We tend to compare our weaknesses with other's strengths.  (I know I do.)  But no one (except Christ) is perfect, and that's okay.  As long as we are trying to become better, we're doing alright.

Second, "Forget not the difference between a good sacrifice and a foolish sacrifice."  Some things are worth sacrificing for, and some are not.  Are we spending our time and effort on worthwhile things?  I think that is an important thing to remember; we can't do everything, so we must choose what is most important and just not worry about the rest.

Third, "Forget not to be happy now."  Sometimes we think, I will be happy...when I've graduated...when I get my dream job...when my baby is sleeping through the night...  (Ah, the joys of a full night's sleep.)  But we need to remember (to "forget not") to be happy even before these things happen.  President Uchtdorf said, "The lesson here is that if we spend our days waiting for fabulous roses, we could miss the beauty and wonder of the tiny forget-me-nots that are all around us."

Fourth, "Forget not the 'why' of the gospel."  We are busy.  That's a fact.  It is hard to get done all the things we need to do.  But the gospel is intended to make us happy, not stressed; if we remember why we're doing the things the Lord asks of us, we will be happier.

And fifth, "Forget not that the Lord loves you."  Always, always remember that.

And now for the printables, to help you "Forget Not."

(11" x 14")

(8.5" x 11")

(Right click-->Save Image to Downloads or some such command)

I hope you like them.

Happy crafting.

21 September 2011

Striped Butterfly--How to Zig Zag Applique

So, those butterflies I appliquéd onto the back of Boo's quilt?  Would you like to know how I did them?

There are many ways to appliqué.  This is the way that I do it.  I like it because it's quick, easy, durable, and doesn't require any materials other than fabric and thread. 

If you are putting together several pieces of fabric, I recommend sewing the appliqué piece onto a base fabric for stability.  If you are appliquéing one piece of fabric onto another, you can skip the next few steps.


For these butterflies, you need thin strips of different fabrics.  You will also need a base fabric--just any fairly neutral cotton fabric you happen to have.  My strips are about one inch wide, and my base fabric is white muslin.


First, draw your pattern onto your base fabric.  I will put the templates at the bottom of this post, if you want to make these same butterflies.  Even if you free-hand the design, you may want to have a copy to trace in a later step.


Lay down your first two strips.  Overlap your traced lines to be sure to completely cover the intended area. Also overlap the two strips by about the width of your zigzag stitch.  This amount isn't critical; it just needs to be large enough for both strips to be secured by the one line of sewing.  You can use a pin to secure the strips, but I just hold them in place.


Now you use a zigzag stitch to sew your two fabric strips down.  I use my machine's default settings for this stitch.  You can make the stitches be closer together if you want.  You can also play with the widths a bit, but don't make it too narrow--I've learned from experience that that isn't very secure.  

You want to sew just barely over the edge of your top fabric, to keep fraying at a minimum.  Continue on until your stripes cover your entire pattern.

By the way, when you use this method, your appliqués may fray just a tiny bit.  It's not nearly enough to be a durability issue; Boo's quilt has been washed a lot, and the appliqués are still perfectly fine.  It's just an aesthetic choice.  (And an "ease of doing" choice--folding under all those edges would take forever!)

{If you are appliquéing a single piece of fabric, start here.}


Now that your butterfly is fully striped, place the original template back on your stripes and cut out your shape.


Put your appliqué patch where you want it to be.  You'll probably want to pin it in place.  Start on a fairly straight section of your design.  You don't need to sew back and forth to reinforce this; you'll take care of that at the end.  Remember to sew just barely over the edge of your appliqué patch.

Go slowly.  If you pull the fabric along, you may distort the stitches.  Put the needle down a pivot around turns.  For most of these turns, I pivoted when the needle was on the outside of the patch.  This depends, though, on the shape of your design--whether the specific turn is concave or convex.  You'll get the hang of it; it's not hard.  (Going slowly helps.)

Once you've sewn all the way around your design, sew a little further, and backstitch a few stitches to lock the threads down.  And you're done!  That was pretty quick, huh?


Since I wasn't blogging yet when I made Boo's quilt, I didn't take pictures of the process.  So I needed to make another appliquéd butterfly for this tutorial.  I decided to sew it onto a little pillow for Boo's dolls, and she was so excited when I told her what I was doing.  She peered over the edge of my sewing table saying, "Me see!  Ready yet!  Ready yet!"


 That is a happy little girl.

{Here are the templates for you.}

Happy crafting.

19 September 2011

Boo's Bedroom is All Decorated!

Remember way back when I painted a watercolor of cosmos flowers for Boo?  Well, I finally got the enlargement printed, framed, and hung.  And I've been adding other finishing touches to her room, and I really like how it turned out.


So here's the painting hanging over Boo's bed.  I love it!  


I also made a curtain.  I love the super-easy tie; it's just a ribbon I happened to already have.


And then we have the dresser Mr. MadeIt and I refinished.  The lamp was Mr. MadeIt's when he was little.  The the dinosaur was, too.  I really like having those sentimental pieces in Boo's room.  


This is something my sister made, actually.  (I guess Boo's room isn't all the way finished--I need to get this hung on the wall.)  It will be fun to display pictures and stuff, tucked into those ribbons.


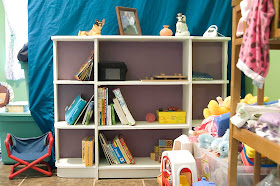
This bookcase used to be Mr. MadeIt's, too.  We refinished it, of course--it wasn't purple when it was my husband's!  I thought it would be fun to have the bookcase a clean, classic white, but then have the purple color pop.  (In case you're wondering, the blue behind the bookcase is a sheet to cover our storage!  Our apartment doesn't have much storage space, so it gets to live in Boo's room for now.)


And this shelf used to be mine!  The wind chimes were mine, too. (Or maybe they're still mine.  We'll see what happens.)  I collected wind chimes growing up, and now Boo gets to enjoy them.


And lest you think Boo doesn't get anything new, I made this quilt for her.  I used several (I don't remember how many; maybe seven?) different purple fabrics for the front.  As you can see, the pattern is just rows of squares, alternating darks and lights.  

My favorite part of the quilt is the appliquéd butterflies on the back.  :)  When I was cutting out the squares for the front, I had one inch strips of fabric left over.  I thought the fabric strips were too pretty to just throw away, so I turned them into butterflies.  I think it adds a special and unexpected touch.  (Update:  I just wrote a tutorial on how I made the appliqué butterflies.  Click on over to see!)

Well, there it is!  It took until Boo was almost two, but finally her room is (mostly) decorated.  I love the colors; the clean white, gender-neutral green (in case Boo ends up sharing her room with a baby brother someday--it's a two bedroom apartment), and the happy purple.  Something I really like but didn't expect from the beginning is how nice the white is--since all the moldings and doors are white anyways, having that color part of the decorating scheme makes these necessary elements feel all the more like they are part of the design.

How have you decorated your kid's room?  How would you like to, if you could do anything at all (no time, money, or child's tastes dictating otherwise)?

14 September 2011

Upcycled Vase (Because My Husband Is So Sweet!)


When Mr. MadeIt picked me up for our first date, he brought me a bouquet of orange gerbera daisies.  Since then (because of that), these happy daisies have become my favorite flower.  And one day, Mr. MadeIt came home with another bouquet for me.  No reason.  Just because.  (Insert starry eyes and floating hearts.)

Unfortunately, our one-and-only vase recently broke.  What to do...?

Enter empty Sam's Club applesauce can.  It was even already washed out and de-labled.  (You never know when you might need a super-sized tin can, apparently.)  All I had to do was tie a scrap of cloth (a ribbon would also work, or even raffia, or twine...) around it, and the problem was solved.


I really love the shiny cleanness of the metal.  And the texture from the ridges.  And the fact that it was free--I'm not gonna lie.


And here's a close-up of one of the flowers.  I love taking pictures of flowers.


And speaking about flowers, does anyone have any idea what kind of flower this is?  Mr. MadeIt found it in our backyard.  (And so I had to take pictures of it, too!)  What a strange flower--strange in an intriguing kind of way.  I have no idea what it might be, but it sure is interesting...

12 September 2011

My Happy Yellow Summer Skirt


I know, I know, summer's practically over, but I actually made this skirt a while ago and kinda forgot about posting it.  Then today, I saw it hanging in my closet, just asking to be worn...And I actually got around to persuading someone to take pictures of me in it, which was the real hang-up.  (Thanks, hubby!)

(Hey, look!  It's me!)

And here's the pattern:  McCall's 4324

Making this skirt was a bit of an adventure.  The pattern is from 1974 (does that count as vintage?) and I didn't really understand the instructions.  And then I lost said instructions.

Oops.

But it worked out anyways, as you can tell.  The instructions (what I remembered of them) actually made sense when I was actually sewing the skirt.

I chose this pattern because I wanted a light, flowing, summer-friendly skirt.  And since it's a wrap-around skirt, I didn't have to buy a zipper.  (Thrifty score!)  And the pattern was free, since it's my mom's.  (Double-thrifty score!)

Now that it's done, I'm glad I did choose it, because, since it's a wrap-around skirt, it still fits perfectly, even though I lost about 10 lbs since I made it!  (I finally decided the last bit of baby weight had to go--Boo was a year and a half already.)

Hurray for perfectly fitting, light and flowing skirts.

07 September 2011

How To Take Pictures Without Natural Light

I live in a basement apartment, with north and west-facing windows.  And around the north and west sides of the house are lots of trees.  And a deck, up on the main floor.  And I do a lot of my crafting after Boo goes to bed.

Why am I telling you this?  Well, because it is really hard to take nice pictures with little-to-no natural light!

But I figured out a way to get nice lighting for finished projects, fun objects--generally anything reasonably small.  And stationary.  (Sorry, Boo.  I guess you still get the unflattering overhead lighting.  Or the regular camera flash.  But you're cute enough to pull it off.)  With a couple adjustments, I bet I could use this set-up for my how-to shots, too.


So, what do you think of that picture?  Not bad for having been taken at 9:30 at night (in a basement apartment, surrounded by trees, with no hope of natural light).

Want to know how I did it?  It was really easy, and I just used things I already had hanging around my apartment.

You need:
a desk lamp
some white fabric

Optional:
some white paper/foam core board, etc to bounce light back to your object
something for a background and for the object to sit on.  I used white paper, because I needed all the light I could to be bounce back to my object (my fabric for my new project!).


Here's the set up.  In case you're wondering, that is my kitchen table I used to hold up my fabric.  I'll figure out something more portable later.


My desk lamp is sitting behind the fabric, which is just plain white muslin I bought for practicing clothes pattern I designed.  (Hopefully I can get one of those posted soon!  I'm working on my first skirt!)  The fabric softens the light, so you don't get the harsh shadows and overexposed highlights.


I used white paper for my background, but other colors would work great, too.  Pretty scrapbook paper would work, or some colored fabric...


 I'm really pleased with the way this worked out.  I did have to raise the exposure in Photoshop, but a stronger lamp or more ambient light will probably do the trick, too.


Now, are you wondering what I'm going to do with this fabric?  Stay tuned...

Happy crafting.

05 September 2011

The Mommy Doll--My Entry for the WholePort Creativity Expo

Remember way back in July when I told you about getting free stuff from WholePort?  (This post.)  Well, I finally got my project done!  I know, I took forever.  I was planning to design my own skirt pattern, and use the trim somewhere on it...but it just wasn't working out, and I wasn't really inspired on the design, anyway.


So I guess Boo won after all--I made her a doll.  Awww, see how she's cuddling the doll?  And when I asked Boo what the doll's name is, she said, "Mommy."  Well, that might be confusing--she already has another toy with the same name as me, so I suggested this one be named "Mommy Doll," instead.  Inventive, I know.

I was going to do a tutorial, have a pattern you to print off, the whole shebang.  But it needs some perfecting first.  So I guess you just get pictures!


I love how her shoes turned out.


Does the flower in her hair look familiar?  It's my little Kanzashi flower I posted about here.  I drew the face on with a Pigma Micron pen (0.45 mm line width, if  you wanted to know).  And the lips I filled it with thread.  Yeah.  Sewing thread, not embroidery thread.  That took forever.

The doll didn't turn out quite the way I wanted it to (though my pictures do hide it's flaws pretty well, I'm glad to say).  But Boo loves it, so I guess that's all that really matters.

Happy crafting.