Showing posts with label quilting. Show all posts

14 January 2014

The Finding Nemo Baby Quilt

{I had this whole blog post written and completely ready to go, but then I somehow managed to delete it by accident.  I don't know what happened.  (Sadness!)  So you get the abbreviated version.}

Jill Made It: Finding Nemo Quilt

I made this baby quilt for one of my friends.  She and her husband were planning a Disney theme nursery for their baby boy, so when I found this fabric, I knew it was meant to be.

I love giving handmade items as baby presents.  It's partially because I just really like making things, but it's also that I feel that handmade gifts are an extra-special welcome to the world.  :)

Jill Made It: Finding Nemo Quilt Close-Up

The quilt is just a big rectangle with a white border inside to add interest, so it was a pretty quick quilt.  I think I even got it done the night before the baby shower.


06 December 2013

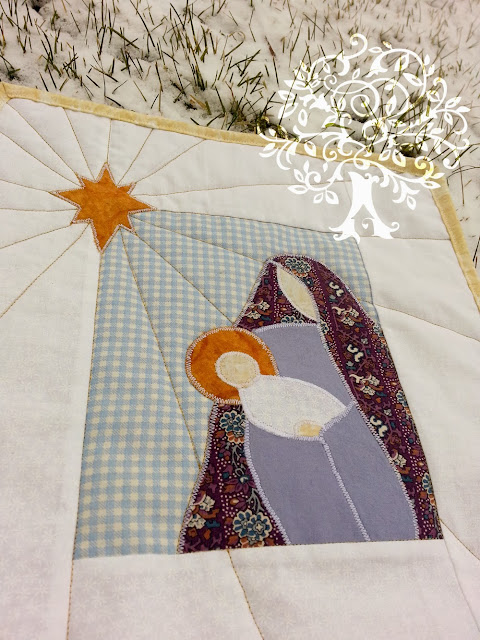
"What Child is This?" Mini Quilt Tutorial from Al of Shaffer Sisters

Today, the wonderful Al is sharing with us her mini quilt inspired by the song, "What Child is This?"

She and her sisters, Jo and Scary (aka SarahLynn), have some great projects at their blog, Shaffer Sisters.  One of their projects I'm excited to try is the Minky Crib Sheet.  (How amazingly comfortable does that sound?!)  And they do a lot of sewing for girls (I love this cute dress) and for boys (like this awesome shirt).  You should definitely go check out their blog!

But first, the "What Child is This?" mini quilt.  On to you, Al.

~~~

Little Girl and Santa
This was taken at a church Christmas party when Ty was 18 months old.
I love Christmas. I treasure the peace, hope, and love that I feel when I think about the true meaning of the season. Too often it seems like the Christ in Christmas is lost to bright flashing lights and an excessive focus on Santa and the entitlement of gifts.
http://shaffer-sisters.blogspot.com/2012/12/merry-christmas-from-us-to-you.html
Christmas Towel Tutorial & Free Printable
I love my Lord and Savior, Jesus Christ, and this season (as with years past) it is my goal to give something that keeps the focus on my Redeemer. The King of Kings was born into the most humble of circumstances, but that didn't make Him less. His birth was marked by the fanfare of angels, the brightest star in the sky, and the company of humble shepherds and faithful Wise-men from afar. From a young, pure, and loving mother He was born. I'm sure that Mary, just like all new mothers, felt an overwhelming love of this gift straight from heaven, but also an uncertainty that she could be the best for of someone so precious and perfect.
"What Child is This?" Mini Quilt
This story is portrayed in the hymn of "What Child is This?"  It is one of my favorite Christmas songs. One day while thrift store shopping I found "Quilt a Colorful Christmas" (contains 39 projects) and it cost only $2. You should probably know that I love quilts so getting it was a no brainer. One of my favorites from the book was the Mother and Child project which I decided to share with you today.

This was such a fast and easy project. I thought it would entail paper piecing or something a little more complicated, but it was simply just fabric, sew-able heat-n-bond (they recommended fusible web, but I had to make due with what I had), stitching on top of the applique, and then putting it all together.
"What Child is This?" Mini Quilt 2
Sadly I can't give this pattern to you since it's not my design, but you can do something similar to this by just sketching it out. Then add 1/8-1/4" (on your sketch with a dotted line) to the pieces that lay underneath the pieces on top (so you don't have any unwanted dead space, but you will be able to trace out your pattern next). Then you can go through and trace out each little pattern pieces onto printer paper. And wala you have your own pattern.

Since I don't want you to miss out if you want to do something like this and feel like you lack the artistic ability necessary, I came up with my own design using the instructions above. I am sharing the pattern with you and tomorrow you can come over to my blog and see the finished project and share yours if you decided to make one as well.
"What Child is This?" Mini Quilt Pattern and Placement Guide
What Child is This Placement Guide & Pattern Pieces (print to be 8.5" x 11" size)
You will need:
Pattern pieces
Scraps of 6 different colors (plan appropriately and make sure there's enough)
(1) blue background fabric 8" x 6 3/4"
(2) 3 3/4" x 6 3/4" for top and bottom border
(2) 3 3/4" X 13 1/2" for side borders
(2) 2 1/4" x width of fabric for binding (piece together to have one long strip)
(1) 12 1/2" x 13.5" piece of quilt batting
*When sewing use 1/4" seam allowance.
"What Child is This?" Mini Quilt Pattern Pieces
After printing or designing your pattern pieces place then fusible webbing or sew-able heat-n-bond above the pattern (paper side up) making sure you trace all the pattern pieces. After that it's just a matter of cutting out the adhesive pattern pieces and ironing them to your scraps of fabric, cutting them out of the scraps and removing the backing paper.
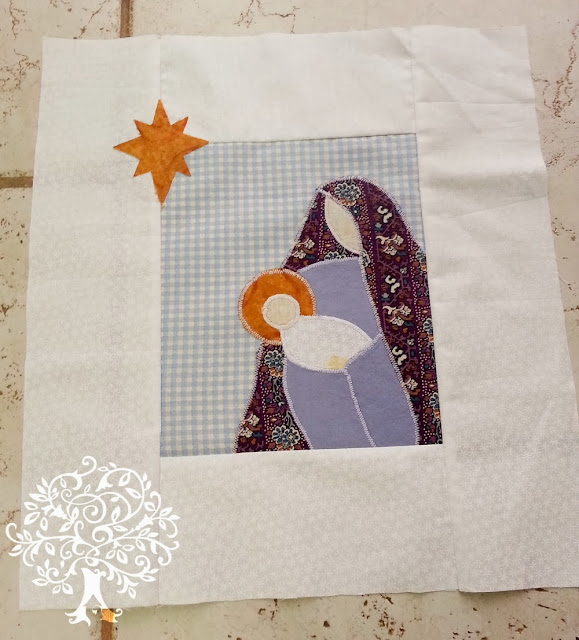
"What Child is This?" Mini Quilt — Fuse on the webbing
To put it together you can look at your original picture for a placement guide and place it on the blue background. Don't iron until you are absolutely ready. When I did it, I just did a little at a time (starting at the bottom and making my way up) because I wanted to be able to adjust if it shifted. Once it's all ironed you can stitch around the edge of the applique with a small zigzag stitch in a clear or neutral thread so that the design will stay.
"What Child is This?" Mini Quilt Top
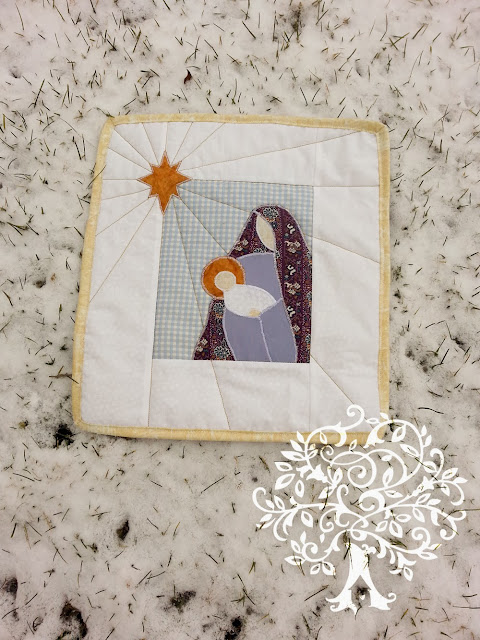
After that it's a matter of adding the border (top and bottom first then sides) and putting it all together like a mini quilt. There's a little extra length on the side pieces (1/4") that you can trim down and square off when you are done. All that will be left is to quilt (what design/method you choose) and bind. If you don't know how to do binding you could read this tutorial on binding.
"What Child is This?" Mini Quilt 3
Thanks so much for letting me share my love for the Lord this Christmas season.

With Love,
Al


~~~
Be sure to check out the other posts as we Sew a Song of Christmas!

14 August 2013

Quilting Pictures

Free-form Quilting Fish Wall Hanging


A while ago, Jill found this book about quilting pictures.  You're basically making a fabric collage, except it looks nicer than the paper collages you (or at least, I) made way back when.  Originally, Jill, my mom, and I were all going to work on it together.  Jill made this cool beta fish design, the three of us shopped for the fabric, we got started, and somehow it ended up being my project alone.  

Free-form Quilting Fish Wall Hanging, showing loads of skinny sections

My goodness, it took forever.  Part of the problem was that I had decided to do a design with loads of skinny sections.  Don't these look fun to cut out at each step? Time consuming, but worth it.  

My two biggest problems are ones that I'd have no matter what I was working on.  I like quilting, but I usually only sew when the once-a-month quilt group meets.  I also seem to have some curse that causes my sewing machine to have tension issues or otherwise hate me.  I might spend so much time fixing tension issues and taking out unstable seams that when it's time to go home from my quilt group, I'm just a few stitches past where I started.

Free-form Quilting Fish Wall Hanging Back

But now the fish done, and it looks pretty cool, if I do say so myself.  The back looks almost as good as the front.  It looks like a whole cloth quilt.  If you’re unfamiliar with that, it’s exactly what it sounds like.  You take your fabric, don’t cut it up, lay it on your batting and backing, and quilt a design on it.  Bind and done.  

Even though this was a lot of work, it was fun to make, and I love the end result.  It’s nice that it’s not as precise as most sewing is.  Wobbly stitching?  Do it a few more times, and people will think you meant to make it wobble.  Or ignore it, and no one will care, even if they look up close.  My mom and sister and I bought new fabric for this, but it would be a great way to use up scraps, maybe even funky patterns that you hope were in style when you bought them but now would make a fashionista faint with fright.  In short, it’s fun, forgiving, and you should give it a try.  You just might want to pick a simpler design than my beta fish.

Free-form Quilting Fish Wall Hanging Close Up. Aka, Angry fish is judging you.

Would you like a tutorial about how to quilt your own pictures? 


24 December 2012

I Finished the Baby's Christmas Stocking Just in Time!

First off, thanks to everyone who's been leaving comments! I love knowing people are reading my posts and wanting to do my projects.  (If you have questions, I'll try and get back to you, but just know I'm not checking my blog very often at this point in new-baby-life.)

Second off, Merry Christmas!!!  I hope you're all having a great holiday and aren't even reading this until the 26th.  :)

Third off, I got Daddy's Girl's Christmas stocking done!  Just barely in time, too.


You like where we hung the stockings?  We don't have a fireplace in our apartment, so we put up a shelf to be a mantle.  :D


I think DG's stocking looks smaller than the other three, but I used the same pattern for all of them...Do you think it might be because I used a different (fluffier) batting?  More of the fabric is being taken up by the up-and-down from quilting the fluffier batting...Oh, well.  It's just a little bit smaller--hopefully the little ones won't notice, even when they get bigger.

The pattern I used, of course, is the one from this post.  (Just click over for the pattern and tutorial.)

But here's a trick I came up with between writing that post and now.  You see, I always have a hard time keeping all those little squares in order.  Oh, sure, I try labeling the rows, and keeping everything in order, but it doesn't always work out, and I end up laying it all out over and over again to make sure everything stays in its place.  Then I thought, why not label all the squares?


See?  The rows have numbers, and the columns have letters.  This way, I will always know where all the pieces go.  Boo could stick them in her bag, carry them around all day, and pour them out on my table in the evening, and I'd still be able to easily put each and every little square back in its place.  I'll never make this kind of quilt project any other way.


And just to make sure you've gotten your daily dose of cuteness, here's my little Daddy's Girl.  Isn't she precious?  I love that baby.


22 February 2012

I'm in a Quilt Block of the Month Club--Here's January's Block.

First off, I have a question:  What do you think of 30's style fabrics?  They are bright and happy, but in my opinion, they're rather busy.  And I don't really like busy.  But when that busy 30's fabric becomes a $7 quilt top, I can handle the busyness.  A little.

I bring it up because a local quilt shop is doing a Block of the Month Club--$7 gets you the fabric and patterns for twelve different quilt blocks.  So I'm doing it.  I just couldn't turn down a $7 quilt.  At the worst, I could give away the quilt, and use the patterns again with more my-asthetic fabrics.


This is January's block--the Yankee Puzzle.  I'd love to give you instructions for this and all the other blocks I'll be sewing, but since I didn't make the pattern, I can just suggest you Google the pattern names.  (To get you started, here are some instructions I thought looked pretty good, though I haven't tried them.)


And here's my version.  I figured, fewer fabrics = less busy, even if the fabrics themselves are busy.  What do you think?  I didn't like the red fabric included, but I do like the value contrast it provided; my version is rather pale.  Hmm...

Let me just say, it is much harder to sew triangles than squares.  Getting all those little points matched up... My quilts thus far have been pretty basic as far as piecing goes (usually just squares/rectangles), so this quilt block was a challenge.  But that's good, right?  Learn new skills?  I hope I get better at it sooner than later, though, because January's block really wasn't much fun to sew.  And unpick.  And re-sew.  Again.


And here's the fabric for February's block, the LeMoyne Star (aka the Eastern Star, Lemon Star, Puritan Star, and Hanging Diamonds, so says my pattern).  There's that same fabric design I didn't like from January's block, but I like it better with the main color being blue.  Good thing, because I couldn't really take out a color when there are only three to start with.

04 January 2012

Rag Quilt Baby Quilt Tutorial


Ah, rag quilts.  They're easy to make, soft and fuzzy, and are already quilted by the time the blocks are put together.  I made this rag quilt for Boo before she was born, and I thought I'd share it with you today.

(Since I made this quilt before I started blogging, I'm a little short on in-progress pictures.  But the quilt is so easy to make, you don't really need them.)

You need:
fabric that frays.  I used flannel.  I've also seen rag quilts made of denim.
batting
general sewing supplies


First, cut your fabric into squares.  I cut mine to 5" square, and I cut out 110 squares.  This made a nice sized baby quilt.  Of course, you could use more or fewer squares, or make the squares larger or smaller--it's a very flexible project!

Then cut your batting into smaller squares--take off 1" from the height and width.  So I cut my batting to 4" square.  I just did this with scissors--precision isn't terribly important.  You'll need half as many batting squares as fabric squares.

Sandwich together fabric + batting + fabric, right sides of fabric facing out.  You can pin them if you like, but they'll probably stay together just fine without pins.


Now, take each square and sew around all four edges with a 1/2" seam allowance.  (Remember to backstitch at the beginning and end.)  While you're at it, go ahead and sew inside the square to quilt the blanket.  I made X's on my squares...

...But  a single diagonal line would be lots faster.  You could even sew cute shapes, or just squiggle down the square.

Once all your squares are sewn (and quilted!  Isn't it nice to have that done already?) then it's time to put them together into a quilt.


Take two squares and set them on top of each other, right sides facing out.  (There may not be much of a difference between the two sides, in which case you just need to make sure your seams all end up on the same side of the quilt.)  Sew them together, going over your sewing line from sewing around the squares.

Continue until you have all your squares made into rows, then sew all your rows to each other.

(Woo-hoo!  Almost done!)


Now it's time to clip the seam allowances so the fabric frays nicely.  Be sure you don't cut through your seams, though!  I made my clips every 1/2" or so.


You'll probably want to use scissors with a spring in them, to help your hands not get too tired out from making all those little cuts.


 Now all that's left is to send the quilt through the washing machine to encourage the nice fraying-fluffyness.  Wash it at a laundromat the first time or two--you don't want that much lint in your machines!  After that, you can stick it in the wash like normal.

I just realized another nice thing about making a baby quilt rag quilt style--all those baby-induced washings will just make the quilt all the more nicely frayed!


And speaking of babies, mine is waking up.  I'm going to lose nap times one of these days--not looking forward to it.  (Boo, you can keep taking naps as long as you want!  I really wouldn't mind!)

Happy crafting!

21 December 2011

3D Snowman Wall Hanging Tutorial

You wanted a tutorial, so here it is!  Thanks, by the way.  Tutorials take a while to write, so it's always nice to know they're wanted.  

(Pardon the poor photography, please.)

First off, you need to design out your wall hanging.  (I didn't make out any patterns last year, and now the wall hanging is across the country, so this tutorial is more of guidelines than anything else.)  I decided to make a little family of snowmen to represent my little family, so it has  Mommy Snowman (Snow-woman?),  Daddy Snowman, and a Little Girl Snowman.


Now, make your patterns and gather your materials.  You need just general sewing supplies, plus batting, and anything special you want for dressing up your snowmen (buttons, etc).


Cut your back and front fabrics to the same size (whatever size your design calls for).  Part of the reason why I don't like the cutting stage of quilting is that sometimes the ruler slips and I gouge my fabric.  But if you put a piece of non-slide shelf liner under the ruler...Really, I don't know why I didn't think of that before.  So much headache could have been avoided.


Now arrange your pattern pieces on the fabric front.  Remember that your available space will shrink a little bit when you add the binding.  I drew my patterns without seam allowances to make this step easier.  Any adjustments needed?  Alright.  Moving ahead.


Next, cut out your snowmen bodies.  Remember to add seam allowances!  You are pretty much making little tiny pillows--you need to cut out a front and back of everything.  The green fabric there is what became the SnowMom's apron, by the way.

Also cut out (without seam allowances) all of your snowman body pieces out of batting.  

If you are going to sew on the snowmen's faces, do that now.  You could also paint faces on, glue on little buttons...

For each part, stack the white fabric circles right sides together, with the batting on top of that.  Sew around, leaving an opening to turn.  And turn.  (Sorry I didn't get a good picture of this.)  If your nice little circles don't quite stay nice and circular, that's okay!  Real snowmen aren't made of perfect spheres, either.  Funny angles = added charm.


You can dress your snowmen first, or sew them together first; whatever works for you.  Clothes that will be tucked under another snowball (SnowMom's apron, Little Girl's scarf) will need to be put on first, though.  When you do sew the snowmen together, you'll do that with little stitches on the back, as in the picture.

I don't have any pictures of making the clothes (except for the shot with the SnowMom's apron you already saw) because I was just winging it.  I do suggest trying to cut your pieces a little too large--working with such tiny pieces of fabric is difficult to start with; working with slightly too small fabric is even more of a pain.


{Snowmen with Clothes}


Lay out your finished snowmen on the fabric front with the patterns for your embroidery.  Everything still fit?  Good.  Pin everything in place, and sew the little snow family in place.  (Go from the back and just catch the back of the snowmen.  Sorry--no picture again.  At least I got better about tutorial pictures since I made this project last year, right?)

I made my embroidery double as my quilting for this wall hanging, so at this point, I sandwiched together the front (complete now with snowmen!), batting, and backing.  (See this post about putting together a quilt if you're unfamiliar with this step.)  

I backstitched the words.  I just free-handed the letters with my patterns as guides.  (Since I didn't take any pictures of the embroidery process, here's a link to a backstitching tutorial.  She doesn't mention how to end the thread; for this particular project, you could just tie a small knot on the back of the wall hanging.)

But this does make the back of your wall hanging look a little messy.  I found out after the fact that you can quilt your wall hanging with muslin (or other neutral-colored scrap fabric) on the back instead of your backing, and then add the backing on top of that when you sew on your binding!  Clean, smooth backing, nicely-held-together front/batting--sounds good to me.


{So here's my wall hanging all quilted...}

Next, add the binding (and backing, if you did it the more polished way).  If you need some help with making or applying your binding, go here.


There really is snow place like Home.

Happy crafting.

14 December 2011

Snowman Wall Hanging


I made this little wall hanging last year for my MIL.  I couldn't put it up last year, for obvious reasons, so here it is, now! 


Here's the finished wall hanging.  I like how it turned out.  I think the family of snowmen is cute.  :)  (Not so much for how this picture of me turned out.  Bleh.  Oh, well.  At least Boo's cute.)  Would you like a tutorial?  I'll get one up next week at least if you do.  In the mean time, I need to go make some baby shoes!

(Is anyone else as not ready for Christmas as I am?  If so, I wish you the best of luck!)

Happy crafting!

30 November 2011

Variations on a Theme Christmas Stockings {Tutorial}

My cousin shared this story; tell me if it sounds familiar to any of you.

She bought a Christmas stocking for her little girl.  All is well.

Time passed, and she had a little boy.  She went back to the same store, and, hurray, they still carried those same Christmas stockings.

BUT--when she got home, she realized that the two stockings were not, in fact, the same; they were different sizes.  Now, a baby's isn't going to know or care that his stocking is smaller than his big sister's, but one day, he will.

How can you have all your Christmas stockings match without buying a whole new set when each new baby comes?  Even if you make the stockings, how do you know the fabric you chose will still be available next time?

Answer:  variations on a theme.


{I made these stockings last year, but didn't have time to get them posted before Christmas.  Okay, I finished them last year; I started them the year before.  Christmas passed and then I didn't have any motivation to finish them until the next Christmas season rolled around.  You've had that kind of project, too, I'm sure.}

All the stockings were made from the same pattern, but in different fabrics:  variations on a theme.  So it doesn't matter if I can't find, for example, the candy cane striped fabric again--I will just pick a new set of fabrics when we add another baby to our family.

Would you like to make your family some new Christmas stockings, too?

For each stocking, you need:
My pattern (It's at the bottom of this post.)
Some Christmas-y fabric scraps, cut into 2 1/2" squares
-----If you are buying new fabric, I estimate that you will need a bit less than 1/2 yd total, so if you got 1/8 yd of four different prints, you'd be good to go.  But you could make this out of however many different fabrics you'd like.
Approximately 60" of bias tape, or fabric to make your own  (For this project, it really should be cut on the bias, to help in going around the curves.)  See this tutorial if you need some help making bias tape.
2/3 yd (total) matching fabric for backing and linings  (I used different fabric for the linings and backing.)
Batting of your choice--enough to cut out two stockings (for the front and the back)
General sewing supplies
Quilting supplies of your choice--you could tie, machine quilt, hand quilt...

First, cut out the fabric for the linings and backing, as well as the batting.  They're all the same; might as well get them all done at once.


Next, lay out your 2 1/2" squares into a nice pattern, or lack thereof.  I arranged my squares in what I like to call "Artistic Random."  It's not true random, since I arranged and re-arranged until I liked the look of it, but neither is there a pattern.  Make sure the squares will cover the entire stocking pattern, with significant extra, to compensate for seam allowances.  Sew them together.

Pin the pattern on your ... stocking top?  (Like a quilt top...)  Cut out the stocking.

(Ouch!  Just look at all those pins!)

Sandwich the stocking.  The sandwiches go together squares/batting/lining, and lining/batting/backing.  Pin the sandwiches together.  Be sure to have right sides facing out.


Now we want to quilt the stocking sandwiches.  I stitched little snowflakes in each of the corners.  It took forever, but was a nice touch, I thought.  And I machine quilted each person's name on the back of their stocking.  You could tie quilt your stockings (tutorial here), but I would use embroidery floss instead of yarn for this small a project.  Or you could machine quilt them.  Use whatever method you'd like.

Next we'll be putting on the binding.  Mostly, the technique is just the same as binding a quilt, as in this tutorial.  But there a couple of differences.  For example...


Since you don't want to sew the tops closed, you'll bind the tops separately.  Bind the tops, but don't worry about finishing the ends--they'll go into the seam allowance when you bind the sides.

Pin the front and back of the stockings together, linings in.  Pin on the binding.  Starting at the top of the stocking, toe side, bind as usual until you get to the top, heel side.  Then...


Make a loop with the bias tape, and stitch it into place by hand.

And that's it!

Happy crafting!


(Right click-->"Save to Downloads")

They are sized so that they should print nicely on two 8 1/2" x 11" sheets of paper.  Tape them together, matching the stars.

21 October 2011

Pumpkin Patch Table Runner/Wall Hanging

Remember way back in this post when I showed you all the fabric I got for a new project?  Well, I finally finished it!


The Pumpkin Patch!

I actually kind of forgot about it, but then I was getting ready to go quilt with some friends, and I remembered I hadn't worked on this since the last quilting night--the month before!

I thought it would be cute to have a wall hanging of pumpkins--all making different faces.  So I made a little Nine Patch pattern of pumpkins (hence the project's name).  I decided it would be a table runner (not that it "runs" much, being a square) since I don't have much wall space.  My kitchen table needed some Halloween lovin' anyways.

I like it, but if I did it again, I would do a few things differently.  For one thing, I'd try to come up with faces with fewer curves.  Sewing around all those tiny curves was such a pain!

The truth hurts, little guy.

Second, I'd add little green stems.  Why didn't I think of that before???  Once I got the green border on, I realized that I should have green in other places, too.  But it was too late to add stems.  I mean, maybe I could, but I didn't leave space for them in the blocks, and to make them match at the edges of the pumpkins...

Third, I might make all the pumpkins out of the same fabric.  Maybe.  I do like having the three fabrics, but I bet if they were all the same, it would emphasize the different facial expressions more, which was the idea of the project.

Ah, well.  You (and my sister--she's planning on making one of these, too) get to learn from my experience.

This isn't going to be a full tutorial--more like a pattern.  If you need help on a specific part, check out one of my previous sewing posts such as...


...Or send me an e-mail at jillmadeitblog {at} gmail {dot} com.


You will need:
1/4 yd black fabric
1/2 yd purple fabric
1/8 yd green fabric
1/3 yd orange fabric (divided among however many different oranges you want to use.)
23" x 23" batting
23" x 23" backing (I used muslin.)
General sewing supplies

Disclaimer:  I think these fabric amounts are correct, but I would feel really bad if you ran out of a color and couldn't finish the project, so you may want to buy a little extra just in case.


{The pattern for the pumpkins and stems is at the bottom of this post.}


First step:  Cutting (My least favorite step!)

From your black fabric, cut four 7 1/2" x 6 1/2" squares, and nine adorable pumpkin faces.  You can use my faces as a guide, but remember:  Tiny curves are annoying to sew!  Another thing to keep in mind is that busier, higher contrast pumpkin fabrics will need larger faces to not get swallowed by the pattern.  So for my orange-on-orange print, I could do intricate little faces, but for my floral orange-on-black fabric, I needed simple, large faces.

From your purple fabric, cut five 7 1/2" x 6 1/2" squares, and a  2 1/2" x 90" strip for binding.  (You'll need to sew strips together to get that length, of course.)  {Update:  The 90" will give you extra, just so you know.}


From your green fabric, cut two 1 1/2" x 18" stripstwo 1 1/2" x 20" strips, and nine pumpkin stems.  {Update:  I think I may have done the math wrong in figuring out how long to make these strips.  Just measure your own nine patch when you're ready to add the green borders, and then cut to size.  Just in case.}

From your orange fabric, cut out your nine pumpkins.

Whew!  Glad that's done!

Now it's time to appliqué.  I used the same technique as I did for my striped butterfly, but using a blanket stitch instead of a zig-zag.

Appliqué the faces onto the pumpkins.

Pin your first stem on to a pumpkin, then center the entire pumpkin on its square (...rectangle, I guess).  Keep the stem in place, but remove the pumpkin.  Stitch around the edges, but you don't have to stitch where it will be covered by the pumpkin.  Then appliqué the pumpkin on top.

Next:  Sewing it all together.

Squares go together in a checked pattern.  Then sew the shorter green strips onto the top and bottom, then the longer strips on the two sides.

Sandwich your top, batting, and backing.  (You'll trim off the excess batting and backing later--it's much easier to have these pieces slightly too big at this step.)  For quilting, I sewed 1/4" from the seams on each of my squares.  I used a slightly longer stitch than normal to emphasize the quilting.

Trim off the extra batting and backing, and bind your wall hanging!

Hurray!  You're done!


Happy crafting!


(Right click, "Save to Downloads")