Showing posts with label guest post. Show all posts

20 December 2013

"Winter Wonderland" Vest Tutorial from Bethany of I Married Superman

I'm really excited about today's Sew a Song of Christmas project!  But first, allow me to introduce you to our final guest poster, Bethany, who blogs over at I Married Superman.  While I don't know Bethany in real life, I think we could totally be friends.  Her blog is so fun, I love the way she writes, and her projects are great.  Here, go read her About Me page, and you'll want to be friends, too.

Bethany sews a lot for her three adorable little kids, two of whom are approximately my children's ages, which makes her posts extra applicable and fun to read.  She posts lots of tutorials (like this cute baby cardigan!  It's really too bad I hate making ruffles...), and there's the free patterns (Hello, adorable sun hat!), and even totally boy-friendly projects (Captain America shorts!) which can be hard to find.  Maybe my nephew would like shorts like that.  

And now, on to today's tutorial!

~~~

I'm so excited to be a part of Jill's series!  Christmas songs are so fun and inspirational.  I'm listening to some as we speak {er....as I type, I should say} and it's makin' me feel so festive.....I feel some hot cocoa coming on!  ;)  

Today my song inspiration-take is on the classic, light-hearted Christmas carol, "Walkin' in a Winter Wonderland."  I have distinct memories of listening to Amy Grants version of the song as a kid.  No matter how many versions I hear, I always go back to that one.  Nostalgia.  :)  

Anyway, I happened to have all of this white/cream colored fur material that I received for free ninety-nine from my sisters neighbors grandma's attic.  I know. I'm all for telling funny, detailed stories, but I'll leave that one alone for today.  

Suffice it to say I had lots of fur material that I didn't know what to do with, so I thought "why not a cozy little vest for my little Lila Lou?"
We waited and waited to take pictures of Lila in this vest for a couple weeks.  Because we thought it would be fun to actually have a winter wonderland to take pictures in.  But no such luck. So I finally let Lila make her own "winter wonderland."
I must say, she really got into character with her tulle "snow."  I mean, check out the frolicking.  :)
A snugly abominable snowman-esqu vest is just the ticket for a winter wonderland walk, don'y ya think?  :)
To make one, all you need is fur material {or a cozy type of material if you're not into fur} and some type of soft fleece material to line the vest.
First get a shirt that fits your child and turn it inside out.  Then fold it in half like so:
Trace it out adding an inch onto each side {or two depending on how much you want the front pieces to overlap}.  You can trace out a front and a back, but I just used the same tracing with different neckline markings.
Using the upper neckline, cut your material on the fold for a back. Then using the lower neckline, cut two separate pieces for the front.
 So you'll have this:
 Do the same for the lining, so you'll have this:
You should have six pieces total.  Two front pieces and a back cut out of your fur material and two front pieces and a back cut out of your lining material.  

 Take the fur material and place right sides together and sew the shoulder seams.
 Do the same with the lining.
 Now sew down the side of the fur pieces.
 And your lining piece.  
 So you'll have two identical pieces just made out of different material.
 Turn your fur piece inside out and open it up.
Place your lining inside the fur vest {with right sides together}
 Sew along one side of the front, around the neckline and back down the front.
 If you flip it around, the vest should look like this:
To complete the armholes, fold the lining arm hole under towards the wrong side of the fabric and then fold the fur piece under in the same way.  Make sure that they align and so you can't see any raw edges.  Pin as you go.
And then sew around so it looks like this:
 Now do the same for the bottom. Fold each piece toward their respective "wrong sides" of fabric.  Pin
 and sew.
Close it up and you should be good to go build a snowman, and call him Parson Brown.  
Here's Lila building hers...putting on buttons
And sticking in a carrot nose.  
Thank goodness for imagination.  :)  Consequently, our forecast says we're in for a real wonderland tonight.  Wohoo!  
Thanks again for having me, Jill! 


~~~

Thank you, Bethany!  And isn't Lila so cute?

And in case you missed any of the posts in our series...
"I'm Dreaming of a White Christmas" Tulle Wreath
"O, Christmas Tree" Glitter Ball Ornaments
"What Child is This?" Mini Quilt {with free pattern}
"Blue Christmas" Simple Holiday Skirts
"Rudolf the Red-Nosed Reindeer" Ornaments
"Joy to the World" Jar {with free printable}

Merry almost-Christmas, everyone!

18 December 2013

"Joy to the World" Jar {with Free Printable} by Megan from One Willis Family

It's almost Christmas; are you so excited?  We have family coming to visit in just a few more days, so we're really excited about that.  And the Christmas lights, choir programs, cookie makingit's a great time of year.

And we're almost done with the "Sew a Song of Christmas" series.  Today's project is by Megan, who blogs over at One Willis Family. She designs a lot of printables, some free, some for sale at her Etsy shop.  She also has tons of free digital scrapbooking paper packsI love this black and white pack!  I'm very happy to have Megan sharing with us today.

~~~

My choice of song for “Sew a song of Christmas” was Joy to the world:
If you remember all the lines, they are as follows:
Joy to the world! The Lord is come
Let earth receive her King!
Let every heart prepare Him room
And heaven and nature sing
And heaven, and heaven and nature sing
Joy to the world! the Savior reigns
Let their songs employ
While fields and floods
Rocks, hills and plains
Repeat the sounding joy
Repeat, repeat the sounding joy
No more let sin and sorrow grow
Nor thorns infest the ground
He comes to make
His blessings flow
Far as the curse is found
Far as, far as the curse is found
He rules the world with truth and grace
And makes the nations prove
The glories of His righteousness
And wonders of his love
And wonders and wonders of his love
How can one possibly capture the majesty of this song or really understand quite how joyful it is that our Lord has come. Each Christmas my family and I try to really celebrate the meaning of the season. We try to remember our savior’s birth, and life, and mission here on the earth. Although this can be difficult at times with the excitement over the presents there are little things we do each year to remind ourselves of Christ’s life. We read Christmas stories and I usually cry…of course, we read the nativity story in the scriptures; we give gifts, and the like. 
This year we have really been brainstorming how to gain more insight into the meaning and importance of our savior. 
Here is just one little thing we’ve done.

Joy to the World Jar with free printable

“Let Every Heart Prepare him Room” Jar

This is super easy to make. Just print out the jar wrap, cut around the edges, and tape it on.

Joy to the World Jar printable

Then you’ll want to make the paper curls. This is pretty easy too. You all know how to curl ribbon when wrapping a present so you’ll just that with the paper.
First take a strip of wrapping paper and fold hamburger style…then fold once more hotdog style. Then you’ll cut the edge off. 
Second you’ll want to cut strips. After you have a few strips you can curl it with the scissors. (The paper is more likely to tear so I go pretty slowly)

Joy to the World Jar—cutting the paper strips

After you have the papers curled there are two ways you can “prepare room in your heart”

Prepare Him Room Option 1
Think of things you can do this Christmas season that would help you be more open to the savoir and more likely to receive him.  You will write different ways to do so and put them in the jar. Then each day you will draw one out and either do the activity or prepare everything and set the date in which you will do it. (For example for things such as caroling you might need to plan things in advance to actually do it.)
Some examples might include:
Service Ideas (When I serve others I feel closer to my Savoir): 
Take treats to neighbors and friends
 Write personalized Christmas cards with your testimony in them, 
Visit the elderly or sick, 
Seek out opportunities to serve as they come, 
Saying a kind word to a spouse, 
Call up someone you haven’t talked to in a while,
Organize or participate in a caroling group
Pondering (Pondering the savoir is a great way to help my spirit feel closer to him)
Read and study the birth of Christ: Luke 2:1-20, Look at Cross references
Read Christmas stories
Write down all the blessing you have received in the last month. Think of ways you can bless the lives of others.
Start a spiritual journal where you write down impressions and promptings or your goals to come closer to the savoir. Keep writing in it.
Any other ideas or things you think would be beneficial to you and your family.


“Prepare him Room” Jar Option 2
In this option you won’t write on the curls until after you do something that brings you closer to the savior. You can watch yourself or if you are doing this as a family and you notice someone else doing something good and kind. When you see someone o yourself do something that opens their heart you write it down and put it in the jar. Then at a determined time such as Christmas eve or Christmas afternoon you pull out the jar and read everything.
It’s fun to watch the jar fill up and it helps us keep our focus on Jesus Christ.
Hope you enjoy
Megan 

Finished Joy to the World Jar

~~~
Thanks, Megan!  That's a great idea; I think we'll be adding that to our family Christmas traditions.

Only two more posts in our Sew a Song of Christmas series!  Here's what we've done so far:
"I'm Dreaming of a White Christmas" Tulle Wreath
"O, Christmas Tree" Glitter Ball Ornaments
"What Child is This?" Mini Quilt
"Blue Christmas" Simple Holiday Skirts
"Rudolf the Red-Nosed Reindeer" Ornaments


11 December 2013

"Rudolph the Red-Nosed Reindeer" Ornaments (that Give You a Kiss)

Today's guest post is by my good friend Stephanie!  She's the talented photographer behind Pink Pearl Photography.  She also writes the blog Life as a Wife, where she posts about her crafting, cooking, and mommy adventures.  She also has great party and date ideas!  How cute is her Whoville Christmas Party?  Or her Clue Date?

Thanks for joining us today, Stephanie!
~~~

Growing up, I have memories of my mom make a bunch of ornaments for our themed tree. One of my favorites she made were these Reindeer ornaments
They were my favorite because she would hide chocolate Kisses inside 
This year I made some for my tree and some to give away. I love these little deer they fill me with Christmas memories from my childhood, and memories of my dear mother who always filled every holiday with cheer!
I used my mom's pattern but tried to put my own spin on them by adding some color...

for instructions on how to make this ornament click here.

~~~


Be sure to check out our previous Sew a Song of Christmas projects!

06 December 2013

"What Child is This?" Mini Quilt Tutorial from Al of Shaffer Sisters

Today, the wonderful Al is sharing with us her mini quilt inspired by the song, "What Child is This?"

She and her sisters, Jo and Scary (aka SarahLynn), have some great projects at their blog, Shaffer Sisters.  One of their projects I'm excited to try is the Minky Crib Sheet.  (How amazingly comfortable does that sound?!)  And they do a lot of sewing for girls (I love this cute dress) and for boys (like this awesome shirt).  You should definitely go check out their blog!

But first, the "What Child is This?" mini quilt.  On to you, Al.

~~~

Little Girl and Santa
This was taken at a church Christmas party when Ty was 18 months old.
I love Christmas. I treasure the peace, hope, and love that I feel when I think about the true meaning of the season. Too often it seems like the Christ in Christmas is lost to bright flashing lights and an excessive focus on Santa and the entitlement of gifts.
http://shaffer-sisters.blogspot.com/2012/12/merry-christmas-from-us-to-you.html
Christmas Towel Tutorial & Free Printable
I love my Lord and Savior, Jesus Christ, and this season (as with years past) it is my goal to give something that keeps the focus on my Redeemer. The King of Kings was born into the most humble of circumstances, but that didn't make Him less. His birth was marked by the fanfare of angels, the brightest star in the sky, and the company of humble shepherds and faithful Wise-men from afar. From a young, pure, and loving mother He was born. I'm sure that Mary, just like all new mothers, felt an overwhelming love of this gift straight from heaven, but also an uncertainty that she could be the best for of someone so precious and perfect.
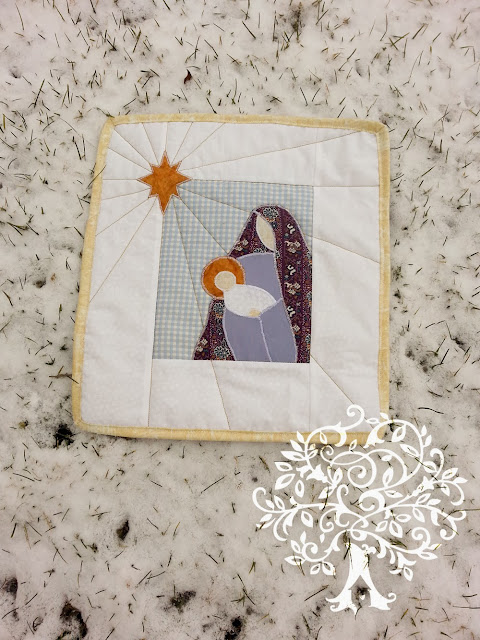
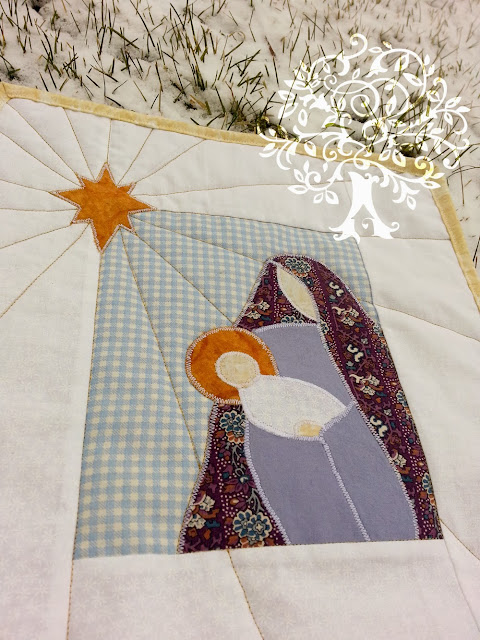
"What Child is This?" Mini Quilt
This story is portrayed in the hymn of "What Child is This?"  It is one of my favorite Christmas songs. One day while thrift store shopping I found "Quilt a Colorful Christmas" (contains 39 projects) and it cost only $2. You should probably know that I love quilts so getting it was a no brainer. One of my favorites from the book was the Mother and Child project which I decided to share with you today.

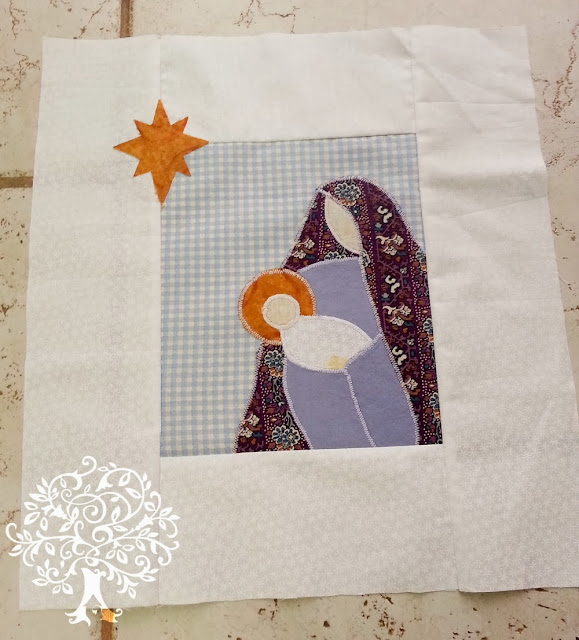
This was such a fast and easy project. I thought it would entail paper piecing or something a little more complicated, but it was simply just fabric, sew-able heat-n-bond (they recommended fusible web, but I had to make due with what I had), stitching on top of the applique, and then putting it all together.
"What Child is This?" Mini Quilt 2
Sadly I can't give this pattern to you since it's not my design, but you can do something similar to this by just sketching it out. Then add 1/8-1/4" (on your sketch with a dotted line) to the pieces that lay underneath the pieces on top (so you don't have any unwanted dead space, but you will be able to trace out your pattern next). Then you can go through and trace out each little pattern pieces onto printer paper. And wala you have your own pattern.

Since I don't want you to miss out if you want to do something like this and feel like you lack the artistic ability necessary, I came up with my own design using the instructions above. I am sharing the pattern with you and tomorrow you can come over to my blog and see the finished project and share yours if you decided to make one as well.
"What Child is This?" Mini Quilt Pattern and Placement Guide
What Child is This Placement Guide & Pattern Pieces (print to be 8.5" x 11" size)
You will need:
Pattern pieces
Scraps of 6 different colors (plan appropriately and make sure there's enough)
(1) blue background fabric 8" x 6 3/4"
(2) 3 3/4" x 6 3/4" for top and bottom border
(2) 3 3/4" X 13 1/2" for side borders
(2) 2 1/4" x width of fabric for binding (piece together to have one long strip)
(1) 12 1/2" x 13.5" piece of quilt batting
*When sewing use 1/4" seam allowance.
"What Child is This?" Mini Quilt Pattern Pieces
After printing or designing your pattern pieces place then fusible webbing or sew-able heat-n-bond above the pattern (paper side up) making sure you trace all the pattern pieces. After that it's just a matter of cutting out the adhesive pattern pieces and ironing them to your scraps of fabric, cutting them out of the scraps and removing the backing paper.
"What Child is This?" Mini Quilt — Fuse on the webbing
To put it together you can look at your original picture for a placement guide and place it on the blue background. Don't iron until you are absolutely ready. When I did it, I just did a little at a time (starting at the bottom and making my way up) because I wanted to be able to adjust if it shifted. Once it's all ironed you can stitch around the edge of the applique with a small zigzag stitch in a clear or neutral thread so that the design will stay.
"What Child is This?" Mini Quilt Top
After that it's a matter of adding the border (top and bottom first then sides) and putting it all together like a mini quilt. There's a little extra length on the side pieces (1/4") that you can trim down and square off when you are done. All that will be left is to quilt (what design/method you choose) and bind. If you don't know how to do binding you could read this tutorial on binding.
"What Child is This?" Mini Quilt 3
Thanks so much for letting me share my love for the Lord this Christmas season.

With Love,
Al


~~~
Be sure to check out the other posts as we Sew a Song of Christmas!

04 December 2013

"O, Christmas Tree" Glitter Ball Ornaments

O, Christmas Tree Glitter Ornament Tutorial

Merry Christmas, everybody!  Since Thanksgiving is over and it's "legal" to get into the Christmas spirit, I helped Jill and her family put up their Christmas decorations on Saturday.  I've given Jill a Christmas tree ornament (or sometimes a set) every year since she got married.  Last year, I made her a glitter ball ornament.  Boo obviously liked it, because later Saturday, she informed me that she was going to use my glitter and ball ornaments to make an ornament for her baby sister.  After getting her to ask me, rather than tell me, I agreed to help her and let her use my stuff. 

When I made these the first time, I got the inspiration from the blog The Greenbean's Crafterole.  You can find the post here.

This tutorial said to use Pledge furniture polish, but I just couldn't bring myself to buy a big bottle of something I would only use once.  I used homemade Mod Podge (aka, watered down Elmer's glue) instead.  A year later, the glue's still holding.  I don't remember what ratio of water to glue I used—just mix in water until it looks good.  (Don't you love instructions like that?)  Just remember that it needs to make a nice, thin, non-gloppy film.


Materials for Glitter Ball Ornaments

What you need:
-Clear glass ball (or other shape) ornaments
-Adhesive of choice.  I used watered down Elmer's glue.
-Glitter
-A funnel.  I made my own with a sheet of paper.


Boo Helps to Make the Ornament
(Isn't my niece cute?  She was cold, so she grabbed the nearest coat—mine.)

Pour glue into the ball.  Use more that you think you'll need.  You'll pour the extra out anyway. Carefully swirl it all around.  As the original blogger said, shaking the ball would made froth, which is bad.  Hence the careful swirling.  Now, dump out the extra.  Make sure it drains well, but don't leave it so long that it dries.  Last year, I had to rinse out my glitter and start a ball over again because too much glue puddled on the bottom of the ball and didn't let the glitter coat the ornament evenly.


Glitter Ornament

Dump in the glitter.  Use the funnel, if needed.  Again, don't be afraid to use more than you think you'll need.  You will dump out the extra.  Just make sure you don't have big glue puddles in the ornament.  This time, you can shake the ball to get it covered.  Let it dry before you pour the extra glitter back into the bottles. You wouldn't want to get wet glue in your unused glitter.


Glitter Ornaments

And that's it!  After they're dry and free of extra glitter, put the tops back on and hang your beautiful, glittery ornaments on your tree.


Glitter Christmas Tree Ornaments on the Tree

Be sure to check out the other posts in our Sew a Song of Christmas series!
And check back on Friday for the next bit of musical Christmas fun!