Showing posts with label sewing. Show all posts

14 January 2014

The Finding Nemo Baby Quilt

{I had this whole blog post written and completely ready to go, but then I somehow managed to delete it by accident.  I don't know what happened.  (Sadness!)  So you get the abbreviated version.}

Jill Made It: Finding Nemo Quilt

I made this baby quilt for one of my friends.  She and her husband were planning a Disney theme nursery for their baby boy, so when I found this fabric, I knew it was meant to be.

I love giving handmade items as baby presents.  It's partially because I just really like making things, but it's also that I feel that handmade gifts are an extra-special welcome to the world.  :)

Jill Made It: Finding Nemo Quilt Close-Up

The quilt is just a big rectangle with a white border inside to add interest, so it was a pretty quick quilt.  I think I even got it done the night before the baby shower.


20 December 2013

"Winter Wonderland" Vest Tutorial from Bethany of I Married Superman

I'm really excited about today's Sew a Song of Christmas project!  But first, allow me to introduce you to our final guest poster, Bethany, who blogs over at I Married Superman.  While I don't know Bethany in real life, I think we could totally be friends.  Her blog is so fun, I love the way she writes, and her projects are great.  Here, go read her About Me page, and you'll want to be friends, too.

Bethany sews a lot for her three adorable little kids, two of whom are approximately my children's ages, which makes her posts extra applicable and fun to read.  She posts lots of tutorials (like this cute baby cardigan!  It's really too bad I hate making ruffles...), and there's the free patterns (Hello, adorable sun hat!), and even totally boy-friendly projects (Captain America shorts!) which can be hard to find.  Maybe my nephew would like shorts like that.  

And now, on to today's tutorial!

~~~

I'm so excited to be a part of Jill's series!  Christmas songs are so fun and inspirational.  I'm listening to some as we speak {er....as I type, I should say} and it's makin' me feel so festive.....I feel some hot cocoa coming on!  ;)  

Today my song inspiration-take is on the classic, light-hearted Christmas carol, "Walkin' in a Winter Wonderland."  I have distinct memories of listening to Amy Grants version of the song as a kid.  No matter how many versions I hear, I always go back to that one.  Nostalgia.  :)  

Anyway, I happened to have all of this white/cream colored fur material that I received for free ninety-nine from my sisters neighbors grandma's attic.  I know. I'm all for telling funny, detailed stories, but I'll leave that one alone for today.  

Suffice it to say I had lots of fur material that I didn't know what to do with, so I thought "why not a cozy little vest for my little Lila Lou?"
We waited and waited to take pictures of Lila in this vest for a couple weeks.  Because we thought it would be fun to actually have a winter wonderland to take pictures in.  But no such luck. So I finally let Lila make her own "winter wonderland."
I must say, she really got into character with her tulle "snow."  I mean, check out the frolicking.  :)
A snugly abominable snowman-esqu vest is just the ticket for a winter wonderland walk, don'y ya think?  :)
To make one, all you need is fur material {or a cozy type of material if you're not into fur} and some type of soft fleece material to line the vest.
First get a shirt that fits your child and turn it inside out.  Then fold it in half like so:
Trace it out adding an inch onto each side {or two depending on how much you want the front pieces to overlap}.  You can trace out a front and a back, but I just used the same tracing with different neckline markings.
Using the upper neckline, cut your material on the fold for a back. Then using the lower neckline, cut two separate pieces for the front.
 So you'll have this:
 Do the same for the lining, so you'll have this:
You should have six pieces total.  Two front pieces and a back cut out of your fur material and two front pieces and a back cut out of your lining material.  

 Take the fur material and place right sides together and sew the shoulder seams.
 Do the same with the lining.
 Now sew down the side of the fur pieces.
 And your lining piece.  
 So you'll have two identical pieces just made out of different material.
 Turn your fur piece inside out and open it up.
Place your lining inside the fur vest {with right sides together}
 Sew along one side of the front, around the neckline and back down the front.
 If you flip it around, the vest should look like this:
To complete the armholes, fold the lining arm hole under towards the wrong side of the fabric and then fold the fur piece under in the same way.  Make sure that they align and so you can't see any raw edges.  Pin as you go.
And then sew around so it looks like this:
 Now do the same for the bottom. Fold each piece toward their respective "wrong sides" of fabric.  Pin
 and sew.
Close it up and you should be good to go build a snowman, and call him Parson Brown.  
Here's Lila building hers...putting on buttons
And sticking in a carrot nose.  
Thank goodness for imagination.  :)  Consequently, our forecast says we're in for a real wonderland tonight.  Wohoo!  
Thanks again for having me, Jill! 


~~~

Thank you, Bethany!  And isn't Lila so cute?

And in case you missed any of the posts in our series...
"I'm Dreaming of a White Christmas" Tulle Wreath
"O, Christmas Tree" Glitter Ball Ornaments
"What Child is This?" Mini Quilt {with free pattern}
"Blue Christmas" Simple Holiday Skirts
"Rudolf the Red-Nosed Reindeer" Ornaments
"Joy to the World" Jar {with free printable}

Merry almost-Christmas, everyone!

09 December 2013

"Blue Christmas" Simple Holiday Skirts

Boo loves to match.  Not like her shirt matching her pants; she comes up with some pretty...inventive outfits.  No, she likes to match other people.  So she will be so excited when she and Daddy's Girl unwrap matching Blue Christmas Skirts on Christmas morning.

"Blue Christmas" Simple Holiday Skirts

These are really basic skirts, but the nice thing about "basic" is that you can easily add your own spin on it.

Holiday Skirts with Pleats, Ruffles

Both skirts are made from the same blue satin (surprisingly affordable, yet it adds a bit of "special" to the outfit).  Daddy's Girl got pleats on her skirt, Boo got ruffles.  I love variations on a theme.

Ruffles on Skirt

Oh, ruffles, why must you be so cute, yet so annoying to make?  I actually prefer making pleats than ruffles.  

Simple Holiday Skirt Pattern
(By the way, I certainly didn't invent this way of making a skirt; it's been around forever.)

I don't have step-by-step pictures, since I sewed these up at night so the girls wouldn't see their Christmas presents.  (Read:  There was really bad lighting for pictures.)  But the skirts are so easy.

Ready?

Cut the elastic to your child's waist measurement.  Don't add seam allowance—you need the elastic to stretch a little so the skirt stays up.

Cut your skirt fabric as shown in the picture above.  Or, if you want a fuller skirt, cut a longer rectangle.  Less full, closer to square.

Sew up the two short sides, finishing the seams as you prefer.  (I went over the raw edges with a zig-zag seam for the first, and made a french seam for the second.  Just because I didn't think about the french seam at first.)

Make your hem by folding the bottom edge over a half inch, then fold again another half inch.  And sew it down.  A decorative stitch with a contrasting thread could be a nice way to add some detailing.  You could also hand stitch for a less visible seam, or use the blind hem stitch on your sewing machine.  But that's another tutorial.

Now you'll make a casing.  Just iron the top edge down a quarter inch, then fold down again whatever size you need to fit your elastic.  Sew this down, too, being sure to leave a little space for inserting the elastic.

And insert the elastic.  Attach one safety pin to the leading edge so it's easier to thread it through, and another securing the other end to the fabric so it can't pull all the way through.  (Hate it when that happens.)  Once the elastic's through, overlap the two ends by a half inch and use a zig-zag stitch to secure them.

Topstitch the casing closed, and you're done!

(If any of this didn't make sense, send me an email or leave a question in the comments below.  If needed, I'd be happy to make a photo tutorial later.)

Skirts with Ruffles, Pleats
Now that you know how to make a basic skirt, you can change it up to make so many different looks!  Besides adding ruffles or pleats, you can make the skirt more or less full, longer or shorter, try color blocking, or a paper bag waistband...I think I'm going to try a scalloped hem next time.

Don't miss any posts as we Sew a Song of Christmas!

06 December 2013

"What Child is This?" Mini Quilt Tutorial from Al of Shaffer Sisters

Today, the wonderful Al is sharing with us her mini quilt inspired by the song, "What Child is This?"

She and her sisters, Jo and Scary (aka SarahLynn), have some great projects at their blog, Shaffer Sisters.  One of their projects I'm excited to try is the Minky Crib Sheet.  (How amazingly comfortable does that sound?!)  And they do a lot of sewing for girls (I love this cute dress) and for boys (like this awesome shirt).  You should definitely go check out their blog!

But first, the "What Child is This?" mini quilt.  On to you, Al.

~~~

Little Girl and Santa
This was taken at a church Christmas party when Ty was 18 months old.
I love Christmas. I treasure the peace, hope, and love that I feel when I think about the true meaning of the season. Too often it seems like the Christ in Christmas is lost to bright flashing lights and an excessive focus on Santa and the entitlement of gifts.
http://shaffer-sisters.blogspot.com/2012/12/merry-christmas-from-us-to-you.html
Christmas Towel Tutorial & Free Printable
I love my Lord and Savior, Jesus Christ, and this season (as with years past) it is my goal to give something that keeps the focus on my Redeemer. The King of Kings was born into the most humble of circumstances, but that didn't make Him less. His birth was marked by the fanfare of angels, the brightest star in the sky, and the company of humble shepherds and faithful Wise-men from afar. From a young, pure, and loving mother He was born. I'm sure that Mary, just like all new mothers, felt an overwhelming love of this gift straight from heaven, but also an uncertainty that she could be the best for of someone so precious and perfect.
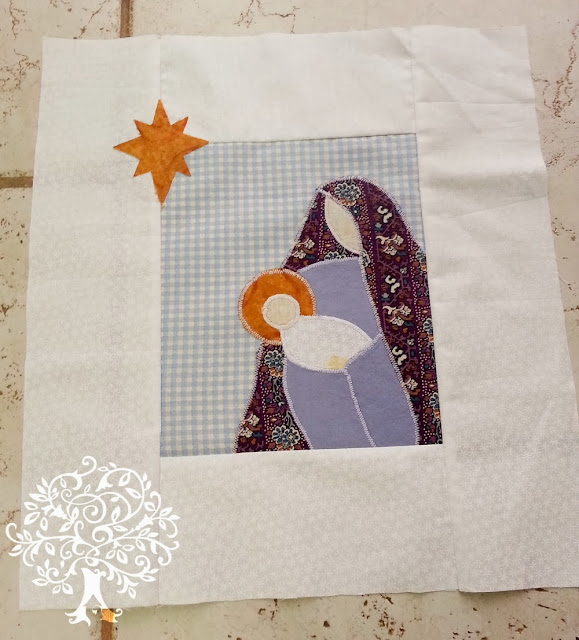
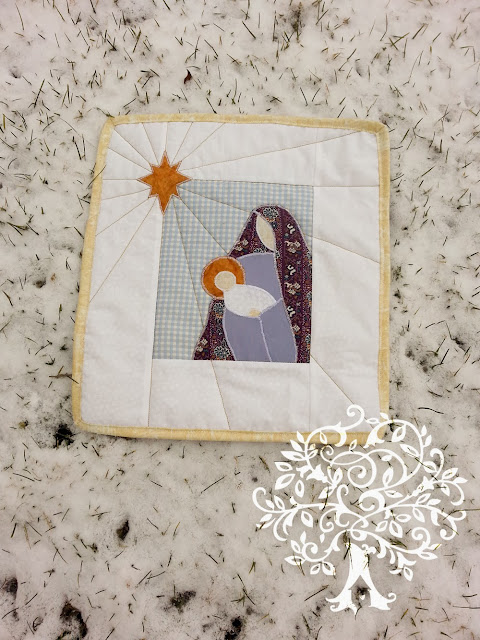
"What Child is This?" Mini Quilt
This story is portrayed in the hymn of "What Child is This?"  It is one of my favorite Christmas songs. One day while thrift store shopping I found "Quilt a Colorful Christmas" (contains 39 projects) and it cost only $2. You should probably know that I love quilts so getting it was a no brainer. One of my favorites from the book was the Mother and Child project which I decided to share with you today.

This was such a fast and easy project. I thought it would entail paper piecing or something a little more complicated, but it was simply just fabric, sew-able heat-n-bond (they recommended fusible web, but I had to make due with what I had), stitching on top of the applique, and then putting it all together.
"What Child is This?" Mini Quilt 2
Sadly I can't give this pattern to you since it's not my design, but you can do something similar to this by just sketching it out. Then add 1/8-1/4" (on your sketch with a dotted line) to the pieces that lay underneath the pieces on top (so you don't have any unwanted dead space, but you will be able to trace out your pattern next). Then you can go through and trace out each little pattern pieces onto printer paper. And wala you have your own pattern.

Since I don't want you to miss out if you want to do something like this and feel like you lack the artistic ability necessary, I came up with my own design using the instructions above. I am sharing the pattern with you and tomorrow you can come over to my blog and see the finished project and share yours if you decided to make one as well.
"What Child is This?" Mini Quilt Pattern and Placement Guide
What Child is This Placement Guide & Pattern Pieces (print to be 8.5" x 11" size)
You will need:
Pattern pieces
Scraps of 6 different colors (plan appropriately and make sure there's enough)
(1) blue background fabric 8" x 6 3/4"
(2) 3 3/4" x 6 3/4" for top and bottom border
(2) 3 3/4" X 13 1/2" for side borders
(2) 2 1/4" x width of fabric for binding (piece together to have one long strip)
(1) 12 1/2" x 13.5" piece of quilt batting
*When sewing use 1/4" seam allowance.
"What Child is This?" Mini Quilt Pattern Pieces
After printing or designing your pattern pieces place then fusible webbing or sew-able heat-n-bond above the pattern (paper side up) making sure you trace all the pattern pieces. After that it's just a matter of cutting out the adhesive pattern pieces and ironing them to your scraps of fabric, cutting them out of the scraps and removing the backing paper.
"What Child is This?" Mini Quilt — Fuse on the webbing
To put it together you can look at your original picture for a placement guide and place it on the blue background. Don't iron until you are absolutely ready. When I did it, I just did a little at a time (starting at the bottom and making my way up) because I wanted to be able to adjust if it shifted. Once it's all ironed you can stitch around the edge of the applique with a small zigzag stitch in a clear or neutral thread so that the design will stay.
"What Child is This?" Mini Quilt Top
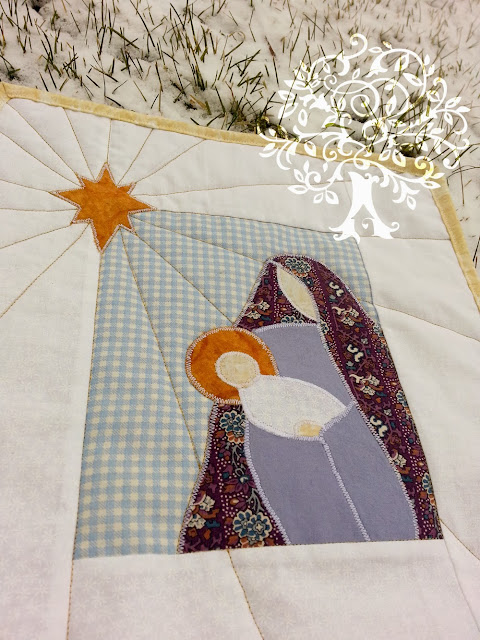
After that it's a matter of adding the border (top and bottom first then sides) and putting it all together like a mini quilt. There's a little extra length on the side pieces (1/4") that you can trim down and square off when you are done. All that will be left is to quilt (what design/method you choose) and bind. If you don't know how to do binding you could read this tutorial on binding.
"What Child is This?" Mini Quilt 3
Thanks so much for letting me share my love for the Lord this Christmas season.

With Love,
Al


~~~
Be sure to check out the other posts as we Sew a Song of Christmas!

14 August 2013

Quilting Pictures

Free-form Quilting Fish Wall Hanging


A while ago, Jill found this book about quilting pictures.  You're basically making a fabric collage, except it looks nicer than the paper collages you (or at least, I) made way back when.  Originally, Jill, my mom, and I were all going to work on it together.  Jill made this cool beta fish design, the three of us shopped for the fabric, we got started, and somehow it ended up being my project alone.  

Free-form Quilting Fish Wall Hanging, showing loads of skinny sections

My goodness, it took forever.  Part of the problem was that I had decided to do a design with loads of skinny sections.  Don't these look fun to cut out at each step? Time consuming, but worth it.  

My two biggest problems are ones that I'd have no matter what I was working on.  I like quilting, but I usually only sew when the once-a-month quilt group meets.  I also seem to have some curse that causes my sewing machine to have tension issues or otherwise hate me.  I might spend so much time fixing tension issues and taking out unstable seams that when it's time to go home from my quilt group, I'm just a few stitches past where I started.

Free-form Quilting Fish Wall Hanging Back

But now the fish done, and it looks pretty cool, if I do say so myself.  The back looks almost as good as the front.  It looks like a whole cloth quilt.  If you’re unfamiliar with that, it’s exactly what it sounds like.  You take your fabric, don’t cut it up, lay it on your batting and backing, and quilt a design on it.  Bind and done.  

Even though this was a lot of work, it was fun to make, and I love the end result.  It’s nice that it’s not as precise as most sewing is.  Wobbly stitching?  Do it a few more times, and people will think you meant to make it wobble.  Or ignore it, and no one will care, even if they look up close.  My mom and sister and I bought new fabric for this, but it would be a great way to use up scraps, maybe even funky patterns that you hope were in style when you bought them but now would make a fashionista faint with fright.  In short, it’s fun, forgiving, and you should give it a try.  You just might want to pick a simpler design than my beta fish.

Free-form Quilting Fish Wall Hanging Close Up. Aka, Angry fish is judging you.

Would you like a tutorial about how to quilt your own pictures? 


09 August 2013

Beach Robe from a Beach Towel Tutorial

Daddy's Girl's Beach Robe from a Beach Towel

Boo had a cute little terrycloth beach cover-up that we loved.  It was so convenient to just put the cover-up on her and not have to worry about carting around another towel.  My goodness, with two kids, there sure is a lot of pool stuff to cart around!  But Boo did what kids are so good at doing and she outgrew her cover-up.  So I decided to make her a new, robe-style terrycloth cover-up.  One beach towel was even enough fabric to make matching robes for both my girls!

Want to make one?  It's not as quick and easy as my sarong-style cover-up, but it's still a fairly quick and easy project.

You need:
a beach towel
bias tape (bought or homemade)
a dress to draw your pattern from
general sewing supplies

Use the dress to draft your pattern for the robe.

Use the dress to draft the front piece of your pattern like in the picture.  Curve the neckline down so it meets the side seam at the waist.  I chose to curve the lower edge, but you could have it go straight down or follow the line of the dress; whatever you'd like.

For sleeves, go out straight from the shoulder.  Connect the underarm with a curved line--this will make the robe lay nicer when it's sewn together.  Make the sleeve roomy.

Add 1/2" seam allowance just to the shoulder seam and side seam.  We'll be binding the other edges, so no seam allowance is needed.

You will need to cut out two front pieces.

Beach Robe Tutorial:  Pattern Pieces

For the back, trace the pattern you just made.  Raise the neckline, and cut the pattern down the center back.  You'll cut out one back piece on the fold.


So here are my pieces all cut out.


Go ahead and zig-zag over the shoulder and side seam edges.  Usually you'd do this after sewing, but my towel frayed pretty badly, and I thought it was easier to zig-zag first.  If you have a serger--lucky!


Sew the side seams.  You'll probably have to clip the seam to get it to lay nicely.


This next step is optional.  After sewing the side seams, I went back and sewed down the seam allowance.  I did this to make the seam stronger by making the highly fray-prone towel less likely to fray.  Not totally necessary, but I want these beach robes to last (and last and last).  It also helped the seams to lay nicely.

Sew and, if desired, reinforce the shoulder seams.

The robe is coming together!  Just a couple of finishing touches, and you'll be ready to take your munchkin to the pool.  :D

Beach Robe Tutorial:  Bound Edges

The rest of the edges get bound.  I learned to quilt before I learned to sew clothes, so I bind everything like I bind a quilt.  I wrote a whole tutorial about making and using bias tape (in the quilting method) so just click on over if you'd like a little help with that.  (Just remember, since you have curved edges, you really do need to cut the fabric on the bias.  I explain that in the tutorial, but I also say I usually don't bother actually cutting in on the bias, since quilt sides are usually straight.  So just remember.)
If you'd rather bind the edges the clothes-sewing way, here's a great tutorial (not by me) for that.

Beach Robe Tutorial:  The Tie

The last step is to make the tie.  Just cut out a rectangle from the towel however long and wide you want it.  You could curve the corners if you want, or leave them.  Then bind the edges like you did for the rest of the robe.

Jill Made It Clothing Tag

I added a little tag.  One day, I may have them professionally done, but in the mean time, I like my little hand-stamped and written tags.


Beach Robe Tutorial:  Finished Beach Robe

Thanks for reading!  If you like what you've seen, please pin and share!