Showing posts with label girl. Show all posts

08 April 2014

Simple Shirt for My Little Goofball

Boo has a t-shirt that I just really really like the fit of.  So I copied it.  It's a simple two piece pattern—just a front and back, with no separate sleeve pieces.  If you're new to using existing clothes as patterns, I suggest trying this kind of shirt.  Or if you've been copying for a long time, I still recommend a shirt like this.  Who doesn't like near-instant gratification?

Jill Made It | Simple Shirt for Kids

Boo likes for me to take pictures of her for exactly as long as she wants, and that time is never very long.


Jill Made It | Simple Shirt for Kids 2

Today, our picture-taking window was really short.  She's a good sport, though, and I was able to cajole her into letting me take a few more pictures.

Jill Made It | Simple Shirt for Kids 3

Because, as adorable as this face is, this picture doesn't really show off her new shirt very well.

Jill Made It | Simple Shirt for Kids 4

  And I'd like a smile please?

Jill Made It | Simple Shirt for Kids 5

There we go.  Good job, Boo.


Jill Made It | Simple Shirt for Kids  with Pocket

By the way, did you notice we cut Boo's hair?  First time ever, excepting trimming her bangs.  Her hair hung all the day down her back, if you remember.  (If you don't—her hair hung all the way down her back.)  She finally got tired of having us brush out so many tangles, so after church one day—haircut time!  We love her new look!

21 January 2014

Baby Announcement Poster (Illustrator Class Homework)

In the next few weeks, you'll be seeing a lot of my Illustrator projects.  Comments are welcome; what do you think?

Baby Announcement Poster (Illustrator Project)

For the first homework assignment in my Illustrator class, we were to make a typography poster.  I have a friend expecting baby #3, so I decided to make this for her.

09 December 2013

"Blue Christmas" Simple Holiday Skirts

Boo loves to match.  Not like her shirt matching her pants; she comes up with some pretty...inventive outfits.  No, she likes to match other people.  So she will be so excited when she and Daddy's Girl unwrap matching Blue Christmas Skirts on Christmas morning.

"Blue Christmas" Simple Holiday Skirts

These are really basic skirts, but the nice thing about "basic" is that you can easily add your own spin on it.

Holiday Skirts with Pleats, Ruffles

Both skirts are made from the same blue satin (surprisingly affordable, yet it adds a bit of "special" to the outfit).  Daddy's Girl got pleats on her skirt, Boo got ruffles.  I love variations on a theme.

Ruffles on Skirt

Oh, ruffles, why must you be so cute, yet so annoying to make?  I actually prefer making pleats than ruffles.  

Simple Holiday Skirt Pattern
(By the way, I certainly didn't invent this way of making a skirt; it's been around forever.)

I don't have step-by-step pictures, since I sewed these up at night so the girls wouldn't see their Christmas presents.  (Read:  There was really bad lighting for pictures.)  But the skirts are so easy.

Ready?

Cut the elastic to your child's waist measurement.  Don't add seam allowance—you need the elastic to stretch a little so the skirt stays up.

Cut your skirt fabric as shown in the picture above.  Or, if you want a fuller skirt, cut a longer rectangle.  Less full, closer to square.

Sew up the two short sides, finishing the seams as you prefer.  (I went over the raw edges with a zig-zag seam for the first, and made a french seam for the second.  Just because I didn't think about the french seam at first.)

Make your hem by folding the bottom edge over a half inch, then fold again another half inch.  And sew it down.  A decorative stitch with a contrasting thread could be a nice way to add some detailing.  You could also hand stitch for a less visible seam, or use the blind hem stitch on your sewing machine.  But that's another tutorial.

Now you'll make a casing.  Just iron the top edge down a quarter inch, then fold down again whatever size you need to fit your elastic.  Sew this down, too, being sure to leave a little space for inserting the elastic.

And insert the elastic.  Attach one safety pin to the leading edge so it's easier to thread it through, and another securing the other end to the fabric so it can't pull all the way through.  (Hate it when that happens.)  Once the elastic's through, overlap the two ends by a half inch and use a zig-zag stitch to secure them.

Topstitch the casing closed, and you're done!

(If any of this didn't make sense, send me an email or leave a question in the comments below.  If needed, I'd be happy to make a photo tutorial later.)

Skirts with Ruffles, Pleats

Now that you know how to make a basic skirt, you can change it up to make so many different looks!  Besides adding ruffles or pleats, you can make the skirt more or less full, longer or shorter, try color blocking, or a paper bag waistband...I think I'm going to try a scalloped hem next time.

Don't miss any posts as we Sew a Song of Christmas!

11 October 2013

Senior Pictures

When I first started taking pictures as a serious hobby, my goal, what I thought was the pinnacle of professionalism, was to have the pictures look like they were taken in a studio.  Like at the mall.  Or for school yearbook pictures.  (Bleh!)

My style has evolved a bit since then.

Now, I love the lifestyle photography look.  Natural light, naturally posed people, friends and family having fun--that's what I like!  

While we were on our family reunion trip, I had the opportunity to practice this style of photography in a way I've never done before:  senior pictures for my beautiful sister-in-law.  We had so much fun--I got a lot of pictures of her laughing!  My MIL and other SILs came along to help with the shoot and join the fun, and we had a great time together.  I love spending time with my family. 

Want to see the pictures we got?  I probably took about five million (give or take), and here are a few of my favorites.


 My SIL loves Mini Coopers, so we borrowed one from a friend for a few shots.

Senior Pictures in a Mini Cooper 1

See?  So happy to be in a Mini Cooper.

Senior Pictures in a Mini Cooper 2

I had fun editing this picture.  Any guesses what year she'll graduate?  :)

More Senior Pictures

I love her eyes in this picture.  Wow.

Next, we took more pictures at the cabin where we had our family reunion.

Senior Pictures Close-Up

I had my telephoto lens on my camera from taking pictures at Mr. MadeIt's graduation (I'm so proud of him!), and my portrait lens was in the room with my sleeping baby.  Telephoto lens it was, then.  I actually love the super-close-up shots I got.


Senior Pictures with HatSenior Pictures with Umbrella 1


Senior Pictures with Umbrella 2

It was starting to rain, so we needed to grab an umbrella from another SIL's car--I'm so glad it was a super-cute one!  I love when necessity makes for good design.  :)


The last place we went was The Gardens at BYU-I.  Beautiful place.  I wish I could take pictures there every day...


Golden Hour Senior Pictures 1

We tried to get here at the "golden hour" (There are two each day:  the hour right after sunrise, the hour right before sunset.) which is hard then that's about bedtime for munchkins.  We managed to catch some of it, though.  Isn't the lighting on her hair beautiful?


Golden Hour Senior Pictures 2


Golden Hour Senior Pictures 3

Golden Hour Senior Pictures 4

Thanks for asking me to take your senior pictures, Sis.  I hope you like them!

30 September 2013

PR&P Week #4: Simple and Special

It's the last week of this season's Project Run & Play.  Boo has certainly loved week one's Belle Dress and week two's Easy Starburst Dress.  I was teaching Boo's preschool during week three, so even though I already had a project done (I didn't make it for PR&P, but it fit the theme), I couldn't manage to get it posted!  Life was crazy that week.  I'm hoping to post that project later.

This week's theme is Your Signature Look.  At first I thought, "I don't have a signature look.  I just do whatever I feel like at the time."  

But I don't sew shirts.  

I don't sew pants.

I rarely sew skirts.

I mostly sew dresses.

It's not like I'm necessarily opposed to sewing shirts or pants, they're just never what I feel like doing.  Because they're less special.  If I'm going to take the time to make clothes, they're going to be something a little fancy, and a little special.  Which works, because Boo loves fancy.  She wears dresses/skirts almost every single day.  I like dresses better than skirts because a dress is a complete outfit.  Simple and done.

I also like the designs to be fairly simple.  This may change as I sew clothes more, but for children's clothes, at least, I don't really want to be fussing with little details.  Cute, but simply executed details, simple to put on/take off (especially for wiggly babies!)--that's what I like to make for my girls.

So here is my Signature Look:

Simple and Special
Easter Dresses

Jill Made It | Easter Dresses for My Two Little Girls

I never did get around to posting my little girl's Easter dresses, and since they fit exactly into this week's theme, I thought today was a great day to show them off.

Jill Made It | Easter Dress for My Baby

Daddy's Girl's dress was another variation of a pattern I've used several times before.  I change the pattern every time!  Here are the first two dresses I made from this pattern.  This time, I made the dress fully lined, instead of using bias tape (blue dress) or facings (orange dress).  I lowered the neckline and thinned the straps, like I did for the orange dress.  I used a hook-and-eye closure instead of the zipper, which was a new alteration.  

I also added a contrast band around the bottom.  That was a really fast and easy alteration, and it made so I didn't even have to hem the dress!  I'll have to do a quick tutorial another day, so you can see how that worked.

Jill Made It | Baby Portrait

Aww, isn't she so pretty?  I love yellow on her.

Jill Made It | Beautiful Little Girl's Dress

Boo's dress is the same style, with a sash that ties in the back, hook-and-eye closure, and contrast band. This dress, I actually spent a lot of time on, and did a lot of work by hand.  (For Daddy's Girl's dress, which I did second and whipped out in one late night of sewing, I figured out how to do it without the handwork.  Good thing, too, because it was the night before Easter!)  

Jill Made It | Easter Dress

Easter morning, I gave Boo her new dress I'd spent so much time on...and she wanted to wear a different dress to church!  (Cry!)  But when I showed her she would be matching her baby sister, she became excited about this dress.  I'm doubly glad I got Daddy's Girl's dress done in time.

Jill Made It | Easter Portraits

After church, we went to the park to take family Easter pictures.  Boo actually didn't like being up in the tree, even though her Aunt Kelli was right there, making sure she stayed safe.  (I actually photoshopped her out of this picture--she was really right by Boo.)  But Boo was a good sport anyway, and let me get a few good pictures of her in the tree.

Jill Made It | Easter Dress

So here's the back of the dress.  The contrast band was actually a necessity, not just a design choice.  I'd bought the two fabrics for this dress one or two years before, intending to make Boo a dress for Christmas, but then the holidays rolled by without the dress being made.  This year, I realized I had to get the dress made NOW or Boo would be too big for the amount of fabric I'd bought.  I had to add the contrast band to the bottom of the skirt to make it long enough, even now.

Jill Made It | Baby Portrait

So that's it; that's my signature look.  Simple to sew, simple to wear, but also special.


And they make my little girls happy.  That's really what matters.

31 August 2013

Fast, Easy, and Elegant Ombre Earrings Tutorial {Plus How to Make Hammered Headpins}

Fast, Easy, and Elegant Ombre Earrings Tutorial

I hope you've had fun with our Summer Swimming series; we have!  From making and using sea glass, to sewing cute and practical cover-ups for yourself and your little ones, to visiting family, we've had a lot of wet and wonderful fun this month.

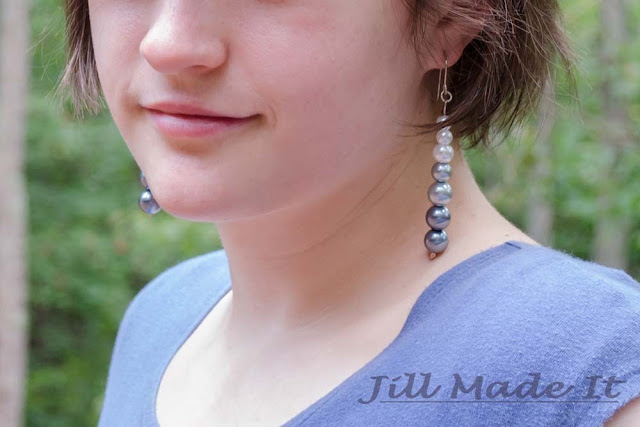
For the last installment for our Summer Swimming, I made these quick and easy ombre earrings.  I like how the beads transition from white to dark blue, like the waves of the sea.  But at the same time, it's not so water-themed that you feel you can only wear them at the beach.  And I like long, dangly earrings.  Not that I feel safe wearing them quite yet--Daddy's girl is still likely to pull on them when I least expect it.  

These earrings are really easy to make, but if you're an absolute beginner, check out my Holiday Earrings Tutorial.  It goes over some basics I'll skip over here.

Ready for the tutorial?

Fast, Easy, and Elegant Ombre Earrings Tutorial--Supplies Needed

You Need:
Two pairs of pliers (one being round nosed)
Jewelry hammer and anvil (optional)
Two ear wires
Two jump rings
Four small white beads
Two medium white beads
Two medium light blue beads
Two large light blue beads
Four large dark blue beads
a length of 20 gauge wire a half inch longer than your finished length (or two headpins)

Note:  This anvil has a bit of metal on it to protect it from scratches, so the scratches won't be transferred to another project .  They don't come like that.

How to Make a Hammered Headpin

How to Make a Hammered Headpin:

This is so easy.  Just take your length of wire and hammer the end of it until it flattens wide enough that your beads won't fall off the end.  Easy and done.

{If you don't have a jewelry hammer and anvil, you can still make your own headpins.  Just use the method I did to make my Holiday Earrings.}

Fast, Easy, and Elegant Ombre Earrings Tutorial--Thread the Beads

Then just thread your beads on your brand-new headpin...

Fast, Easy, and Elegant Ombre Earrings Tutorial--Make a Loop

...make a loop at the top, cutting off any extra wire, and attach the jump ring and ear wire.  And you're done!

Fast, Easy, and Elegant Ombre Earrings Tutorial--Finished!

If you missed any of our Summer Swimming fun, just click on the images below to check them out.  I'm hoping to make this series a yearly event, only next year it will be Summer Swimming and Sun.  :D  What kinds of things would you like to see in next year's series?

07 August 2013

Super Easy Sarong Style Beach Cover-Up Tutorial

A couple of years ago, I made myself an easy swimsuit cover-up out of a beach towel, but I couldn't find it this summer!  I'm sure it will show up once the weather starts getting cold again...Isn't that the way it always goes?  Ah, well.  I guess I have an excuse to make myself a new cover-up!


(Yes, this was before my haircut.  My hair didn't grow out already!)

The cover-up I made last time was easy, but this one was super easy.  Beginning sewers need not fear!  


And then, when I was writing up this post, I came up with an even easier method!  The way I made this cover-up didn't take very long, but this new way would take almost no time at all!

Ready?  It might take you longer to read this tutorial than it will to make the cover-up.  And all you need is two yards of a pretty knit fabric and some coordinating heavyweight ribbon, such as grosgrain, in whatever width you prefer.

Step 1:
Decide how long you want your cover-up to be.  Cut your fabric so it is two yards x that length.  Knit doesn't fray, so you don't have to hem it or anything!  (I used quilter's cotton, so I did hem mine.  So it still didn't take long, but I'm excited about this no-hem option!)  Depending on how long you want your cover-up, you may even be able to get two cover-ups from one length of fabric.  Or a maxi-length skirt would be...ooo, that would look really nice.  I think I'll do that next time.  :)

Step 2:
Wrap the ribbon around your waist and tie it.  Now that you know how much ribbon you need, cut it to size.  Go ahead and finish the ends however you want to.  (Some ideas:  cut at a diagonal to minimize fraying, use a lighter to melt the edges of synthetic ribbon, or coat the edges with clear nail polish.)


Center the tie on the top edge of the sarong, and stitch it on like in the picture, leaving enough of the tie free on both sides so that you can, you know, tie it on.  (I made a tie out of more quilter's cotton.  Ribbon will be much cuter.)


Now you're done!  Head over to the pool, and enjoy taking random artsy photos of the brickwork.  (What?  That's just me?  Oh...)


Ah, there we go.  Enjoy your finished sarong.  That makes more sense.  Sillyness aside, I really like how the fabric cascades down where the cover-up ties closed.  And wouldn't it look even better in a beautiful knit?  Totally doing it that way next time.


But I do love the random artsy shots.


So, what are you doing this summer?  Beach?  Swimming pool?  Family vacation?  It's been ridiculously rainy here, but hopefully we'll be able to go to the lake sometime soon.