Showing posts with label Summer Swimming. Show all posts

31 August 2013

Fast, Easy, and Elegant Ombre Earrings Tutorial {Plus How to Make Hammered Headpins}

Fast, Easy, and Elegant Ombre Earrings Tutorial

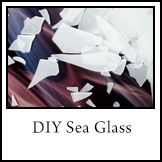
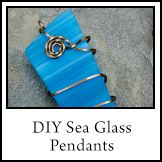
I hope you've had fun with our Summer Swimming series; we have!  From making and using sea glass, to sewing cute and practical cover-ups for yourself and your little ones, to visiting family, we've had a lot of wet and wonderful fun this month.

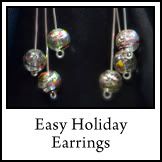
For the last installment for our Summer Swimming, I made these quick and easy ombre earrings.  I like how the beads transition from white to dark blue, like the waves of the sea.  But at the same time, it's not so water-themed that you feel you can only wear them at the beach.  And I like long, dangly earrings.  Not that I feel safe wearing them quite yet--Daddy's girl is still likely to pull on them when I least expect it.  

These earrings are really easy to make, but if you're an absolute beginner, check out my Holiday Earrings Tutorial.  It goes over some basics I'll skip over here.

Ready for the tutorial?

Fast, Easy, and Elegant Ombre Earrings Tutorial--Supplies Needed

You Need:
Two pairs of pliers (one being round nosed)
Jewelry hammer and anvil (optional)
Two ear wires
Two jump rings
Four small white beads
Two medium white beads
Two medium light blue beads
Two large light blue beads
Four large dark blue beads
a length of 20 gauge wire a half inch longer than your finished length (or two headpins)

Note:  This anvil has a bit of metal on it to protect it from scratches, so the scratches won't be transferred to another project .  They don't come like that.

How to Make a Hammered Headpin

How to Make a Hammered Headpin:

This is so easy.  Just take your length of wire and hammer the end of it until it flattens wide enough that your beads won't fall off the end.  Easy and done.

{If you don't have a jewelry hammer and anvil, you can still make your own headpins.  Just use the method I did to make my Holiday Earrings.}

Fast, Easy, and Elegant Ombre Earrings Tutorial--Thread the Beads

Then just thread your beads on your brand-new headpin...

Fast, Easy, and Elegant Ombre Earrings Tutorial--Make a Loop

...make a loop at the top, cutting off any extra wire, and attach the jump ring and ear wire.  And you're done!

Fast, Easy, and Elegant Ombre Earrings Tutorial--Finished!

If you missed any of our Summer Swimming fun, just click on the images below to check them out.  I'm hoping to make this series a yearly event, only next year it will be Summer Swimming and Sun.  :D  What kinds of things would you like to see in next year's series?

14 August 2013

Quilting Pictures

Free-form Quilting Fish Wall Hanging


A while ago, Jill found this book about quilting pictures.  You're basically making a fabric collage, except it looks nicer than the paper collages you (or at least, I) made way back when.  Originally, Jill, my mom, and I were all going to work on it together.  Jill made this cool beta fish design, the three of us shopped for the fabric, we got started, and somehow it ended up being my project alone.  

Free-form Quilting Fish Wall Hanging, showing loads of skinny sections

My goodness, it took forever.  Part of the problem was that I had decided to do a design with loads of skinny sections.  Don't these look fun to cut out at each step? Time consuming, but worth it.  

My two biggest problems are ones that I'd have no matter what I was working on.  I like quilting, but I usually only sew when the once-a-month quilt group meets.  I also seem to have some curse that causes my sewing machine to have tension issues or otherwise hate me.  I might spend so much time fixing tension issues and taking out unstable seams that when it's time to go home from my quilt group, I'm just a few stitches past where I started.

Free-form Quilting Fish Wall Hanging Back

But now the fish done, and it looks pretty cool, if I do say so myself.  The back looks almost as good as the front.  It looks like a whole cloth quilt.  If you’re unfamiliar with that, it’s exactly what it sounds like.  You take your fabric, don’t cut it up, lay it on your batting and backing, and quilt a design on it.  Bind and done.  

Even though this was a lot of work, it was fun to make, and I love the end result.  It’s nice that it’s not as precise as most sewing is.  Wobbly stitching?  Do it a few more times, and people will think you meant to make it wobble.  Or ignore it, and no one will care, even if they look up close.  My mom and sister and I bought new fabric for this, but it would be a great way to use up scraps, maybe even funky patterns that you hope were in style when you bought them but now would make a fashionista faint with fright.  In short, it’s fun, forgiving, and you should give it a try.  You just might want to pick a simpler design than my beta fish.

Free-form Quilting Fish Wall Hanging Close Up. Aka, Angry fish is judging you.

Would you like a tutorial about how to quilt your own pictures?