Showing posts with label jewelry. Show all posts

01 April 2014

All Things Pretty Necklace Review

Who likes jewelry?  Pfft, who  doesn't like jewelry?  I just found about a new place for getting some beautiful eye candy.

Kitsy Lane Necklace Review 1

Like this lovely necklace here.  This is the Annalise Necklace from All Things Pretty.  I love the dramatic length of it, and the gold and pink look so nice against my dark blue shirt.

Kitsy Lane Necklace Review 2

And I just thought this post could use another picture.  Hi, me!  Now that that little bit of dorky-ness is out of the way, you might want to click over to their Pinterest board to see what other bits of sparkle All Things Pretty has to offer.  

Their stuff is seriously pretty.  They have everything from bold and dramatic to simple and sweet, modern to classic, super sparkly to understated.  

Disclaimer:  I was given this necklace for free in order to write a review.  All my own opinions, etc, etc.

31 August 2013

Fast, Easy, and Elegant Ombre Earrings Tutorial {Plus How to Make Hammered Headpins}

Fast, Easy, and Elegant Ombre Earrings Tutorial

I hope you've had fun with our Summer Swimming series; we have!  From making and using sea glass, to sewing cute and practical cover-ups for yourself and your little ones, to visiting family, we've had a lot of wet and wonderful fun this month.

For the last installment for our Summer Swimming, I made these quick and easy ombre earrings.  I like how the beads transition from white to dark blue, like the waves of the sea.  But at the same time, it's not so water-themed that you feel you can only wear them at the beach.  And I like long, dangly earrings.  Not that I feel safe wearing them quite yet--Daddy's girl is still likely to pull on them when I least expect it.  

These earrings are really easy to make, but if you're an absolute beginner, check out my Holiday Earrings Tutorial.  It goes over some basics I'll skip over here.

Ready for the tutorial?

Fast, Easy, and Elegant Ombre Earrings Tutorial--Supplies Needed

You Need:
Two pairs of pliers (one being round nosed)
Jewelry hammer and anvil (optional)
Two ear wires
Two jump rings
Four small white beads
Two medium white beads
Two medium light blue beads
Two large light blue beads
Four large dark blue beads
a length of 20 gauge wire a half inch longer than your finished length (or two headpins)

Note:  This anvil has a bit of metal on it to protect it from scratches, so the scratches won't be transferred to another project .  They don't come like that.

How to Make a Hammered Headpin

How to Make a Hammered Headpin:

This is so easy.  Just take your length of wire and hammer the end of it until it flattens wide enough that your beads won't fall off the end.  Easy and done.

{If you don't have a jewelry hammer and anvil, you can still make your own headpins.  Just use the method I did to make my Holiday Earrings.}

Fast, Easy, and Elegant Ombre Earrings Tutorial--Thread the Beads

Then just thread your beads on your brand-new headpin...

Fast, Easy, and Elegant Ombre Earrings Tutorial--Make a Loop

...make a loop at the top, cutting off any extra wire, and attach the jump ring and ear wire.  And you're done!

Fast, Easy, and Elegant Ombre Earrings Tutorial--Finished!

If you missed any of our Summer Swimming fun, just click on the images below to check them out.  I'm hoping to make this series a yearly event, only next year it will be Summer Swimming and Sun.  :D  What kinds of things would you like to see in next year's series?

02 August 2013

Pendant Power: Sea Glass Pendant Tutorial


Last time, I showed you how to make sea glass.  As promised, I’ll now show you something you can do with all your lovely glass. 


Ta da!  Pendants!  I’m sure you’re so surprised, considering the title of the post.

It’s always nice to have a quick, done-in-one-sitting project, isn’t it?  Wrapping glass to make pendants is so easy, you don’t really need a tutorial, but I’ll give you some tips.

1) The most important thing: remember you’re working with glass.  There’s nothing more frustrating than being almost done with a project, then breaking it. 


2) Make sure you wrap the piece so it’s secure from all angles.  If the glass can fall out if the pendant’s tipped upside down, it will tip upside down at the most inconvenient time.  The picture above shows three different ways to wrap: 1-near the edges, rather than going across the glass, 2-wrapping with fairly even loops and ending with a spiral, with another wire wrapping across the top and side so it won't fall out, and 3-having the wire radiate from (mostly) one point.   

3) Spirals are good for making the end of your wire decorative (as you can see from the middle pendant).


4) If you use found, rather than purchased glass, you’ll probably end up with more clear than colored glass.  Unfortunately, since you can see through the resulting sea glass, it can hide more than you’d want a pendant to.  Solution: before you wrap the glass, paint the back of it.  I used fingernail polish.  You probably have some handy, and it comes in every color you can think of.  I haven’t tried glitter ones yet, but I expect they’d be great. If you want to keep the glass colorless, but don't want it to hide, try using white fingernail polish. I think this blue one turned out nicely, don't you?


5) For a different look, you can hammer some wire flat, and wrap it around the edge of the pendant, like I did with this one.  

Unless you use some kind of adhesive, you’ll still need to wrap on the front and back, but doesn’t that look spiffy?  Too bad I forgot rule #1 and broke the glass.  See the crack on the top right side?  (Cry!) 


6) Try different kinds of wire.  I used square wire for one pendant.  See how the wire of the spiral is twisted?  The easiest way to get a nice twist would probably be to clamp one end of the wire in a vice and twist the other end with pliers.  I don’t have a vice, so I made do with a pair of pliers at each end.  You can hold one end stationary and twist the other end, or you can twist a small section at a time.  If you use the second method, you may want to use nylon-jawed pliers so you don’t mark up the wire.  Keep an eye on the twist to make sure it’s doing what you want it to.

And voila!  String your pendants on a chain or cord, and you have a brand new necklace.  I went pretty simple with these, but you don’t have to.  Add beads.  Make the wire the focus and the glass the accent.  Combine multiple pieces into one pendant.  Try anything!  That crazy idea might become your favorite necklace.


If you don't want to wrap the pendants, you can also drill a hole in the glass and hang it.  But that's a post for another day!

What pendants have you made?  What would you like to see us do with sea glass?

If you like our Summer Swimming series, share it with your friends!  We'll see you back here on Wednesday for our next fun project!

08 February 2012

The Easiest Bracelet You'll Ever Make {Tutorial}


This really is the easiest bracelet you could ever make.  If you've never made jewelry before, or if you just want an instant-gratification kind of project, this is the one for you.  With elastic thread and no clasp, this bracelet is the easiest to wear, too.

I have lots of pictures, but don't worry that that means this is complicated (Easiest Bracelet Ever, remember?).  I just like having pictures for every step; really, you could just look at the pictures and understand the project without even reading my instructions.

Ready?


You need:
Beads (not pictured, but I bet you figured that out already)--Larger beads work best for this bracelet.
Crimp beads--They come in different finishes (I have silver and gold), so pick what will match your beads best.
Stretchy beading thread--I used .7mm diameter thread, but this depends on how big the holes in your beads are.  I figure thicker thread = stronger bracelet, so I use the thickest I can for my beads.
Crimping tool--You probably could use regular pliers if you need to, but crimpers are a better choice.
Something to cut beading thread--I used wire cutters since I keep those with my jewelry making supplies, but scissors would work better.


First, plan out how the pattern you want for your bracelet.  For this bracelet, I chose a symmetrical pattern, but a random pattern works nicely, too.  (That's what I did for the finished bracelet shown above.)


Then string your beads on the elastic thread.  Don't cut your thread until you have all your beads strung on, and you're sure the bracelet is the right size.  Trust me, it's a royal pain to keep having your beads falling off the opposite end of the thread.  Yep, I have experience with that one.


After you cut the thread, you'll string both ends of the thread through a crimp bead in opposite directions.


Next, you will crush the crimp bead with the crimpers, then fold it in half over itself.


The crimp bead gives a nice, barely noticeable, and professional finish to the bracelet.  Thread the elastic thread through the neighboring beads, if the holes are big enough.  Trim the thread.


And the bracelet is done! 

Depending on the beads you use, this bracelet would work for any occasion, and for any age group.  Pink plastic beads for a little girl for Valentine's Day, silver and gold glass beads for your sister for Christmas--this makes a really versatile, and super simple gift.

Happy crafting!

06 February 2012

Every Girl Likes Jewelry--How About a Trio of Bracelet Tutorials?

Another of the projects my mom motivated me to do during my month of crafting blahs was jewelry making.  My mom wanted another item to go in her Valentine's goody bags, and I suggested bracelets.  I got tired of making the same bracelet over and over again, so I came up with some variations.


Double-Stranded Sea Foam  (Feel free to mock the name--or suggest a better one.)


The World's Easiest Bracelet


And Looper-Tastic.  (That's what I get for asking my husband for name suggestions.)

I will be writing up tutorials for these soon--I hope you like them!

28 December 2011

Making Jewelry Thanks to My Christmas Presents (Thanks!)

I think my family knows me well--for Christmas, I got clothing patterns, crafting patterns, jewelry making supplies, a jewelry making book, a Jo-Anne's gift card, a coupon for enough babysitting for me to do a painting...  Thanks, everyone!  I am so excited about all of my presents.

I've already started making use of some of these lovely presents--Christmas Day wasn't even over before I'd made this...


And started this...


The designs came from this book.  (Thanks to my mother-in-law for the present!)

No tutorial today, since they're not my designs, but you can be sure there will be some to come, once I put my own spin on what I'm learning!


Happy crafting!

09 November 2011

Red Envelope Inspired Beaded Bracelet Tutorial (Plus Matching Necklace and Earrings!)

Okay, so I didn't restrain myself from starting my project until Craft Night.  But I realized that I wouldn't be able to finish this all in one night, and I wanted to share it with you today!

The other day, I found this bracelet (from redenvelope.com) on Pinterest:


Isn't is so pretty?  But what wasn't pretty was the price tag--$79.95.

So I made my own (in a different color scheme--I loved the rich creams and golds).  And mine only cost $10.01.  (Plus the headpins, which I already had.)


(Like the heart-shaped clasp?  I think it adds a little cuteness while still being subtle.  And it references the heart in the inspiration bracelet.)

Granted, theirs in made of semi-precious stones, silver beads, and freshwater pearls, whereas mine is made of glass beads.  But I love mine.  It's a lot more bracelet than I usually wear, but this time of year just makes me want to sparkle and shine a little.  (And the Christmas lights aren't even up yet!  I think I'm in trouble!)

I actually got too far ahead on my bracelet before Craft Night; I finished it long before my sister was ready to leave (or me, either, for that matter).  What to do...

I know, I'll make a matching necklace.

So I did.


I took more of the chain I'd used to make the bracelet, added another heart-shaped clasp onto one end, and beaded up the other.

Well, that necklace didn't take nearly as long as the bracelet had, and I got it done, too, before the night was over.  

Hmm...I don't have any pearl earrings, yet.

So I made a pair of those, too.

(Okay, the earrings look kinda' funny hanging on the necklace chain...Oh, well.)

The earrings were done in the same method as these earrings, but with much shorter wires.  I used a small, medium, and large bead for each earring, and had the wires for the small and large beads the same length, with the other just a little longer.

And then it was time to go home.  But now I've got a complete set of matching pearl jewelry!

Okay, so now for the Pearl Bracelet tutorial.  Ready?  It's time consuming, but really easy.

You need:
A plain chain bracelet  {OR a length of metal chain (from the jewelry section, still) and a clasp.  This is far and away the cheaper way to do it.  I got enough chain for my bracelet and necklace with lots still left over for $3.  One chain bracelet was going to cost me $7 or so.}
lots of headpins {OR you could make your own, like I did for my Holiday Earrings, but you'd need so many for this project that I think it's more worthwhile to just buy them.  I don't remember how much they cost, but it wasn't too much.}
a lot of beads of your choice  
Round-nosed pliers
Wire cutters
Second pair of pliers {optional, but very helpful}


Plan out where you want your beads.  I started with a pattern at first, but by the end, I was just filling in beads wherever they were needed.  So this picture shows where I put my first round of beads--the pearls.

Thread a bead on to your first headpin.  Use your round-nosed pliers to make a loop in the headpin above the bead (as above), then thread the wire on to your chosen link of the bracelet.


Next, wrap the wire around itself just above the bead.  Cut off the extra.  Bend the loop so it comes out straight from the bead.

{You could also attach the beads like in my Holiday Earrings tutorial, it you like that better.  I like that the loop can't accidentally be pulled open with this method.)

Continue until your bracelet is as full as you want it.  

Wasn't that easy?  A few supplies, a simple technique, and a few hours and you can have an $80 bracelet for $12 (to include the headpins in the total).  

Happy crafting!

P.S.  Tomorrow is a special day for my blog.  Check back to see why...  :)


02 November 2011

Holiday Earrings Tutorial

Whew!  I liked doing my Grand Month of Halloween, with all those fun projects and extra posts, but I'm glad to get back to my regular two posts a week.  Four posts each week is hard!  (I didn't even always manage that.)  Hats off to you bloggers who always do that (and more).

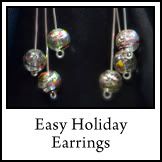
Let's start off November with these fun earrings I made the other day!  I realized that Boo is long past the pulling-on-everything stage, so it is safe to wear earrings again.  I really love dangly earrings, but I didn't have any yet, so I made up this pair while watching TV with my hubby one evening.


They will be great to wear all the time, but they make me think of fancy Christmas parties.  I'm just imagining theses earrings with a pretty, red, fancy dress...

And they are really easy to make.  Just gather your materials, put on your favorite TV show, and you'll have new earrings before the credits roll.


(The above picture shows the materials for each earring--you'll need twice this so you can make a pair.  But not twice the pliers; that would be silly.)

You Need:
a pair of ear wires
some 20 gauge jewelry wire
2 large jump rings
6 largish glass beads
round-nosed pliers
wire cutters
needle-nosed pliers (or a second pair of any kind of pliers)  These aren't absolutely necessary, but it does make working with such small things easier to have pliers for each hand.

(Note to self:  Use a pen instead of a pencil the next time I need to take pictures of writing.)

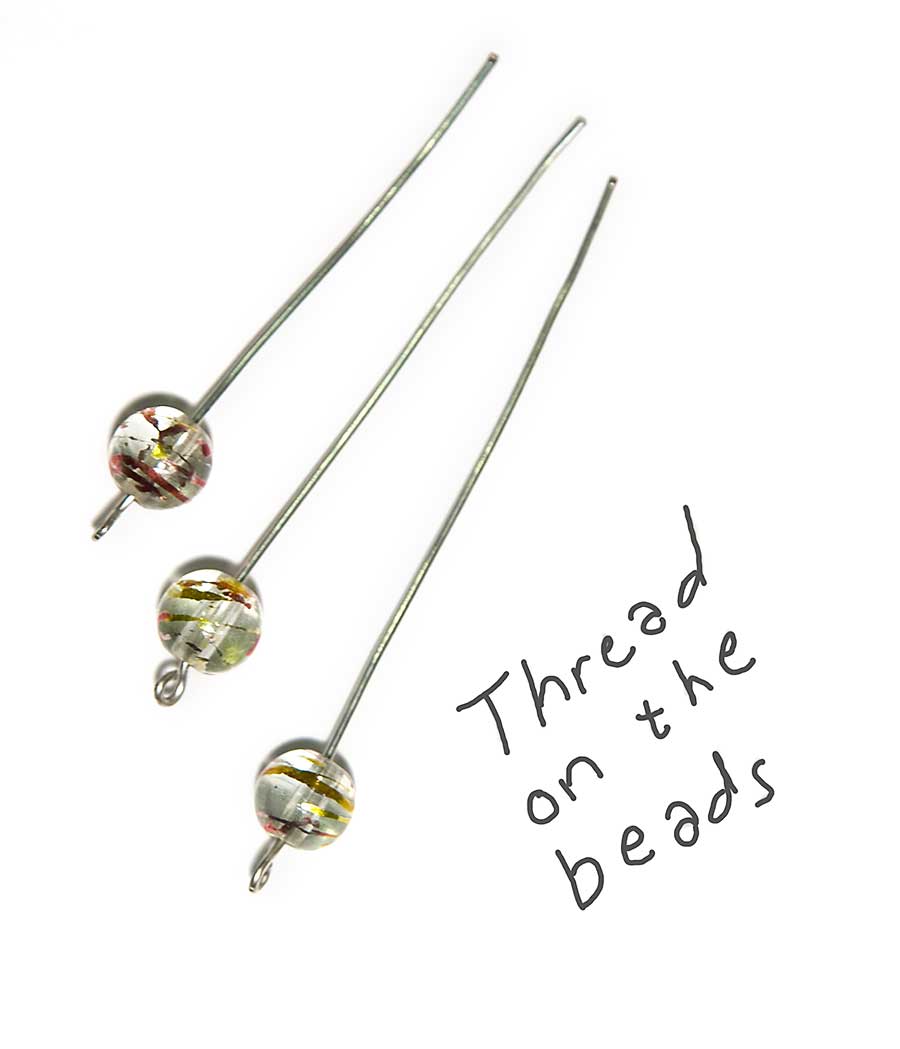
First, cut your wire.  Determine how long you want the finished earrings to be, then add a little for making loops at the top and bottom.  This is Wire 1.

Wire 2 will be one bead-length shorter than Wire 1.

Wire 3 will be one bead-length shorter than Wire 2.


Next, make a tiny loop at the bottom of each wire.  (This is just to keep the bead on.)  Bend the wire so the loop comes out straight from the wire.


Thread the beads onto the wires.

Make larger loops on the tops of each wire.  (I forgot to take a picture of this, but you know what I mean, anyways.)


If the loops are not lined up the way you want them to be, just twist them into place.


Connect the ear wire and beaded wires with the jump ring.

Repeat for the second earring, and you're done!  

See how easy that was?  I was so excited these earrings turned out so well and so easily, that I made several more pairs of earrings over the next few days.


First these pretty little things.


And then these fun little feet earrings.  I was actually trying (unsuccessfully) to do something else, when I realized it was starting to look like a foot.


And, of course, the earrings for my vampire costume!  But I love that they will work for non-Halloween occasions, too.

What kind of earrings do you like best?  Dangly, stud, or hoop?