

My daughter is one year old, and she has a cousin who is two, and another cousin due in February. And they're all girls! So for Christmas presents this year, I wanted to make all the cousins matching stuffed animals. The pattern I wanted to use was going to on sale the day after I went to the store (of course) for $1 instead of $15 or so. That's fine; I'd just buy it online (the store it too far away to go back just for that). But what do you know, but you can't buy patterns from their website. (???) So I decided to see what Google could do for me by way of free patterns. Sadly, the answer was not much. Anyway, I decided to design the pattern myself. I just love to design things, to figure out how to make it work, and make it exactly the way I want to.
And to help everyone else out there who wishes they didn't have to pay $15 for a pattern, I'm sharing it with all of you.


The patterns include 1/4" seam allowances. (But in hindsight, I think the skinnier sections--the back part of the underbelly, namely--should be wider.)
Remember to sew everything right sides together so the seams are on the inside.
What You'll Need:
Some fabric. I used fleece, but I imagine most kinds of fabric would work. I got three elephants out of a yard.
The normal sewing supplies
Lay the pattern out on your fabric and cut.
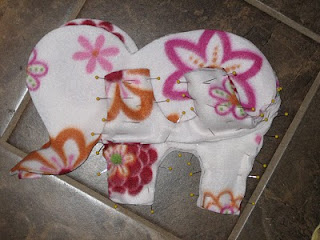
 Here are the pieces all cut out.

Sew the two underbelly pieces together, leaving a hole in the middle for turning the elephant right-side-out and stuffing. Reinforce where you stop and start by sewing back and forth over the same few stitches. The lines on the pattern are sewing lines—if you take in a small seam there, the legs will point more downward. Without it, they point out a lot.

 Sew the underbelly to the body. Remember, right sides together. (You’ll sew the two body pieces to each other later.)

Now sew the backs/fronts of the ears together, and turn them right-side-out.


Sew on the ears, eyes, and tail. I hand-embroidered the eyes, but you could sew on buttons, or applique eyes, or whatever. (Just be careful that any choking hazards are very securely attached, if you’re making them for small children.) I also sewed the ears on by hand, so you wouldn't see a seam and so the ears could flop more freely, but you could attach them with by machine, either. The tail is three pieces of ribbon knotted together and sewn onto the appropriate place.

Now pin the ears out of the way, pin the two body pieces together, and sew. If you want the bottoms of the feet to be flat, sew down the legs but not across the feet. If you want them to be pointy, go ahead and sew all the way around.
 Here’s what it looks like so far.
Unfortunately, none of my pictures for sewing flat bottoms onto the feet turned out, and I don’t really know how to describe it. Sorry, but you’re on your own for that.
 Now she's all done except for stuffing!
What I would do differently next time:
Make the legs and trunk fatter. I just think it’d be cuter that way.
Make the skinny-part that I mentioned at the beginning wider.
Well, I hope you like the elephants and have lots of fun making your own!
Oh, yeah. Thanks to HomemadebyJill.blogspot.com, who posted an elephant she made, and a link to the free pattern she based it on. Free Pattern: http://weewonderfuls.typepad.com/wee_wonderfuls/downloads/Pointy-Kitty-Pattern.pdf This was a lot of help in figuring out how to create my elephant pattern.
Please don't sell toys made from this pattern, but feel free to make them for gifts. I want to see pictures of what you make!
Lay the pattern out on your fabric and cut.
 Here are the pieces all cut out.
Sew the two underbelly pieces together, leaving a hole in the middle for turning the elephant right-side-out and stuffing. Reinforce where you stop and start by sewing back and forth over the same few stitches. The lines on the pattern are sewing lines—if you take in a small seam there, the legs will point more downward. Without it, they point out a lot.


Now sew the backs/fronts of the ears together, and turn them right-side-out.


Now pin the ears out of the way, pin the two body pieces together, and sew. If you want the bottoms of the feet to be flat, sew down the legs but not across the feet. If you want them to be pointy, go ahead and sew all the way around.
 Here’s what it looks like so far.
Unfortunately, none of my pictures for sewing flat bottoms onto the feet turned out, and I don’t really know how to describe it. Sorry, but you’re on your own for that.
 Now she's all done except for stuffing!
What I would do differently next time:
Make the legs and trunk fatter. I just think it’d be cuter that way.
Make the skinny-part that I mentioned at the beginning wider.
Well, I hope you like the elephants and have lots of fun making your own!
Oh, yeah. Thanks to HomemadebyJill.blogspot.com, who posted an elephant she made, and a link to the free pattern she based it on. Free Pattern: http://weewonderfuls.typepad.com/wee_wonderfuls/downloads/Pointy-Kitty-Pattern.pdf This was a lot of help in figuring out how to create my elephant pattern.
Please don't sell toys made from this pattern, but feel free to make them for gifts. I want to see pictures of what you make!
Here's the exact url to HomemadebyJill's post. I finally found it again.
ReplyDeletehttp://homemadebyjill.blogspot.com/2008/07/toy-society-donation.html
Super cute Jill!
ReplyDeleteI think I'm gonna try it!
So stinkin' cute! I think I may have to make these sometime. Come link up at I Made It! Monday at Ninth Street Notions.
ReplyDeleteWhat a sweet lovey!
ReplyDeleteI'm glad you like it! If you make elephants of your own, I'd love to see them! Just send me an e-mail or a link to your blogs.
ReplyDeleteGreat! You are so nice to share your talent!
ReplyDeleteI'm going to feature this project tomorrow on I Made It! Monday at Ninth Street Notions. I'll also post a link on my Facebook page. Thanks so much for sharing! I can't wait to see what you have this week.
ReplyDeleteIt's the same as on your blog, how did you do that! So cute!
ReplyDeleteEmily--
ReplyDeleteThis project was actually the inspiration for my blog's header--and most of the blog's design, actually! I pulled a picture of the finished elephant into Photoshop and just went from there. I'm glad you like it!
Made an elephant today using this pattern - with a few little tweeks. Hope you like her - I will email you some pics - she is for my mum in law for christmas - she collects elephants. Thanks so much for sharing this pattern.
ReplyDeleteLise Bu--
ReplyDeleteYay! I look forward to seeing those pictures!
just discovered your blog while on the hunt for an elephant pattern for my new grandson. This is really nice. I've just knitted a long length of fairisle fabric on my knitting machine and am going to back it with vilene and use it to make the elephant. Thank you!
ReplyDeleteMargo--
ReplyDeleteI'm glad you like it! I hope your grandson loves his present.