Showing posts with label for your blog. Show all posts

25 March 2013

How to Add Social Media Icons to Your Blog

I'm working on redesigning my blog, and one of the things I wanted to add was social media icons.  It's pretty easy; want to learn how to do it?

First, of course, you need to get/make your icons.  You can get free icons in various styles, in several file types, for more social media sites than I've ever heard of here.  That's where I got mine.


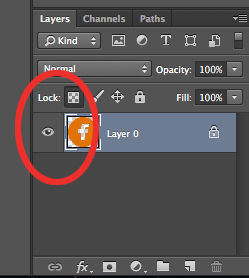
This is the Facebook icon I chose.  But I didn't want it to be black, so I pulled the png file into Photoshop.  


 I just locked the transparent pixels, pick my color, and (on a Mac) hit SHIFT+F5 to fill the unlocked pixels with the new color.


And now I have my own customized Facebook icon.

Then you just follow the same steps as in this tutorial for adding customized navigation tabs.

If you want to have an e-mail icon, the code goes like this:  

<a href="mailto:your-e-mail@whatever.com" mce_href="mailto:your-e-mail@whatever.com/"><img src="the url where the image is hosted aka Direct Link on photobucket" mce_src="the url where the image is hosted aka Direct Link on photobucket" border="0" /></a>

Just change the red text to your information.

If you are adding multiple icons, you can put a couple spaces (not line breaks, just spaces) between the code blocks to make them not butt up against each other.

Social media icons:  check!

Now on to the next blog-improvement project...


(This post just needed a Pin-able image, so now it has one.)

31 August 2011

Don't Be a No-Reply Comment Blogger! I Want To Respond To Your Comments

Soooooo...I've been writing e-mails to nobody.

No, I'm not crazy.

(Well, maybe I am, but the e-mails have nothing to do with it.)

I have my blog set up so that your wonderful comments are sent to my e-mail.  I try to respond to your comments, because I love that you decided to take the time to let me know you liked my post.  (Thank you!!!)  Or I can answer any questions that you have.  But often the "To" field says, "noreply-comment@blogger.com."  Which means you are not getting my reply.  So I'm writing to nobody.

Would you like to hear back from me?  It's an easy fix.  Ready?

Log in to Blogger.
Go to your Dashboard.
Choose Edit Profile.  (It's next to your picture.)


Now, in the Privacy section (it's at the top), check the box that says "Show my e-mail address."
In the next section (the Identity section), enter the e-mail where you would like to receive blogger e-mails, like my replies. :)


Save, and you're done.  And now I can talk to you.  Hurray!

PS:  If you would like to set up your blog so that comments are e-mailed to you, that's really easy to do, too.
Go to your Dashboard-->Settings-->Comments.  Now scroll down to the bottom, and you will see "Comment Notification E-Mail."  Pick which e-mail address you want comments sent to, and click Save Settings.  Let me know if you have any questions.

01 August 2011

How to Emphasize Your Comments on Your Blogger Blog

I'm always looking for ways to improve my blog.  One thing I've been wondering how to do is make my own contributions to the comments section stand out.  For example, let's say one of you lovely readers asks me a question.  You'd like to be able to easily skim through the comments to find my answer, right?  So how could I make my comments look different?

I found this tutorial, How to Highlight Author Comments in Blogger, from SimpleBloggerTutorials.com, and it worked!  (Sometimes I find html-related tutorials that don't work...but it's probably just my inexpertness in html.)

Okay, so just click over to SBT's tutorial, then meet me back here, and I'll teach you some ways to customize how your (and your readers') comments look.

...

...

Good, you're back.  :)

So, if you follow SBT's instructions exactly, you get this:


If this fits the look of your blog, then you're done!  But if you'd like to tweak it a bit, read on...

(This is the second bit of code that the instructions have you paste into your blog template.)

.comment-footer{
margin-bottom:0 !important;
}

.author-comment{
background-color:#F0FFF0;
 <--Background color.  Bet you guessed that already.
padding:5px;  <--  Has to do with the space around the comment.
margin-bottom:1.5em;  <--  Similar to padding.
border:1px solid #ccc;  <--  Border thickness, style, and color
border-radius:10px;  <-- This is what makes the corners rounded.
}
.author-comment.blog-author {
background: #FFEBCD
<--  This is the background color for your comments.  url(https://lh3.googleusercontent.com/_-BRP4LFLyWc/TZX3b7r2AyI/AAAAAAAAATY/8Am8ri02OjE/s800/admin.png) no-repeat right top;  <--   The url is a direct link to the crown image.  
}

The text in blue applies to all comments on your blog.  The text in red applies to your (the author of the blog's) comments only.

If you'd like to change the background color (for all the comments, or just for yours), just change the appropriate number.  Click here for a list of web colors.  Or, if you use Photoshop, open an image that has a color you'd like (for example, if you'd like to use the same color as your custom navigation tabs you rushed off and made after reading my tutorial about it, you would open that image).  Open the Color Picker, use the Eyedropper tool to select your color, and Photoshop will tell you the number right there.


If you'd like to change the border, click here for css coding for different border styles.  If you'd like to change the rounding of the corners, click here to find out how.  If you want to remove the border entirely, simply delete the code for the border.

Here's how I customized my code:
.comment-footer{
margin-bottom:0 !important;
}
.author-comment{
padding:5px;
margin-bottom:1.5em;
}
.author-comment.blog-author {
border-style:double;
border-color:#fc8700;
}

And this is what I got:

Have fun making your blog exactly the way you want it!  Let me know if you have any questions!


27 July 2011

How to Add a Favicon in Blogger

I think it's really cool when blogs have a favicon appear before their url--it just seems so professional.  But the tutorials I'd found on how to add my own seemed too complicated.  (And I don't think Photoshop can save a file as an .ico, which the favicon must be.)


Then, as I was working on my blog one day, I saw a new feature in the Page Elements section:  I could now add a favicon right from there!  Awesome!  No complicated html coding, no hosting images on other sites, and guess what?  It doesn't even have to be a .ico file!


Are you as excited about this as I am?  I think this rocks.

A favicon is 16 pixels square, so use your favorite image editing software to make a really awesome (and tiny) icon.  Remember that since it is so small, simple is best.

I tried uploading my favicon as both a .jpg and a .png, and I don't remember which one ended up working. Sorry!  Maybe either would work?

Once your image is ready, just go into Page Elements, and click to Edit your favicon.  Upload your favicon and save.  

It took a few minutes for my favicon to actually appear on my blog for some reason, but it did work, and it was really easy.

Have fun making your awesome blogs even better!

11 June 2011

How I Did My Tutorials Page/How to Make a Blog Button

One of you wonderful readers asked how I did my tutorials page, so get ready for a tutorial on that!  You could use this technique wherever you want to have images function as links.


First, of course, you need to make your image (to become the button/badge).  Mine is 162 px square, but just choose whatever size works for you.  You'll probably want to include a picture (who doesn't like pictures?) and a title.  If you will be making several of these images, I suggest keeping one as a template.  In the case of Photoshop (my image-making software of choice), this means not flattening the layers, so I can just switch in the new pictures and titles.

Now, upload the image to Photobucket or similar site.

Next, in Blogger, go to Edit Pages and then Edit HTML for the page of your choice.

For each image, enter this code, replacing the orange words with your own information:


<a href="the url you are linking to"><img src="the Direct Link to your image" /></a>


If you are putting in more than one button, just paste the above code in again, with new information in the orange spots.  If your buttons are showing up too close to each other, you can just enter a couple spaces between the two sets of code.  You can make other additions to your page (adding categories for the tutorials, for example) in the Compose tab.

And that's it!  It's really easy, and makes your blog easy to navigate.

If you have any questions, please leave a comment or e-mail me!

08 June 2011

How To Add a Different Image Before Each Post Title

I was looking and looking and trying and trying and asking and--well, no, I just asked once--how to get a cute image with the posting date to show up before each post title.  I easily found tutorials on how to put the same image before each post title, but I couldn't have each post dated "June 2" (unless I severely cut down on how often I post).  But finally, I found a tutorial that worked.  And now I'm going to share it with you:  Add Icon or Picture in Blogger Post Title

It's really easy, and it actually worked.  The main post is on adding the same image before every post title, but scroll down to the Update, and you'll see how to add different images.

PS--If your image is pressing too close to the title, you can add some breathing room by entering a few spaces (just hit the spacebar key--no complicated coding) between the HTML code given and your title.  I added two.

So what do you think of my little date icon?  I think it adds a little personality.  :)


UPDATE:  I found out a different and easier way to customize the posting date.  I will write a post about it soon.  But so you know what I was talking about in this post, this is how I was doing it:


I do like how this little icon looks, but now I don't have to create a new image for each post.

02 June 2011

New Free Blog Backgrounds

Well, June is here, and that means it is officially SUMMER!  Okay, okay, I know summer doesn't "officially" begin until June 21, but really, JUNE is summer.  And I'm so excited about the new season that I made some fun summer-themed blog backgrounds for you.  I hope you like them.  If you download one, leave me a comment!  I'd love to visit your blog.  And of course, if you have any questions about using the backgrounds, leave a comment or e-mail me at jillmadeitblog(at)gmail(dot)com.

(Right click on the image you want to download, click "Save Image to Downloads" or similar options, and Save.)

By the way, all the backgrounds are repeating except the Bumblebee background.

Enjoy!

Ah, the season of picnics...and ants.

Getting ready for the Fourth of July!

For those of you who like the "distressed" look.

For my fellow quilters, or anyone who loves quilts.

What's not to love about watermelons?

Watermelons and picnics--does anything say "summer" more than that?

I call this one "Yellow Happiness." :)


For personal use only.

08 April 2011

Diamonds Blog Backgrounds

Hi everyone!  Here are some new blog backgrounds for you.  I designed the pattern for my friend to use on her blog, and I'm sharing the results with all of you, too.  I have lots of color schemes available.  Which one do you like the best?

These backgrounds can be used for any non-commertial purpose.

I think that these backgrounds work best with the alignment set to Center Top, and the tiling set to Tile Vertically.  Right click on the background and save it to your computer.


14 March 2011

How To Make Custom Navigation Tabs

(Once again, the evil laugh of success.)

I told you in my post about adding navigation tabs (aka Pages) under your blog's heading that I had an idea for how to make these customized.  Well, it worked.  (Bwa-ha-ha-ha-ha!)  I'd read other tutorials about how to do this, but they involved all this html stuff that I really didn't understand.  So I just kept thinking about it and hopeing there was an easier way to accomplish the same thing.

Then it occurred to me--What is the difference between a blog button and a navigation tab?  Nothing.

So here's what you do.

First, whip up some completely awe-inspiring Pages.  (You do not have to have added the Pages gadget to do this.)

Then, use your favorite image editing software to design your new, unique tabs (one for each page).  Upload the images to Photobucket or some similar website.

Next, on Blogger, go to Design-->Page Elements (Update:  It's under "Layout" now)-->Add a Gadget right under your header, like in my other tutorial.  This time, add the HTML/JavaScript gadget.  (If you already have the Pages gadget, you can delete it.  Don't worry, your pages won't disappear.  I tried it just to make sure.)

Now paste this into the space for "Content," and replace the red text with your own info.

<a href="the url of the page you want this tab to take you to" mce_href="the url of the page you want this tab to take you to"><img src="the url where the image is hosted aka Direct Link on photobucket" mce_src="the url where the image is hosted aka Direct Link on photobucket" border="0" /></a>

(I don't know why everything is there twice; all I know is that this does work.)

Do this for each of your tabs (in the same HTML gadget--you don't need to add multiple gadgets).  Click Save, and you're done!


Here are my tabs.  What do you think?  I'm not completely in love with them, myself, but the'll do for now.

07 March 2011

Swap Followings @ Homemaker On a Dime

The blogger at Homemaker On a Dime is hosting a Swap Followings Linky Party.  As part of the party, I am featuring two of the other participants.


First up is Homemaker in Heels.  This is who she is in her own words:

Hi! My name is Crysta and I am so glad you stopped by! Here you will find a random mix of posts on crafting, cooking, decorating, faith, random domestic tips, any bargains I find, along with any other random thing that comes to mind, all with a Southern twist. 

I will update this post later this week with the next featured blog.  I hope you enjoy the blog hop!

Update!
The second blog I am newly following is Lisa Made It.  (I like her blog's name.  You know what they say about great minds...)  This is what her blog is in her own words:

Welcome to my BLOG where I will be sharing all of my creations such as recipes, sewing and crafts. There may even be the odd post about my kids cuz I made them too! 


Have a great day, everyone!

How To Add Navigation Tabs Under Your Header with Blogger

Here's a really simple trick to make your blog much easier to explore:  add navigation tabs under the header.  (Like on my blog, I have tabs for Home, Tutorials, etc.)  I was really excited when I found out how to do this, and it's so easy, too!  Here's how you do it.

In Blogger, click on the Design option.  From there, choose Page Elements, and Add a Gadget right under your header.  Add the "Pages" gadget (under "Basics").  You probably want to have the "Automatically publish new pages" option checked.  Save changes, and you have your navigation tabs.  :)  See?  Super easy.


Now for adding pages (and tabs).  You will automatically have a Homepage (of course--this is where all your amazing posts go!), but you probably want more than just that, which is why you're reading this post. Let's say you want to add an About Me page and tab.  Just go to Posting, then Edit Pages.  From there, you can add new pages, edit the ones you already have (but not the homepage--it is what it is) or click on "Learn more" to (are you ready for this?) learn more.  So, click on New Page, and then write all about yourself!
And there you go!  Super easy.

I have an idea about how to make customized navigation tabs.  I'll let you know when I get it all worked out!

24 February 2011

How to Tidy Up Your Linky Party Buttons!

You know when you're working on something and it's difficult/ complicated/ confusing/ generally not working, but you keep at it until you figure it out--that feeling you get?  I feel like a mad scientist--It worked!  IT WORKED!  BWA-HA-HA-HA-HA!  (Ahem!  Sorry about that.)  I call it the "evil laugh of success."

There was definite evil laughing when I finally figured this out.  Here's what happened.

It all started on a dark and stormy night...or an unseasonably pleasant February evening, anyway.  I was exploring one of the blogs I follow, when I came upon a tutorial on how to resize your blog's buttons with html.  Personally, I'd just use my good ol' Photoshop and change the actual size of the button, but what about OTHER blog's buttons you have on your page?  That would be worthwhile.

Most (all?) linky party hosts ask you to put their party button somewhere on your blog.  (I totally would if I hosted a linky party--advertising!)  So I have the buttons for the parties I join down at the bottom of my homepage, but they were such a mess!  The buttons were all different sizes, and some of them didn't play nice with the other buttons (insisting on being on their own lines), and they just generally made my page cluttered.

But with this tutorial, I could make them all the same size!  (The anti-social tendencies of the buttons would be dealt with later.)  It was great, and so simple!  Well, I was excited and tried it immediately...and nothing happened.  Re-read the instructions.  They weren't very clear.  It was only one step--insert width:##; height:## somewhere after the "img" in the html code.  Problem is, it says "img" several times in the button code.  ???  So I tried a couple of different things, with no luck.  I checked the comments; maybe others were having the same problem, and the blogger clarified.  Well, other's had the same question, but no answer yet.

Okay, next step--try Google.  I found this article, How To Resize an Image With HTML,  and I thought, A button is just an image, when you think about it.  Maybe this will work.

It said to put the new height and width after the img src html tag, so:
<img src="the url where the image is hosted" width={new number} height={new number}

So for a real-life example, here's how you would re-size my button.


The Original Button  and Resized  (Aww, isn't it cute?)

Here's the code:
By the way, sometimes the "img" and "src" bits aren't right next to each other, so look for the "src" specifically.

Now a quick note about the anti-social buttons:
If you see a code like this  <center>  then it is (you guessed it) centering itself.  Just take that out.

Let me know if you have questions!

Update:  I thought you might want a point of reference so you can choose how many pixels tall/wide to make the buttons.  The linky party buttons at the bottom of my page are 75 x 75 pixels, and the Resized Button in my example is 35 x 35 pixels.
Oh, yeah--remember to keep the dimensions proportional.  Rectangle buttons will look weird if you resize them to be squares.

14 February 2011

Free Blog Backgrounds!

I love it when other bloggers post free backgrounds and other stuff I can use on my blog.  And since this is me, what I like even better is letting their ideas (and their instructions!) inspire me to make my own.  So here are some backgrounds I made today!  Feel free to use them for any non-commertial purpose.  If you use one of them on your blog, please leave me a note in the comments so I can check it out.  I hope you like them!


Here's how you use them (with the new template designer):
Right click on the background you like and save it to your computer.
On your blog, go to Design->Template Designer.
Pick which template you want to use.  I liked how these ones looked on the Watermark template, but that's just a personal choice.
Next, click on Background (right under Templates).
There where you see the background image, click on the little triangle, which opens a dialogue box with the option to upload an image.
Upload your new background, click to choose it, and then click Done.
Be sure uncheck the "Scroll with page" option.
Update:  Pick the Center Top alignment option, like so:


You may want to adjust your layout or column widths (other options in the Template Designer).
There you go!

Let me know if you have any questions!

Update:  I changed the backgrounds a little to work better with a wider blog.  So if you downloaded the backgrounds already but wished the center column was wider--now they are.