Showing posts with label paint. Show all posts

18 March 2014

Every Baby Boy Needs a Tribal Frog Onesie

Hand-Stamped Tribal Frog Onesie

So, you know I like to make, rather than buy, presents for babies.  I've made quilts (like the Finding Nemo Quilt and Elephant Quilts for Twins), burp cloths, and nursing covers.  Right now, I like decorating onesies.

Specifically, I like to carve custom stamps, and stamp the onesies.  I've made flower, crab, crawfish, seahorse, starfish, and now frog stamps.  It's so fun to make (and use) a hand-carved stamp.  I have another baby shower coming up, this time for a baby girl, so I'm thinking about carving a new stamp. What design to do...?

Hand-Stamped Tribal Frog Onesie 2

What do you like to give for baby shower presents?  What is the best baby gift you've received?

23 December 2013

"Star of Bethlehem" Christmas Tree Ornament Mini Tutorial

Merry Christmas Eve-Eve!  

Today is the last of our Sew a Song of Christmas series.  I hope you've enjoyed it!  I've sure had fun teaming up with Kelli, Al, Stephanie, Megan, and Bethany to bring to you a bit of musical holiday craftiness. :)

Star of Bethlehem Christmas Tree Ornaments


For my last song, I chose "Shine for Me Again, Star of Bethlehem."  This song is about keeping the faith in the things you once knew, even though the long days and years make that difficult sometimes.    

Star of Bethlehem Green Christmas Tree Ornament

There is a line of the song that sums this idea up very nicely: "Do not despair—your star is still there."

It's nice to have that reminder hanging on the Christmas tree.

Star of Bethlehem Three Christmas Tree Ornaments

These stars, inspired by this pin, are so easy to make!  Boo made these with me last year, actually.

We used salt dough, but you could use any kind of clay you'd like--polymer clay, corn starch clay, whatever.

After rolling the dough out, we cut out the stars with cookie cutters and stamped the designs.  Rubber stamps, found objects—whatever you'd like could be used to make fun patterns.  I made these swirls with a sea shell!  :)  Don't forget to make a hole for running the ribbon.

After baking the clay, we made painted the stars and hung them with loops of ribbons.  Easy and done.  

They make nice little Christmas presents, too; my family all got ornaments last year.

Boo Holding the Star

Boo wanted to help me take the pictures.  Love her.

Merry Christmas!


16 December 2013

"Away in a Manger" Sweet and Simple Nativity

Do you ever feel like Christ gets a little lost in the Christmas season?  I do.  So I wanted today's Sew a Song of Christmas project to remind us what Christmas is really about.

I did already make a wooden nativity set a couple years ago, but there's always room for another nativity set, right?   We will have fun playing with these cute little guys and teaching Boo and Daddy's Girl about when Christ was born.

"Away in a Manger" Sweet and Simple Nativity

This project was inspired by these adorable Princess Peg Dolls.  When I showed Boo this tutorial, she decided she wanted to paint a princess set.  So she did.  And they turned out really cute.  I'll have to show them to you later.
  
Wooden Peg People Nativity Set—Supplies

Besides the regular painting supplies, all you need for this project are eight wooden peg dolls.  I found mine at Hobby Lobby.  They come in packs of eight, so that worked out great!

These are the "Man" sized peg people; they also make "Boy" sized dolls, so you could make baby Jesus smaller than the others.  I didn't want Daddy's Girl to eat or lose the little baby Jesus, so I painted Him on Mary.  (The "Man" size are still a choking hazard, so be watchful if you have babies/toddlers.)

Wooden Peg People Nativity Set—Step 1

First, I painted their heads.  The nice thing about painting all the Nativity People at once is that by the time you've finished the last one, the first is dry already and you can go right to the next step.

Wooden Peg People Nativity Set—Paint Their Clothes

Then I painted their clothes.  I decided this was a "less is more" kind of project, and painted their clothes really simply.  

I painted Mary in her traditional blue.  Joseph is dark blue so he feels like he belongs with Mary.  The shepherds are grey to show their humble state in life. (I would have done brown, but I couldn't mix a nice color.)  The three kings are rich, jewel-toned colors.  And of course, the angel is white.

I feel like the nativity set is already identifiable, but that's probably just me.  Let's add a little something, while still keeping them simple.

Wooden Peg People Nativity Set—Mary and Joseph

Mary is holding baby Jesus and wearing the blue head covering.  I didn't know what to do for Joseph; most nativity sets I've seen have him holding a shepherd's crook, which doesn't make any sense at all for the carpenter that he is.

Wooden Peg People Nativity Set—Angel

 The angel gets a halo and wings.


Wooden Peg People Nativity Set—Shepherds

The shepherds get a shepherd's crook and a lamb.

Wooden Peg People Nativity Set—Three Kings, Wise Men

And the kings get crowns.  I thought about giving them gold, frankincense, and myrrh, but I went back to "less is more."

UPDATE:  I realized these guys should have a coat of clear polyurethane to protect them, but I haven't done that yet.

Wooden Peg People Nativity Set

I think this little nativity set turned out so cute.  :)  

 Merry Christmas, everybody!  Only nine more days!

Don't miss the other posts in our Sew a Song of Christmas series!
"I'm Dreaming of a White Christmas" Tulle Wreath
"O, Christmas Tree" Glitter Ball Ornaments
"What Child is This?" Mini Quilt
"Blue Christmas" Simple Holiday Skirts
"Rudolf the Red-Nosed Reindeer" Ornaments
"Let It Snow" Mitten Ornaments

19 October 2013

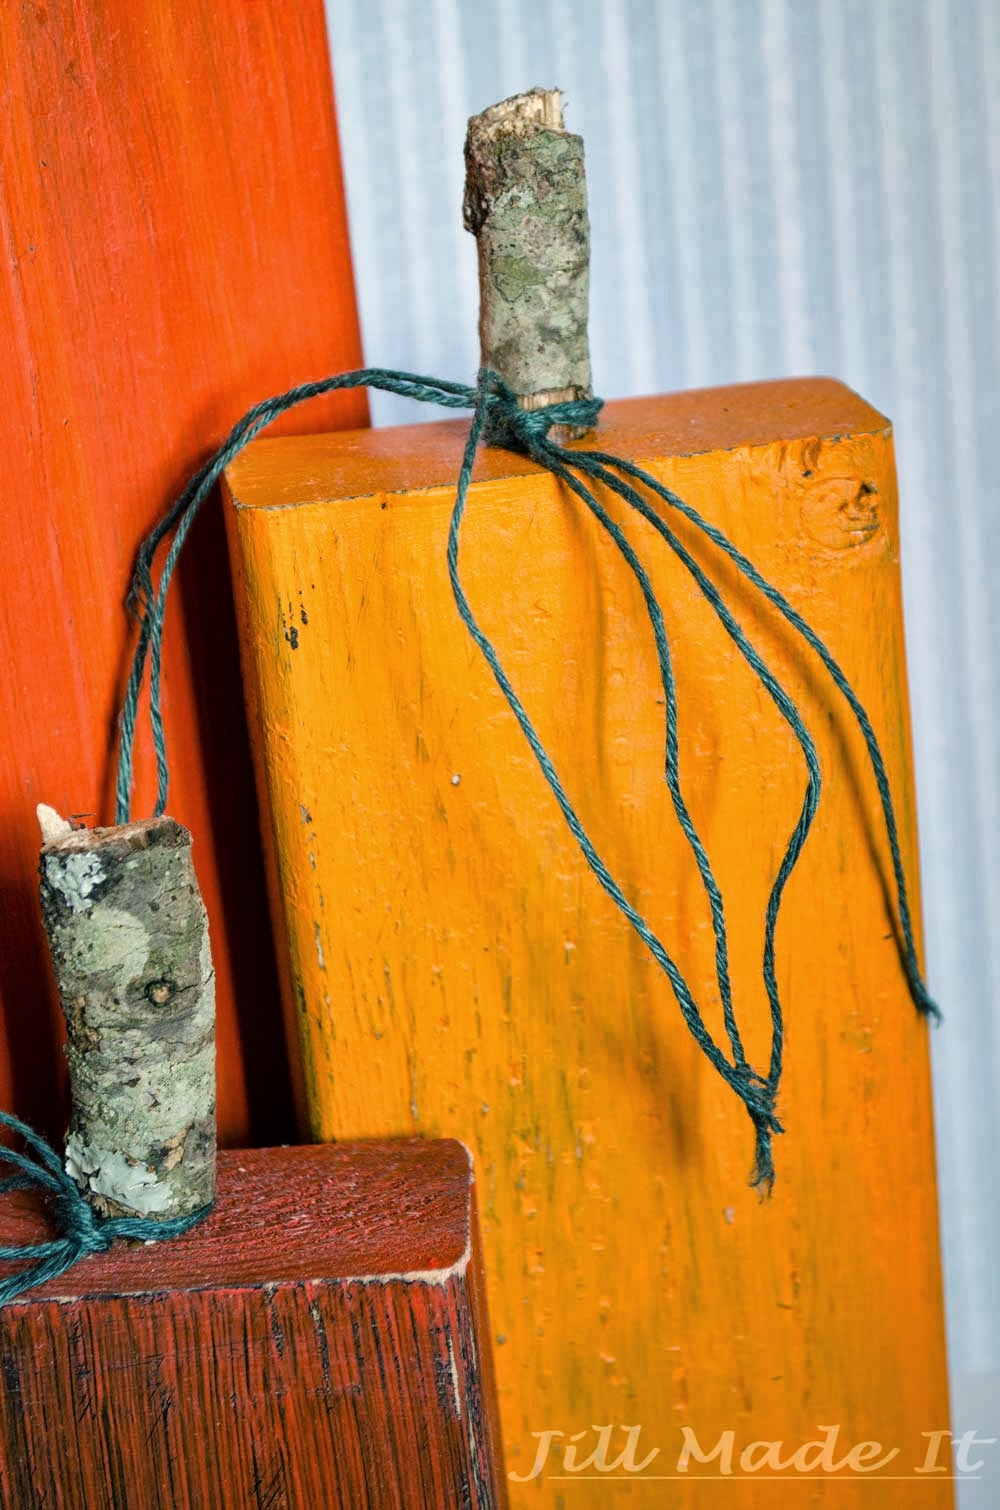
All Autumn Pumpkins Tutorial

 Last year about this time, I had a little tiny baby, a three-year-old, a Halloween party at church that I'd committed to bring table decorations to, and almost no time at all!  What Halloween decoration could I make really quickly?

If you were following my blog a couple years ago, you know I love pumpkins for Halloween/Thanksgiving decorations.  So I came up with the perfect quick, easy, and cheap Halloween decoration--pumpkins made from a 2x4!  And these pumpkins transition seamlessly from Halloween to Thanksgiving, so I was ready for all of autumn.


All Autumn Pumpkins Tutorial

These pumpkins are so easy to make!  Watch this.

Short lengths of 2x4 + black spray paint + orange paint + sandpaper to distress + drill holes in the tops + glue in short, fat sticks from the backyard (or dowel rods, if you'd prefer) + raffia/hemp tied around pumpkin "stems."

All Autumn Pumpkin Tutorial Close-up

And done.

If you like pumpkin decorations like I do, you may want to check out the other pumpkin projects I've made.  

Fabric Pumpkin.  I didn't make a tutorial for this one, but I did find you some tutorials for similar projects.

26 June 2013

Easy, Durable, Take-With-You-When-You-Move Growth Chart

I found this guest post I'd written, oh, probably almost two years ago.  The blog I guest posted on doesn't seem to exist anymore, so I guess I'd better repost my tutorial here!  Well, without further ado, here's my Easy, Durable, Take-With-You-When-You-Move Growth Chart.

. . .

Hi, everyone!  I'm Jill from Jill Made It, and I am really excited to be here today!  I love creating things, designing new things, and generally making my little world a prettier place.  I also love teaching people the things I learn, hence writing tutorials!


When my siblings and I were growing up, my mom kept track of our heights on growth charts.  Unfortunately, the early ones were made of paper and didn't survive.  Next, she marked our heights on a door...and then we moved.  Now that I'm a mommy, I want to keep a record of my munchkin's height, too, but in way that will withstand life in general.  So I came up with the Growth Stick.


(Yes, it's intended to be hung on the wall, but I couldn't get any good pictures outside.)

It is so easy and cheap, yet it will last right near forever.  Love that kind of project.

All you need to make it are:
 a 2x4x6 length of wood
sandpaper
some semi-gloss paint (mine was leftover from refinishing a dresser, which made this project even cheaper!)
two sharpies or other permanent markers (one fat, one medium or thin) 
a paintbrush (a large foam one)
a yardstick
and picture hanging hardware of your choice

First, sand down your board.


(Don't be like me and fail to realize your board needs sanding until after the first coat of paint.)

Paint all sides except the back.  (It'll never be seen anyway.)

Now take your smaller sharpie and mark the center of your board (longways--you know, like a hotdog).  You'll want to mark it near the top (but not at the very top--you'll see in a minute), then at the bottom and middle. These are just little marks to make sure you get your line straight.  (Sorry I forgot to take a picture of this.)

Next, use your yardstick and fat sharpie to connect these marks into one nice, straight line.


Use the space you saved at the top for your title.  I tried to come up with something cute, but decided to go with simple instead.


The next step is to mark your measurements.   First, determine how high on the wall you want to mount the growth chart.  I think we picked 7 inches off the floor.


This is the main reason for the skinny sharpie.

Make any touch-ups.

Mount your hardware, then hang your brand-new, super-durable, highly transportable growth chart.

Now all that's left is to mark everyone's heights!

21 March 2012

"Sometimes Being a Brother" Nursery Decor--Tutorial


Here's the finished crafting project I mentioned in my last post.  I have a friend who's about to have her second baby--another boy.  I made this as a present for her, and so I wanted to give the gift to her before I posted about it.  Wouldn't want to spoil the surprise!

I've barely used my Silhouette since I got it for Christmas.  Shame on me, I know!  I was (and still am) excited about all the many things the Silhouette could help me make...but choosing exactly what to do has been a little harder.  That and my pregnancy-induced tiredness and lack of crafting motivation for several months that is just starting to abate, plus wanting to focus more time on my art and on Mommy School...  But with this friend giving birth early next month,  I had motivation, inspiration, and a deadline!  Deadlines are always very helpful for me.

I wanted to make a sign/wooden wall hanging/whatever with a quote on it so I could use my Silhouette to cut the vinyl.  I also wanted to make a present that was kind of for the mommy and kind of for the big brother, so I was excited when I found this quote:

Sometimes being a brother is better than being a superhero. 
--Marc Brown

How cute is that?  Of course the three-year-old big brother won't care about it now, but I bet he will like it when he is older (and wanting to be a superhero...and is able to read).   

The sign was really easy to make, so much so that I didn't think there was a point to have in-progress pictures.  I'll just explain quickly what I did.

I asked Mr. MadeIt to cut out a 7 1/2" x 9 1/2" rectangle out of some scrap wood we had hanging around.  (Actually, it was a shelf from a wall unit we decided to get rid of.  Let's hear it for recycling!)

Then I spray painted the wood with primer.  I don't think this part is necessary, but I do think I wouldn't have gotten the subtle texture I liked if I hadn't primed the wood first.

Once the primer dried, I painted the wood with tole paints.  I bet whatever acrylic paints you have on hand would work just as well.  Since I wanted the sign to have a subtle texture, I applied the paint unevenly, letting some areas be darker, and others areas lighter.  Because of the primer, the paint didn't soak into the wood, allowing me more time to push it around with the paintbrush to get it just how I wanted it--smooth, but with tonal variations.  (I used Hunter Green + Charcoal, by the way.  For the edges, I had more Charcoal in the mix, so they would be darker.  For the back I mixed the green with black, to make it darker still.)


(So you can see the edges.)

And, of course, I had to make up the design so my Silhouette could cut the vinyl.  If you'd like to use my file, you should be able to download it here.  (This is my first time using Google Docs.  Let me know whether or not this link and the download work!)

If you'd rather make your own file, I used the font Haettenschweiler.  (Goodness!  I'm glad I don't have to actually pronounce that!)

I suggest using transfer paper when applying the letters--I did it without and it was a ROYAL PAIN.  It took forever to get those words on straight!

After that, I though the wood needed to be sealed and the vinyl stuck down permanently.  (No need for inquisitive little fingers to take my hard work apart.)  So I coated the whole thing with my homemade Mod Podge, which is just school glue watered down a little.  (Apply with a paintbrush, and be sure to wash the brush out really well afterwards.)

And that's it!  Except for spending forever getting the words on straight, this was a really quick and easy project.  (I'll have to get myself some transfer paper for next time.)

I hope you enjoyed the tutorial.

Happy crafting!

19 December 2011

DIY Simple Wooden Holy Family Nativity


Last Thursday, I went to a wonderful Christmas party put on by the women's organization in my church.  We had dinner, a really nice musical program (I didn't know there were so many talented people in my congregation!), and at the end of the night, they gave us these cute little nativities.

It would be really easy to make one of these for yourself.  And who wouldn't want one of these nativities to decorate their home?


You need:
Some wood  (see the dimensions in the picture above)
Three wooden knobs.  Baby Jesus's head is about 3/4" diameter; I forgot to put that in the picture.
Green, blue, and white crackle paint
Flesh-colored (non-crackle) paint
About 26" of twine
Hot glue
General painting supplies

UPDATE:  I've gotten lots of questions about where I got the wood for this project.  Like I said, I didn't make this nativity, but rather had it given to me at the end of this church activity.  I'm guessing that they got the wood at Home Depot/Lowe's/etc.


The process is pretty clear from the pictures, I think, so I won't write them out.  Here's a picture of the back, though.


Merry Christmas!
 Only six more days!!!

26 October 2011

Tin Can Jack-O-Lanterns

Yes, another jack-o-lantern post.  What can I say?  I like pumpkins.

I had the idea to punch holes in a tin can to make a jack-o-lantern.  (Not exactly revolutionary, but it was cheap, easy, and hopefully nice-looking, so that's good enough for me.)  But how to keep the can from bending...?

Mr. MadeIt and I thought the can would probably bend if we just used a hammer and nail to punch the holes, so enter:  Power Tools.


Well, drilling was a pain.  It takes more pressure than you might think to drive a drill bit into a tin can!  (You might notice, I used another Sam's Club applesauce can, like for my upcycled vase.  Good thing Boo likes applesauce so much!)  But the real problem was that this method left sharp bits of metal poking out of the holes--not good for a family with a two year old!

Pinterest to the rescue!  One of my friends pinned these little guys, so I clicked on over...


(Update:  The pin isn't working anymore; I don't know why.  Here's the link to the tutorial, though.)

The people at Better Homes and Gardens solved the problem of the bent cans by filling the cans with water and freezing it!  (Then using hammer and nail to poke the holes.)  Genius.

For more details, here's the full tutorial.  (There are even templates for their designs!)  I would just like to add that it's way easier if you have someone to hold your can still while you're punching holes.

These could be used as lanterns, like the BHG people did, or they could line your driveway, or you could make them out of different sized cans and cluster them on the mantle...

I've only made one so far; maybe I need to make a few more.

By the way, are your Halloween costumes done yet?  I finished mine last night.  Pictures to follow.  :)

Happy crafting!

19 October 2011

Family Night Pumpkin Painting

Growing up, we almost never carved pumpkins.  It's a mess, it's hard for little ones to participate, and the pumpkin goes bad so quickly.  So what we did instead was paint pumpkins!  (Okay, having several little ones painting is a mess, too, but at least it's not a pumpkin-innards kind of a mess.)  Ahhh, good times painting pumpkins...

Mr. MadeIt and I decided to continue the pumpkin painting tradition in our family.  So for Family Night last night, we had our first ever Pumpkin Painting Night!


Here we are, hard at work.  Wow, we look so serious!  Except for Boo.  She was just enjoying her sucker.


...Which stained her mouth blue.


Mr. MadeIt's pumpkin decided to be an Indian for Halloween.  (Ignore the ketchup bottle in the background; we had just finished dinner.)


Boo wanted to keep her pumpkin au natural.  She was very adamant about keeping her cute little pumpkin as is.  (She's very adamant about everything these days.  I think it's because she's two now.)

And my pumpkin would like to wish you a


And happy crafting.

17 October 2011

Mason Jar Jack-O-Lantern Tutorial


You may have realized it by now, but I really like jack-o-lanterns.  (Or any pumpkins, really.)  I don't really get into the scary/creepy/gross side of Halloween, so for me, jack-o-lanterns are the way to go.

So here's another really easy, super-cheap jack-o-lantern craft.  Seriously, I gathered my materials, started watching Project Runway, and was completely done before the episode was over.  (Except that I couldn't find my hemp to tie around the top, but that's not the point.)

Okay, ready?  Set!  Go!


You need:
Orange craft paint
Mod Podge or School glue (I used school glue--it's cheaper.  Water it down to a nice paintable consistency)
A glass jar (I was going to use a mason jar, but then I found a clean pickle jar I'd saved for when inspiration struck!  Sweet!  Even-cheaper craft!)
A dry erase marker
Green hemp, raffia, ribbon, etc
General painting needs:  paper towels, water, something to mix the paint on (I used waxed paper), paintbrushes (I realized after I'd started that I shouldn't have used my nice paintbrushes for painting with glue, but I just washed them out really really well), and something to protect your table (I like kitchen garbage bags)
Tea light (battery-operated or regular)


Draw your jack-o-lantern face on the jar.  (Great thing about dry erase markers--it's so easy to make changes!)

Mix up some paint + Mod Podge (or school glue + a little water) until you like the color strength.  More glue = more transparent, more paint = more opaque.

{After first coat... and second coat.}

 Paint around your outlines.  If you get some paint on the marker lines, you'll have to scratch them off, instead of just wiping them off.  (Still not hard, though--I had to scratch off a couple places.)  

Let dry.  Apply a second coat if you want (I did) and let dry again.  Wipe off the marker outlines.


Paint on an all-over coating of Mod Podge/glue to help protect your little lantern from scratches.  Don't worry; it dries clear.

Finish watching Project Runway while the glue fully dries, then tie your raffia around the top of the jar.

Drop in a tea light, and you're done!


(By the way, I recommend the battery-operated tea lights because it's hard to light a real candle inside a little glass jar.  But if you have one of these guys, it's doable.)

Now just sit back and watch him glow...


Happy crafting!

01 October 2011

"Happy Haunting" Sign--Day 1 of the Nameless Halloween Series


(Are you looking for the My Memories giveaway?  Click here.  Remember, the winner will be announced on Wednesday, so hurry and enter!)
(This giveaway is now closed.)


Don't you just love Halloween?  All the silly fun of dressing up, decorating the house, eating strange-looking foods...


There are so many fun things to do for  Halloween that I want to dedicate all of October to Halloween projects!  I'm going to try to post something most days, so cross your fingers for me.  It's a lot more blogging than I'm used to, but there's just so many projects I want to do, and of course I want to share them with you!

(I'm trying to come up with a fun name for my Halloween extravaganza, but all I've got so far is "Days of  Halloween."  Can anyone help me out with a fun title?) 

Anyway, first on my list of Halloween crafts is this "Happy Haunting" sign.


I'm really happy with how this turned out--Mr. MadeIt even loves it.  He told me-- repeatedly, and without my even asking for his opinion--that he likes it.  Which means he likes it A LOT.  (Wo-hoo!)

And to make this project even better, it was practically free.  (Ah, I love practically-free craft projects.)


Here's what you need:
some wood--I  used a 5" by 15" board  from a pallet my dad had hanging around
black craft paint
orange craft paint
sandpaper
chalk
my templates, or you could make your own.  The font I used was Mesquite Std.  (I'm putting my templates at the bottom of this post.)
normal painting supplies--brushes, something to protect your work surface (which I forgot about when I took this picture), etc

Your first step is to lightly sand your board.  You want your board to still be rough; just make sure you aren't going to be skewered with splinters.


Next step:  Paint it black.  And then paint it orange.  (This is so the black can show through when you distress the board later.)  How thick you make your orange layer is up to you.  You can still see some black through my orange coat, which I think adds to the old/distressed feel I'm going for.

Next, transfer the words from the template onto your board.  I used the same method for this project as I did for the Mother's Day signs that I made


(I love using that trick.)


Now you just paint in your letters with black.  

The last step is to distress your sign.  Pull out your sandpaper again and have at it.  Focus on the corners and edges, since those are the surfaces that get the most wear and tear through normal handling.  Feel free to sand down to bare wood in some places.

If you get a little too excited about the whole distressing process (like I did)  and decide that you took off too much paint, you can fix it.  Just touch up the paint, being sure to blend out around the edges so your touch-ups aren't noticeable.

And that's all there is to it!  Now you just have to choose the best place to display your fabulous (new) old sign.  I sat mine on top of  our front door (on the inside) so we will see it on our way out and be inspired for our Halloween activities.  

Happy crafting!  And Happy Halloween!


For these templates, the words are  sized to fit on their own 8.5" by 11" paper.
Right click on each picture, save it to your computer, and print.