31 August 2013

Fast, Easy, and Elegant Ombre Earrings Tutorial {Plus How to Make Hammered Headpins}

Fast, Easy, and Elegant Ombre Earrings Tutorial

I hope you've had fun with our Summer Swimming series; we have!  From making and using sea glass, to sewing cute and practical cover-ups for yourself and your little ones, to visiting family, we've had a lot of wet and wonderful fun this month.

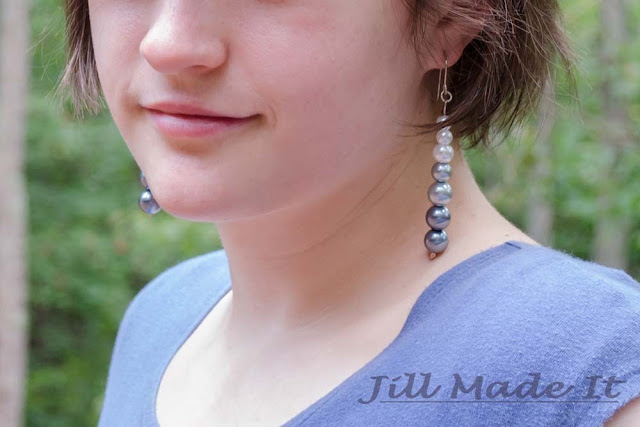
For the last installment for our Summer Swimming, I made these quick and easy ombre earrings.  I like how the beads transition from white to dark blue, like the waves of the sea.  But at the same time, it's not so water-themed that you feel you can only wear them at the beach.  And I like long, dangly earrings.  Not that I feel safe wearing them quite yet--Daddy's girl is still likely to pull on them when I least expect it.  

These earrings are really easy to make, but if you're an absolute beginner, check out my Holiday Earrings Tutorial.  It goes over some basics I'll skip over here.

Ready for the tutorial?

Fast, Easy, and Elegant Ombre Earrings Tutorial--Supplies Needed

You Need:
Two pairs of pliers (one being round nosed)
Jewelry hammer and anvil (optional)
Two ear wires
Two jump rings
Four small white beads
Two medium white beads
Two medium light blue beads
Two large light blue beads
Four large dark blue beads
a length of 20 gauge wire a half inch longer than your finished length (or two headpins)

Note:  This anvil has a bit of metal on it to protect it from scratches, so the scratches won't be transferred to another project .  They don't come like that.

How to Make a Hammered Headpin

How to Make a Hammered Headpin:

This is so easy.  Just take your length of wire and hammer the end of it until it flattens wide enough that your beads won't fall off the end.  Easy and done.

{If you don't have a jewelry hammer and anvil, you can still make your own headpins.  Just use the method I did to make my Holiday Earrings.}

Fast, Easy, and Elegant Ombre Earrings Tutorial--Thread the Beads

Then just thread your beads on your brand-new headpin...

Fast, Easy, and Elegant Ombre Earrings Tutorial--Make a Loop

...make a loop at the top, cutting off any extra wire, and attach the jump ring and ear wire.  And you're done!

Fast, Easy, and Elegant Ombre Earrings Tutorial--Finished!

If you missed any of our Summer Swimming fun, just click on the images below to check them out.  I'm hoping to make this series a yearly event, only next year it will be Summer Swimming and Sun.  :D  What kinds of things would you like to see in next year's series?

28 August 2013

So We Drove Across the Country With Two Children Under the Age of Four...

We might be crazy.  Mr. MadeIt and I drove across the country with two children under four years old...And Daddy's Girl (at least half the time) hates her carseat.  Which is really funny, because she used to sleep best when in her carseat...hmm.

But it was family reunion time, and we were determined to go!  The three married couples from the hubby's siblings all had babies last year (Daddy's Girl is the youngest by three weeks), and the other three cousins are within three years of each other, so I really really really want the cousins to get to know each other and be friends.  My own cousins are pretty widely spaced in age and geographic distance, and I don't think I even know all their names!  I don't want this to happen with my little ones.

So we nervously set off for my in-laws' home with a "Magic Bag" full of things my parents surprised us with to keep little ones entertained during the long (long, long, long) car ride.  (I'm so glad some family lives close!)  We drove through the night to have as little children-awake-and-wanting-out time as possible.  By two in the morning, whenever I'd see another car on the road, I would think, "What's the matter with you, you lunatics!  Go to bed!  ...Oh, wait..."  

The plan worked.  We made excellent time and the girls did really surprisingly well.  The next leg of the journey was easier, as we carpooled with Grammie and Pa (that's what the grandkids call Mr. MadeIt's parents) the rest of the way.

And it was worth it.

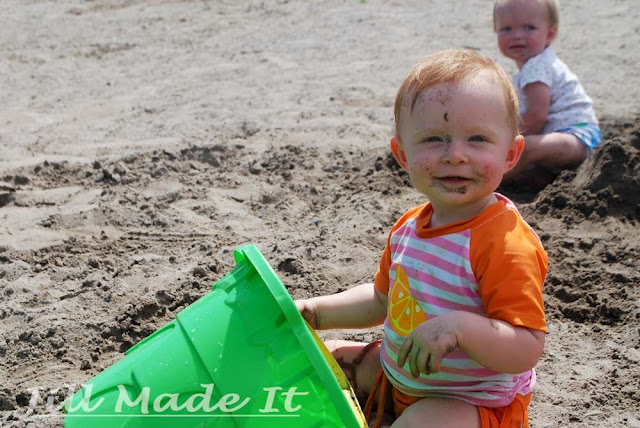
Daddy's Girl Playing at the Beach

One day, we all went to the beach.  We all had so much fun, but the cousins enjoyed themselves the most.  This was Daddy's Girl's first time at a beach.  (It's been super rainy here, remember?  No lake-going for us.)  Her slightly older cousin taught her about eating sand, unfortunately...Oh, well.  It's extra minerals, right?  Gotta have your minerals...  Needless to say, Daddy's Girl loved every bit of playing in the sand.  She was "helping" with the sand castle, digging in the sand, eating the sand...

Boo Has Fun at the Beach

Boo had a great time, too.  She LOVES playing with her cousins.  And just look at those cute sandy legs--she had a great time making the sand castle, too.

Child playing in the sand at the beach

Here's the cousin who's closest to Boo's age; she's almost exactly one year older.  We stayed at their house for a week, and I almost didn't see Boo during that time!  These two were playing pretend 24/7--Princesses, Incredibles, Mommies and Daddies, all the time!  I love that Boo got to have this time with her cousin.

SweetCheeks Playing in the water at the beach

This is "SweetCheeks."  She's the next cousin, and is, oh, probably 18 months younger than Boo.  She is such a sweetheart.  With her own baby sister almost exactly Daddy's Girl's age, I might have thought she'd be tired of the babies, but no--she loved playing with Daddy's Girl.  It was so cute.

Have fun in the sand at the beach

Out of six cousins on this side of the family, this little man is the only boy.  Maybe more will join him later, but for now, he's pretty outnumbered!


Cousins making sandcastles at the beach

This is "Tootsie."  Yep, she's the one who taught Daddy's Girl to eat sand.  I'm sure these two will be getting into all kinds of mischief together when they get older.

That's enough with the talking.  Let's get some more pictures of these little ones having fun!


Swimming in the water at the beach


Cousins swimming in the water at the beach


My baby playing in the water at the beach

Okay, maybe just a little more talking.  Daddy's Girl took a couple of steps by herself while playing at the lake!  I can't believe she's not still my little tiny preemie "just borned" (as Boo would say) baby.  Why do they have to grow so quickly?


She had so much fun playing at the beach

Thanks to my brother-in-law for taking these pictures!  Mr. MadeIt and I chose not to risk our nice camera around all this sand and water, but I'm glad we didn't have to do without pictures of our little ones having so much fun!

Did you get to visit cousins this summer?

21 August 2013

Cutting Watermelon the Easy Way

I hope you've been enjoying Summer Swimming!  For today's addition, my wonderful husband is going to explain how to cut watermelon the easy way.  Enjoy!


~~~

Hello there, Mr. MadeIt here. 

 I love a good watermelon. Sadly, I am about the only one in the house who feels that way. So I usually only get it at the grandparents’ house. But that is ok. 


 Naturally, I go and help with the food preparation, especially that of cutting and cooking. (And for some reason, setting the table {shrug}) As you probably know, cutting watermelon can often be a bit of a challenge. 


Cutting Watermelon the Easy Way

But then I saw this PIN. Wow! It worked so well. I have never cubed a watermelon so fast. And I am no slouch with a knife. I highly recommend it to all watermelon cutters. 


 The pictures tell the story pretty well, but I thought I would spell it out for those verbal learners. 


 Cut the entire watermelon into quarters long-way.  (Not pictured)


Slicing Watermelon the Easy Way: Step 2

 Cut the vertical layers.


Cutting Watermelon the Easy Way: Step 3

Cut the horizontal layers.

Cutting Watermelon the Easy Way: Step 4

Lastly cut it from the rind.  You may have some watermelon goodness left on the rind, but a spoon can make quick work of that, too. {Mmmm...}
  
Cutting Watermelon the Easy Way: Finished

 This method works great for preparing a bowl of watermelon (my favorite), or a fruit salad. This is the fastest and best way to dice a watermelon I’ve ever seen. See the original post here


 Thanks for reading and happy watermelon eating!


~~~

Thanks, love!  


14 August 2013

Quilting Pictures

Free-form Quilting Fish Wall Hanging


A while ago, Jill found this book about quilting pictures.  You're basically making a fabric collage, except it looks nicer than the paper collages you (or at least, I) made way back when.  Originally, Jill, my mom, and I were all going to work on it together.  Jill made this cool beta fish design, the three of us shopped for the fabric, we got started, and somehow it ended up being my project alone.  

Free-form Quilting Fish Wall Hanging, showing loads of skinny sections

My goodness, it took forever.  Part of the problem was that I had decided to do a design with loads of skinny sections.  Don't these look fun to cut out at each step? Time consuming, but worth it.  

My two biggest problems are ones that I'd have no matter what I was working on.  I like quilting, but I usually only sew when the once-a-month quilt group meets.  I also seem to have some curse that causes my sewing machine to have tension issues or otherwise hate me.  I might spend so much time fixing tension issues and taking out unstable seams that when it's time to go home from my quilt group, I'm just a few stitches past where I started.

Free-form Quilting Fish Wall Hanging Back

But now the fish done, and it looks pretty cool, if I do say so myself.  The back looks almost as good as the front.  It looks like a whole cloth quilt.  If you’re unfamiliar with that, it’s exactly what it sounds like.  You take your fabric, don’t cut it up, lay it on your batting and backing, and quilt a design on it.  Bind and done.  

Even though this was a lot of work, it was fun to make, and I love the end result.  It’s nice that it’s not as precise as most sewing is.  Wobbly stitching?  Do it a few more times, and people will think you meant to make it wobble.  Or ignore it, and no one will care, even if they look up close.  My mom and sister and I bought new fabric for this, but it would be a great way to use up scraps, maybe even funky patterns that you hope were in style when you bought them but now would make a fashionista faint with fright.  In short, it’s fun, forgiving, and you should give it a try.  You just might want to pick a simpler design than my beta fish.

Free-form Quilting Fish Wall Hanging Close Up. Aka, Angry fish is judging you.

Would you like a tutorial about how to quilt your own pictures? 


09 August 2013

Beach Robe from a Beach Towel Tutorial

Daddy's Girl's Beach Robe from a Beach Towel

Boo had a cute little terrycloth beach cover-up that we loved.  It was so convenient to just put the cover-up on her and not have to worry about carting around another towel.  My goodness, with two kids, there sure is a lot of pool stuff to cart around!  But Boo did what kids are so good at doing and she outgrew her cover-up.  So I decided to make her a new, robe-style terrycloth cover-up.  One beach towel was even enough fabric to make matching robes for both my girls!

Want to make one?  It's not as quick and easy as my sarong-style cover-up, but it's still a fairly quick and easy project.

You need:
a beach towel
bias tape (bought or homemade)
a dress to draw your pattern from
general sewing supplies

Use the dress to draft your pattern for the robe.

Use the dress to draft the front piece of your pattern like in the picture.  Curve the neckline down so it meets the side seam at the waist.  I chose to curve the lower edge, but you could have it go straight down or follow the line of the dress; whatever you'd like.

For sleeves, go out straight from the shoulder.  Connect the underarm with a curved line--this will make the robe lay nicer when it's sewn together.  Make the sleeve roomy.

Add 1/2" seam allowance just to the shoulder seam and side seam.  We'll be binding the other edges, so no seam allowance is needed.

You will need to cut out two front pieces.

Beach Robe Tutorial:  Pattern Pieces

For the back, trace the pattern you just made.  Raise the neckline, and cut the pattern down the center back.  You'll cut out one back piece on the fold.


So here are my pieces all cut out.


Go ahead and zig-zag over the shoulder and side seam edges.  Usually you'd do this after sewing, but my towel frayed pretty badly, and I thought it was easier to zig-zag first.  If you have a serger--lucky!


Sew the side seams.  You'll probably have to clip the seam to get it to lay nicely.


This next step is optional.  After sewing the side seams, I went back and sewed down the seam allowance.  I did this to make the seam stronger by making the highly fray-prone towel less likely to fray.  Not totally necessary, but I want these beach robes to last (and last and last).  It also helped the seams to lay nicely.

Sew and, if desired, reinforce the shoulder seams.

The robe is coming together!  Just a couple of finishing touches, and you'll be ready to take your munchkin to the pool.  :D

Beach Robe Tutorial:  Bound Edges

The rest of the edges get bound.  I learned to quilt before I learned to sew clothes, so I bind everything like I bind a quilt.  I wrote a whole tutorial about making and using bias tape (in the quilting method) so just click on over if you'd like a little help with that.  (Just remember, since you have curved edges, you really do need to cut the fabric on the bias.  I explain that in the tutorial, but I also say I usually don't bother actually cutting in on the bias, since quilt sides are usually straight.  So just remember.)
If you'd rather bind the edges the clothes-sewing way, here's a great tutorial (not by me) for that.

Beach Robe Tutorial:  The Tie

The last step is to make the tie.  Just cut out a rectangle from the towel however long and wide you want it.  You could curve the corners if you want, or leave them.  Then bind the edges like you did for the rest of the robe.

Jill Made It Clothing Tag

I added a little tag.  One day, I may have them professionally done, but in the mean time, I like my little hand-stamped and written tags.


Beach Robe Tutorial:  Finished Beach Robe

Thanks for reading!  If you like what you've seen, please pin and share!


07 August 2013

Super Easy Sarong Style Beach Cover-Up Tutorial

A couple of years ago, I made myself an easy swimsuit cover-up out of a beach towel, but I couldn't find it this summer!  I'm sure it will show up once the weather starts getting cold again...Isn't that the way it always goes?  Ah, well.  I guess I have an excuse to make myself a new cover-up!


(Yes, this was before my haircut.  My hair didn't grow out already!)

The cover-up I made last time was easy, but this one was super easy.  Beginning sewers need not fear!  


And then, when I was writing up this post, I came up with an even easier method!  The way I made this cover-up didn't take very long, but this new way would take almost no time at all!

Ready?  It might take you longer to read this tutorial than it will to make the cover-up.  And all you need is two yards of a pretty knit fabric and some coordinating heavyweight ribbon, such as grosgrain, in whatever width you prefer.

Step 1:
Decide how long you want your cover-up to be.  Cut your fabric so it is two yards x that length.  Knit doesn't fray, so you don't have to hem it or anything!  (I used quilter's cotton, so I did hem mine.  So it still didn't take long, but I'm excited about this no-hem option!)  Depending on how long you want your cover-up, you may even be able to get two cover-ups from one length of fabric.  Or a maxi-length skirt would be...ooo, that would look really nice.  I think I'll do that next time.  :)

Step 2:
Wrap the ribbon around your waist and tie it.  Now that you know how much ribbon you need, cut it to size.  Go ahead and finish the ends however you want to.  (Some ideas:  cut at a diagonal to minimize fraying, use a lighter to melt the edges of synthetic ribbon, or coat the edges with clear nail polish.)


Center the tie on the top edge of the sarong, and stitch it on like in the picture, leaving enough of the tie free on both sides so that you can, you know, tie it on.  (I made a tie out of more quilter's cotton.  Ribbon will be much cuter.)


Now you're done!  Head over to the pool, and enjoy taking random artsy photos of the brickwork.  (What?  That's just me?  Oh...)


Ah, there we go.  Enjoy your finished sarong.  That makes more sense.  Sillyness aside, I really like how the fabric cascades down where the cover-up ties closed.  And wouldn't it look even better in a beautiful knit?  Totally doing it that way next time.


But I do love the random artsy shots.


So, what are you doing this summer?  Beach?  Swimming pool?  Family vacation?  It's been ridiculously rainy here, but hopefully we'll be able to go to the lake sometime soon.