10 June 2013

DIY Burp Cloths

Ready for a non-clothing project?  Just to make sure this blog isn't completely taken over by clothes-sewing.  :)  I made these for a baby shower a couple of months ago and hadn't gotten around to posting them yet.


Since Daddy's Girl was born, I've had less time for projects, as you can imagine!  So even though I like making tutorials for all of you, the choice has been between making a tutorial and actually finishing a project.  Obviously tutorials lost.  This project is super-simple, though, so here's a mini-tutorial.

Start off with a couple of plain cloth diapers.  (I got mine from Walmart, in the baby section.)  Get the pre-folded kind, though, unlike me, since they wrinkle less and are a good burp cloth shape to start with.  Decorate with some scraps of cute fabric, and you're done!


I just zig-zag appliquéd these cute little elephants onto the burp cloths, like in this tutorial, only simpler, since it's just a rectangle!  For a more finished look, I also bound the two short ends of the cloths with some non-bias cut 'bias tape' made from a different part of the same fabric scrap as the elephants.

If you need a little help with binding or zig-zag appliqué, click below.  


Now, since you're binding only two edges, rather than all four, it will be a tiny bit different than in the quilt binding tutorial--just cut the bias tape an inch longer than the length of the side you're binding, fold the two short sides 1/2" in so it ends up the same length, and then proceed as normal.

05 June 2013

Design My Own: Wear to the Playground Skirts

You know what I realized?  It's much harder to design clothing for yourself than for someone else.  I whipped out lots of ideas for my sister to choose from during Project Sewn (click to see my skirt, sundress, shirt, and other dress if you missed them before), but when it came time to design MY OWN clothes for my new project...so much harder.  I think it's because, sewing clothes for someone else, I was only in it for the experience--my sister paid for the fabric and got the clothes at the end.  But this time I'm more invested.  

{On a related note, I decided that I will not necessarily make the winning design each month; I was too stressed trying to come up with four ABSOLUTELY PERFECT ideas so that I would be completely thrilled with whatever design won the vote.  I did come up with four that I love, so I will probably make the winner, but not promising I will every time.}

After scrapping two completely different themes and lots of sketches, I decided that for my June project, I would: 

Design a Playground Skirt

That is, I wanted a skirt casual enough to wear sitting on the grass, having a picnic at the playground.  Here are my top four designs for you to vote on.  (The poll is on the left sidebar.)

#1--This one is the simplest, and whether or not anyone votes on it, I'll probably make it anyway to test my pattern before trying anything more elaborate.  Simple, a-line, neutral colors to match any shirt--I think I'll be happy with this one.


#2--I like this idea because of the pocket.  I don't like having things in my jeans pockets because they make these funny bulges right where no one wants funny bulges, you know?  But I have to put my phone somewhere.  (Without having to dig through the diaper bag and get to the phone in time to see I missed the call.)  With this skirt, though, I can keep my phone in the cargo pocket.  No funny tummy bulges, no missed calls.  

#3--This skirt could double for date night, while still not being overkill for the playground.  I don't like for skirts to gather from the waist (tummy bulges, again), so I designed this skirt with a fitted yolk, and the gathers start from the hip or so.  I think Boo would like this one best--she likes ruffles and other "fancies."


#4--(Another skirt that can do double-duty for date night!)  I love polka dots.  I couldn't decide if this one should have all big dots, or little dots on the yolk and big dots on the skirt...What do you think?

So those are my four favorite ideas for this month's project.  Please vote for your favorite!  Voting will close two weeks from today, in the morning of June 19.  You may vote for more than one skirt, if you wish.

{By the way, I *may* make patterns for the winning skirt.  I haven't tried pattern grading yet, but I'd like to.  So if you'd like to make one of these yourself, be sure to vote!  And also let me know in the comments.)

28 May 2013

Project Sewn Week 4: Exploring My Style

We're down to the last week of Project Sewn.  It's been lots of fun, lots of work, and lots of learning.  I'd say that the biggest thing I learned, though, was just that I CAN do this!  I can design clothes, and then actually create them.  I'm going to keep doing it, too, just not one outfit every week.  

I'd like to design several items of clothing each month and have my lovely readers vote on which design you'd like me to create.  I think that should be a lot of fun.  I hope you'll participate!  So, I'll need to come up with some ideas to post your your inspection next week...

But back to Project Sewn.

This week's theme is "Your Signature Look."  When I told my sister the theme, she said, "But my style's boring."  So we're experimenting to find a non-boring style for her.  


I started off with the same base pattern as my sundress from a couple of weeks ago.  Isn't it fun how you can change up patterns?  I never thought of doing that until Project Sewn.  I also took the sleeves/armholes from another pattern I've had forever (and hadn't actually used yet...).  It was a plain sleeve, but I added pleats and shortened it a little.


We picked a bottom-weight fabric (that is, a heavier kind of fabric than, say, the quilter's cotton I used for the sundress) so that the fabric would be able to hold the pleats nicely.  And it does.  I especially love the pleats at the hem of the dress.  And my sister wanted green, since she doesn't have much green in her wardrobe.


I know this doesn't show much of the pleated ruffle, but I liked the picture.


And here's the back of the dress.  Ignore that wrinkle at the bottom.  Apparently I wasn't finished ironing.


Here's a view of the asymmetrical neckline/opening.  I like asymmetry--it's just different, not quite what's expected.

That opening's special in another way, too:  those aren't functional buttons.  There's a zipper underneath.  So, 1) I didn't have to sew a lot of buttonholes, and 2) there's no gapping between or pulling on the buttons.  Win!


Here's a picture of my sister just because she looks so pretty.


Please vote for me starting Friday!

20 May 2013

Project Sewn Week 3: Asymmetrical Draped Shirt


I wasn't going to do this week's Project Sewn because the theme is 80's Inspired and I couldn't figure out anything redeeming about fashion in the 80's.  I really look forward to seeing what other ladies made for this theme.  How can you interpret those crazy fashion trends into something you'd actually want to wear today?

But I finally came up with something.  Draping was fashionable in the 80's, as I understand it.  (I wasn't fashion-aware myself back then.)  And when I showed my mom the fabric, she told me she had exercise pants back in the day that were almost that color.  So that worked out unexpectedly well.


My sister wanted a shirt for this week's project, since I'd already made her a skirt and a dress.  I got 4th place for the dress, by the way, and 3rd for the skirt.  Thanks, everyone who voted for me!  And if you didn't vote for me...well, I guess we can still be friends.  No, really, there were lots of great entries, and I'm happy to have done so well.  But I hope you'll vote for me this week!


I made this pattern by tracing around a knit shirt that fits me.  I then "slashed and spread" at the front shoulder to give extra fabric for the pleats.  The neckline wasn't going to be asymmetrical, but either the pleats pulled it funny, or the neckline stretched out, because it was gaping.  So I took in the one shoulder seam, making the neckline asymmetrical.  And I like it better this way!  Happy accident.


You may recognize the skirt.  I made it, too.  You can read about it in this post.


And of course, Boo wanted me to take pictures of her, too.


Isn't she adorable?  She doesn't hold still very well for pictures, so they turned out a little blurry, but I love them anyway.  Just look at that happy smile!


Please vote for my Asymmetrical Draped Shirt starting on Friday!  


13 May 2013

Project Sewn Week 2: 50's Inspired Sundress

I got the material for this week's challenge a couple weeks ago, in the same shopping trip as for the black/white challenge.  With that head start, I thought I'd be able to finish this week's outfit earlier in the week.

Not so much.

This dress has gone through so many incarnations even since buying the fabric.  Really, all that stayed the same (besides the fabric) was that I wanted cap sleeves and a fitted bodice.

First idea:  Lace detail.  My sister vetoed that at the fabric store, saying that all their lace looked like it was for old ladies.

Second idea:  Pockets on the front.  My mom and sister both said no to that one, feeling that it would look juvenile. (The pockets would have been like these ones--they wouldn't look too young, right?  But that dress is for a toddler, so maybe I'm wrong...)

Half-circle skirt?  Would hide the piping I was planning to have in the skirt.

Princess seams with piping?  Too hard to draft.  (I'll figure it out, just not with this time crunch.)  So I guess I could have done the half-circle skirt, after all.

Ruffles?  No, not needed.  And I'm running out of time.

And then there was the method of patten-making...

Draft from an item of clothing I already have?  Tried that for two entire days (well, evenings anyway; gotta take care of the little ones during the day), but failed.  (Probably should have started with something simpler than a button-up shirt with princess seams and bust darts.)

Highly alter a pattern I used back when I was sixteen?  Okay, let's try that.


I didn't really want to start with a commercial pattern because I was afraid I would end up making their dress instead of my dress.  But this pattern was drastically different than what I had in mind while at the same time having the features I was having such a hard time drafting.  (Namely, a fitted bodice and dolman-style cap sleeves.)  So what began as a Asian-style shirt and top became:

The 50's Inspired Sundress


Okay, first I want to point out that this all-yellow dress really has little white polka-dots all over it.  Because polka-dots are awesome.  And 50's-ish.  (My sister and I really wanted yellow fabric with LARGE white polka-dots, but it wasn't to be.  Next time, I'll paint the dots on myself.  :D )

Let's talk about the changes I made.


Mandarin collar changed into scoop neck.
Cap sleeves shortened.
Shirt-and-skirt combo changed into dress.  Yes, I used the shirt/skirt pattern pieces instead of the dress option.  It seemed appropriate because I was making a bodice/skirt kind of a dress instead of an all-one-piece kind.
Gathers instead of the darts on the front of the bodice.
Four darts instead of two on the back of the bodice.  Seriously, this dress is full of darts; there were going to be 24 darts in this dress before I changed some out for gathers.  Granted, half of the darts are in the lining, but I still had to sew them.  But I'm getting ahead of myself a little.
Neck and sleeve facings changed to fully lined everything.  (Hence fully lined...)
Slim skirt widened to A-line.  That alteration was actually really easy.  Maybe I should write a quick tutorial on that.  You know, someday.  When I'm not designing and sewing a new outfit every week for this competition.
No sash to wide sash.  Really difficult change, I know.

Okay, I think those are all the changes I made.  So, radically different from the pattern, huh?  


Here's a close up of my favorite details of the dress.  (See?  There really are polka-dots.)  I like the interest the gathers add to the front of the dress, and I think the white sash was necessary to break up all the yellow.

Please vote for my dress starting on Friday!
Here's the link:  Project Sewn Week 2

By the way, I got third place last week for the black and white skirt  I made!  Thanks to everyone who voted for me.  :)  


06 May 2013

Project Sewn Week 1: The Spiffy Date Night Skirt

Have you heard of Project Run and Play?  Blogging designers, kids clothes, contest, short deadlines, you get the drift.  Now they have a sister site called Project Sewn, and this season's competition starts today!  

I am not yet an awesome enough blogger/clothing designer/sewer to be one of the official contestants, but they have a sew-along division for us regular folks!

This week's theme is "Black and White."  I happen to love black and white clothes since they're so dramatic and classy.  So I love this theme.  I'm making the clothes for my sister, though.  Just because.  (She loves black/white, too.)

Week One Entry:

The Spiffy Date Night Skirt


This is one of the first times I've designed clothes, and it's the first time ever designing adult clothes.  It's less intimidating to whip up a no-pattern baby outfit; if it turns out a little funny, oh, well.  They'll love it anyway.  Or not care.  I don't imagine babies really care what they wear.  And Boo likes anything I make for her, especially if she gets to help and it has "fancies."  (That would be ribbons, ruffles, etc.  She is a girly-girl. :) )

Isn't she pretty?  I love the red shoes with the black and white.  (I didn't make the shirt, by the way; just the skirt.)


Boo wanted in on the photo shoot.


And she loves to be with her aunt.


Please vote for me starting Friday morning!

25 March 2013

How to Add Social Media Icons to Your Blog

I'm working on redesigning my blog, and one of the things I wanted to add was social media icons.  It's pretty easy; want to learn how to do it?

First, of course, you need to get/make your icons.  You can get free icons in various styles, in several file types, for more social media sites than I've ever heard of here.  That's where I got mine.


This is the Facebook icon I chose.  But I didn't want it to be black, so I pulled the png file into Photoshop.  


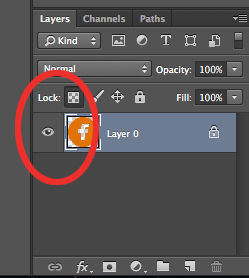
 I just locked the transparent pixels, pick my color, and (on a Mac) hit SHIFT+F5 to fill the unlocked pixels with the new color.


And now I have my own customized Facebook icon.

Then you just follow the same steps as in this tutorial for adding customized navigation tabs.

If you want to have an e-mail icon, the code goes like this:  

<a href="mailto:your-e-mail@whatever.com" mce_href="mailto:your-e-mail@whatever.com/"><img src="the url where the image is hosted aka Direct Link on photobucket" mce_src="the url where the image is hosted aka Direct Link on photobucket" border="0" /></a>

Just change the red text to your information.

If you are adding multiple icons, you can put a couple spaces (not line breaks, just spaces) between the code blocks to make them not butt up against each other.

Social media icons:  check!

Now on to the next blog-improvement project...


(This post just needed a Pin-able image, so now it has one.)