31 July 2013

DIY Sea Glass

Have you noticed the Summer Swimming button on my sidebar?  Well, it's not coming soon anymore--it's here!  I'm really excited to announce my new series, which will celebrate all things summery and wet!  There will be clothing, quilting, and crafting tutorials, guest posts from some of my favorite people, and twice weekly posts full of watery fun.  
 ~~~

Hi, I’m Kelli, Jill’s sister.  If you want to put a face to the name, I’m the one who modeled the clothes that Jill made for Project Sewn.  

Kelli is ready to cut glass!

Oh, look, there’s another picture of me.  Well then.

Twice a month, I will be doing a guest post.  I majored in Horticulture, with my emphasis in Floral Design, so I’ll do some posts about flower arranging.  You can also expect to see posts about making jewelry, and the occasional sewing post.  {Jill:  She’s the one who helped me with my table centerpiece that I showed you earlier.}

The first project I’m going to share with you is making sea glass. 

Imagine...

You’re vacationing at the beach, collecting seashells as a souvenir, and you find a bit of glass that has been frosted by the ocean.  You look around and find more, clear/white, green, brown, maybe red if you’re really lucky.  You snatch these prizes up and take them home to be used in jewelry, to put a finishing touch on that nautical-themed room, or to put with your other souvenirs.  

But what if you can’t just go to the beach and pick up some sea glass?  You can make your own!  

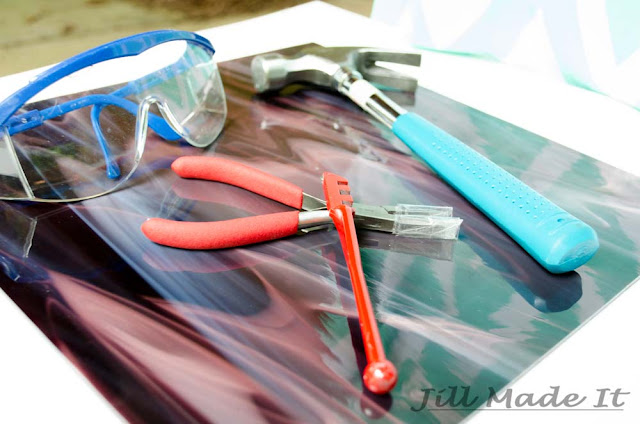
Tools for cutting glass: glass, glass cutter, pliers, safely glasses, and hammer
What you’ll need:
Safety glasses
Glass--empty bottles, stained glass, whatever
Hammer--if you want a more “natural” look, or
Glass cutter--if you want more control (It's the red tool that's not pliers.)
Rock tumbler and play sand

First, you need glass.  Any glass should work, as long as it's not too thin.  Rather than recycle that empty pickle jar, upcycle it!  Clear glass is easy to find, and keep an eye out for colored glass, like the green bottles sparkling cider comes in.  If you don’t want to wait to find colored glass, you can buy it.  If you do, make sure it’s actually colored all the way through.  If it’s just painted, the paint will be gone by the time you’re done. For my colored glass, I went to the stained glass section of Hobby Lobby.   

If you want your glass to look more like “natural” sea glass, you’ll want to break it.  Wear safety glasses and have some way to contain the glass.  I break mine in low box with a paper towel covering it.  Bust out your hammer and set to it.

I haven’t wanted to just break my pretty stained glass and see what shapes I happened to get, so I cut it.

Despite the name, you’re not actually “cutting” the glass.  You’re scoring it so it will break where you want it to.  I’d start with squares and rectangles, since they’re easiest.  Press the wheel of the cutter on the edge of the glass, and push it all the way across the glass.  With most glass, you will hear a soft crackling noise and end up with a fine line if you’re using the right pressure.  Too little pressure, and you don’t get the job  done.  Too  much, and you could fracture the glass so it breaks where you don’t want it to.  This hasn’t been a problem for me, so just be aware, and you should be fine.  Be sure to wear safely glasses!    


Starting to cut the glass

You want to make a score line all the way across the glass.  But if, like me, you have trouble actually starting your score line on the very edge of the glass, just start scoring as close to the edge as you can, make your score line go all the way across, then turn the glass around so the scored end is towards you.  


Place your hands on either side of the line, and flex the glass gently.  If one of the sides is small, it can be easier to hold that side with pliers.  A kind that meets at the tip but not the hinge would be best.  I don’t have a pair like that, so I use my flat nosed pliers with the tips wrapped in tape to protect both them and the glass. I haven’t been cut while “cutting” the glass, but if you have leather gloves, you might want to wear them, just in case.


Place a hand/plier on either side of the score line, and gently flex.

Voila!  Isn’t that cool?

Now use the same method to cut that strip of glass into pieces the sizes you want.

Some people use the ball at the end of the glass cutter to tap the score line and break the glass, but for me, it usually didn’t break where I wanted it to.  

If you’d like to see a video of someone cutting glass, here’s the video that taught me how to do it: http://www.youtube.com/watch?v=1D0XLXVkJKE

Ta da! A piece of cut glass
Now you have the glass.  So how do you make it sea glass?  Sea glass is frosted and the sharp edges are rounded by tumbling in the ocean for who knows how long.  You can simulate this with a rock tumbler.  For my 3 pound capacity rock tumbler barrel, I fill it half to a bit over half full with glass, then add half a cup of play sand, then fill the barrel with water till the glass is nearly covered.  Read the instructions for your tumbler to see how yours should be filled.  The sharp edges should be worn down 8-12 hours later.  Point the lid away from you when you open it.  I’ve never had anything dangerous happen, but, you know--just in case.

Well, now that you know how to make sea glass, what should you do with it?  Find out next time, on.........JILL MADE IT!    


~~~
Thanks, Kelli!

For those of you who don’t have a rock tumbler, you can buy sea glass at a craft store.  I've found it at Jo-Ann.  Rock tumblers can be found at craft stores and Amazon.

Be sure to check back with us on Friday for our next Summer Swimming project!  If you miss any posts, I will have them all archived under my Series tab.

24 July 2013

Something's Gotta Change

I needed a change.

It's been like this for too long.

I mean, really too long.

So I finally did it.  I cut it all off.


My hair is gone.  And if you're wondering about the drumstick, I was going for "Rocker-Chick."  Yes, this is about as rocker-chick as I get.  I'm a wild one, as you can see.

Just for some contrast, let me remind you what my hair looked like up until last week:


Drastic change.


My hair is now the shortest it's been since I was four and my parents felt it was cruel to make my sister and me have long hair in the Southern heat.


My dad asked if Boo was by traumatized my haircut.  She actually likes it!  She has told me (over and over) that she likes my short hair.  She doesn't want her own hair to be cut, though, and good thing!  I love her long hair, with her cute baby curls at the end...

I'm still getting used to my hair, but I think I like it.  Wow, it's different.  I keep trying to get it to poke out more, especially in the back...you know...like Rapunzle's hair after Flynn cuts it off.  (Boo's not the only one who likes that movie.)

What was the most drastic thing you ever did to your hair?  Were you glad you did it, or did you wish you hadn't?


17 July 2013

The Best From-Scratch Brownies I've Ever Made...and they're so easy, too!


Most foods taste better from scratch, but my previous attempts at brownies...well, I always went back to box-mix brownies.  I want brownies to be moist and fudgy, but my from-scratch brownies always turned out more dry or cake-like.  Not that there's anything wrong with cake, but if I wanted cake, I wouldn't be making brownies, now would I?


On Pinterest (where else?), I found this Fake Betty Crocker Brownie Mix Recipe.  Could this recipe really be the one?  The brownie recipe that tastes as good as box-mix, but leave me in control of all the ingredients?  (The Betty Crocker brownies aren't too bad as far as having fake-food ingredients, but I'd still like to eventually eliminate fake-food entirely.)  And could this recipe be really cheap and easy, too?


Oh, yes, my friends.  It is all that.

If you'd like to re-pin the recipe, here's my pin.  And if you'd like to skip right over to the original recipe, click here.

And if you'll excuse me, I think some chocolate is calling my name.  

Do you have a favorite brownie recipe?

13 July 2013

Re-Design in the Works

I'm working on redesigning my blog right now.  Please ignore anything that looks wonky, or any broken links!

Feel free to browse around my site, and remember that it'll be better soon.

10 July 2013

The Cargo Skirt


Well, here it is--I finished the Cargo Skirt I was supposed to have done last week, before I got distracted.  I'd say it turned out pretty cute!  I love how well the green skirt goes with the purple shirt I just happened to be wearing (and managed to keep spit-up-free!) today. 


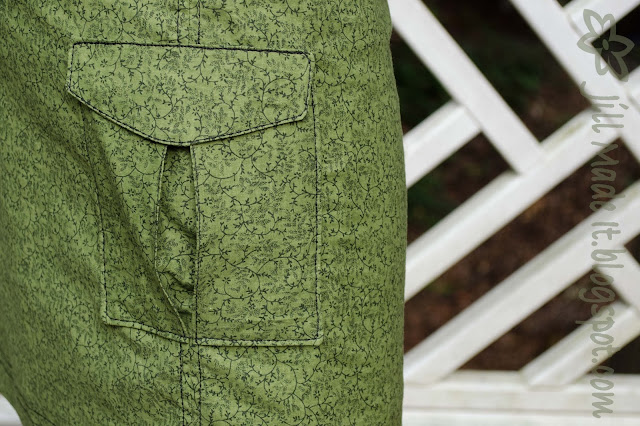
Here's the pocket.  This baby's going to come in very handy.  Cart around phone (phones, actually, since I usually have my iPhone-sans-cell-service in addition to my phone-to-make-calls-on) without adding tummy bulges.  Score.

I made the skirt a very slim A-line, because I think having things in the cargo pocket will pull the skirt down on that side.  So, if the skirt is already pretty slim-fitting, it will not be pulled out of place.


I also included regular jean-style pockets, because I thought they made sense to go with the cargo pocket.  They're good for resting your hands in.  Or they would be, if I had gauged the needed size better.  My fingers fit, but not my thumb, too.  Oops.


I like the decorative stitching.  It does blend in with the print a little, but I think it still adds a little to the design.  

If I make this skirt again (which I probably will!) I will make the skirt from a bottom-weight fabric like this dress instead of using quilter's cotton.  I just think the skirt would be a little nicer in a heavier fabric.  But this green print was leftover from a quilt I made, the zipper came in a pack bought for another project, and the hook-and-eye (you can't see it in these pictures) is leftover from a third project.  So this skirt was entirely free!

Totally cute and useful skirt for free?  Yes, please.

I used to wear skirts only for church or other dress-up occasions, but now I'm getting into wearing them any old time.  When do you like to wear skirts?  

03 July 2013

4th of July Dresses for My Little Girls

All right!  It's time to announce which swimsuit design won the voting, and it is...

The Gathered Halter!  I'm really excited about that, since this was my favorite design, too!  I ordered the fabric yesterday (HERE, in case you love the chevrons, too!) so I'll be able to start sewing in a few days. I'd better hurry so I can get some good use out of my new swimsuit before the summer's over.  (I can't believe it's July already!)


I know, I should be posting my Cargo Skirt, like I said I would.  But...I haven't started it yet.  (Bad me!)  I've been working on this instead:


Cute little dresses for my girlies!  I like making special 4th of July outfits for my little ones, and with the 4th coming up so soon, their dresses got higher priority.  Neither dress is quite done, though.  Daddy's Girl needs a hook-and-eye sewn on the back of her dress (or a button--that would be cute...) and Boo is not nearly so tall as her dress makes her out to be.  Ah, well.  I have another day, right?


I made Boo’s dress red and white, and Daddy’s Girl’s blue and white (as you can see), rather than either being red, white, and blue, because I didn’t want the dresses to shout “FOURTH OF JULY!” and be less wearable the rest of the year.  So, together the dresses are patriotic, and apart, they’re appropriate for anytime.

I gave Daddy’s Girl’s dress a slight high-low hem for ease of crawling.  If I did it again, I would make the high-low more dramatic--with that little diapered bum in the air, she could certainly manage a longer-in-the-back dress!  But she’ll be wearing cute little pink shorts (that I didn’t make) underneath the dress, so we’re good.  I would make the dress fuller, too, like Boo’s.  There isn’t enough of the blue fabric (leftover from a quilt I haven’t posted yet but plan to) to cut a whole new skirt, so it is what it is.


No zippers, no buttonholes, easy sewing.  I just need to add the hook-and-eye.


Boo’s dress is (and still will be once I’ve cut off the extra 4-6 inches) maxi length.  I suggested making her’s high-low, too, but she wanted it long “so I can hold it up like this when I walk.”  Cute little princess loves her dresses and loves them fancy.  


Boo picked out her fabric, as well as the hem length.  We went through my fabric stash, and first she picked the white and blue fabrics that became Daddy’s Girl’s dress.  But, since the white was just remnants from making this project, there wasn’t enough for a 3T dress bodice.  Back to the boxes we went, and Boo decided on the red/white with red flowers fabrics.  And I think she liked that the fabrics she picked out became her baby sister’s dress.


I think I'll update this post later this week with some pictures of my girlies wearing their dresses to the festivities.

I'm not sure what we're going to be doing for the 4th, besides the annual 4th of July Breakfast my church congregation does.  It's supposed to be pretty rainy, so I'm not sure how well fireworks will work out...What are your plans?